Section 6.2. Use Windows Security
|
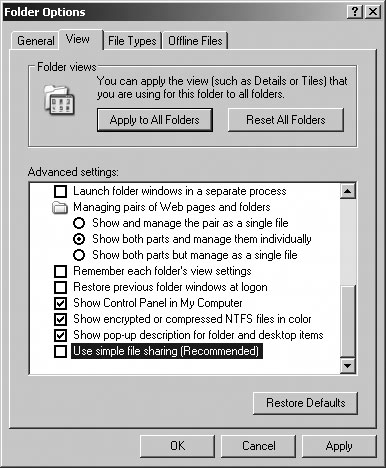
6.2. Use Windows SecurityBefore we talk about Excel security, it is important to explain some general concepts related to the Windows operating system. Note: This may seem basic to some of you, but Windows security features are somewhat hidden and it's a good idea to cover them somewhere. Permissions are a set of capabilities that someone has or doesn't have. Permissions apply to files and locations, so someone may be able to open a specific folder, see files, but not write to that folder or edit the files it contains. Users are identities that Windows uses to control access. When you sign on with a username and password, Windows authenticates that information, and thereafter identifies you as machinename\username if your network uses workgroups or domainname\username if your network uses domains. Your identity is then used any time you request permission to use a resource, such as open a file or run an application. If your identity has permission to use that resource, you are granted access and the requested file opens or the application runs. Groups are the security groups to which a username belongs. Windows comes with some groups already configured: Administrators, Users, Guests, Backup Operators, and Power Users. Groups provide an easy way to grant a set of permissions to a set of users rather than having to grant permissions to many individual users. Certificates and digital signatures are small identifiers that can be attached to a data file or executable that identify the author of the file or executable. Certificates are issued by a third-party certificate authority (sometimes called a CA) such as Verisign, which provides the service that authenticates certificates. The idea here is that if a user knows the author of a particular file, she is more likely to trust that it will not harm her computer. 6.2.1. How to set file permissions in Windows XPHow you set permissions is not obvious from the default setup of Windows XP. First, you must disable the Use simple file sharing folder option in Windows Explorer (Figure 6-2). To set permissions on a folder or file:
If you're not familiar with how this works, it's a good idea to experiment with a file. For example, create an Excel workbook named Book1.xls then deny Full Control for your username. Then try to open Book1.xls in Excelyou'll get an Access Denied error. Now, change the file permissions to allow read and execute, but deny write access. You'll be able to open the file in Excel, but you can't save it as Book1.xls. These permissions don't have much meaning in the preceding example because you can always change them back to allow writing or whatever. You own the file so you can do whatever you like. Permission settings are truly significant when a file is shared with other users, such as when the file is placed in a public network address. For example, if you want to allow others to read workbooks but not to make changes, a simple solution is to create a shared folder that denies write permission to everyone but you. Figure 6-3. Setting permissions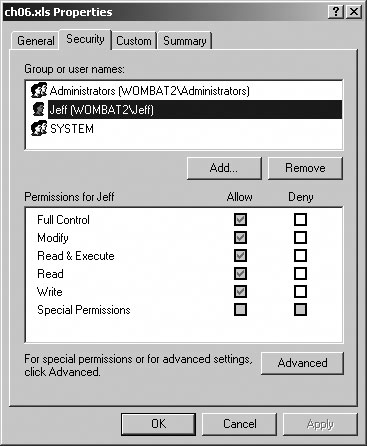 6.2.2. How to view users and groups in XPWhen you set up user accounts from the Windows XP Control Panel, you have three types of accounts available: Computer Adminstrator, Limited, or Guest. These accounts correspond to the Administrator, User, and Guest account groups within Windows. These aren't the only groups available, however. To view all the groups:
Figure 6-4. Viewing members of a group in MMC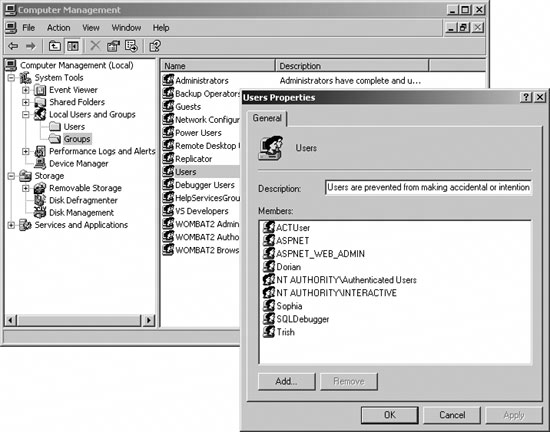 Your list of groups may be different from the list shown in Figure 6-4 because applications often add groups and then add users as members of those groups. If you click around and explore a bit, you'll see that you can't set the permissions of groups or users through the MMC. That's because permissions are set on objects, not on identities. For example, a folder in Windows may allow users that belong to the Administrators group to read and write files, but only allow Users group member to read those files, and prohibit Guest members from even reading files. In this case, the folder is the security object that defines the permissions for groups that have access. Applications sometimes check if a user belongs to a certain group before allowing him or her to perform a task. This is referred to as role-based security . 6.2.3. What about...See the chapter sample file for links to the Windows security tools. |
|
EAN: 2147483647
Pages: 133