Configuring a Solaris DHCP Server
 |
The Solaris client (dhcpagent) and server (in.dhcpd) solution features backward compatibility with other methods already in use, particularly the Reverse Address Resolution Protocol (RARP) and static configurations. In addition, the address of any workstation's network interfaces can be changed after the system has been booted . The dhcpagent client for Solaris features caching and automated lease renewal and is fully integrated with IP configuration (ifconfig). The in.dhcpd server for Solaris can provide both primary and secondary DHCP services and is fully integrated with the NIS+ Network Information Service. The Solaris DHCP server has the ability to handle hundreds of concurrent requests and also has the ability to boot diskless clients . Multiple DHCP support is provided through the Network File System (NFS). Although we won't cover these advanced features in this chapter, it's worthwhile considering them when making a decision to use RARP or DHCP (or some other competing dynamic IP allocation method).
The main program used to configure DHCP under Solaris is /usr/sbin/ dhcpconfig , which is a shell script that performs the entire configuration for you. Alternatively, you can use the dhtadm or pntadm applications to manage the DHCP configuration table ( /var/dhcp/dhcptab ). The dhcpconfig program is menu-based, making it easy to use. The first menu displayed when you start the program looks like this:
*** DHCP Configuration *** Would you like to: 1) Configure DHCP Service 2) Configure BOOTP Relay Agent 3) Unconfigure DHCP or Relay Service 4) Exit Choice:
The first menu option allows the DHCP service to be configured for initial use. If your system has never used DHCP before, you must start with this option. You will be asked to confirm DHCP startup options, such as the timeout periods made on lease offers (that is, between sending DHCPOFFER and receiving a DHCPREQUEST) and whether or not to support legacy BOOTP clients. You will also be asked about bootstrapping configuration, including the following settings:
-
Time zone
-
DNS server
-
NIS server
-
NIS+ server
-
Default router
-
Subnet mask
-
Broadcast address
These settings can all be offered to the client as part of the DHCPOFFER message. The second menu option allows the DHCP server to act simply as a relay agent. After entering a list of BOOTP or DHCP servers to which requests can be forwarded, the relay agent should be operational. Finally, you may choose to unconfigure either the full DHCP service or the relay service, which will revert all configuration files.
If you selected option 1, you will first be asked if you want to stop any current DHCP services:
Would you like to stop the DHCP service? (recommended) ([Y]/N)
Obviously, if you are supporting live clients, you should not shut down the service. This is why DHCP configuration needs to take place outside normal business hours, so that normal service is not disrupted. If you have ensured that no clients are depending on the in.dhcpd service, you can answer yes to this question and proceed. Next , you will be asked to identify the datastore for the DHCP database:
### DHCP Service Configuration ### ### Configure DHCP Database Type and Location ### Enter datastore (files or nisplus) [nisplus]:
The default value is the NIS+ Network Information Service, covered in Chapter 27. However, if you are not using NIS+ to manage network information, you may choose the files option. If you choose the files option, you will need to identify the path to the DHCP datastore directory:
Enter absolute path to datastore directory [/var/dhcp]:
The default path is the /var/dhcp directory. However, if your /var partition is small or running on low on space, and you have a large network to manage, you may wish to locate the datastore directory somewhere else. You will then be asked if you wish to enter any nondefault DHCP options:
Would you like to specify nondefault daemon options (Y/[N]):
Most users will choose the standard options. However, if you wish to enable additional facilities like BOOTP support, you will need to answer yes to this question. You will then be asked whether you want to have transaction logging enabled:
Do you want to enable transaction logging? (Y/[N]): Y
Transaction logs are very useful for debugging, but grow rapidly in size over time- especially on a busy network. The size of the file will depend on the syslog level that you wish to enable as well:
Which syslog local facility [0-7] do you wish to log to? [0]:
Next, you will be asked to enter expiry times for leases that have been offered to client:
How long (in seconds) should the DHCP server keep outstanding OFFERs? [10]:
The default is 10 seconds, which is satisfactory for a fast network. However, if you are operating on a slow network or expect to be servicing slow clients (like 486 PCs and below), you may wish to increase the timeout. In addition, you can also specify that the dhcptab file be reread during a specified interval, which is useful only if you have made manual changes using dhtadm:
How often (in minutes) should the DHCP server rescan the dhcptab? [Never]:
If you wish to support BOOTP clients, you should indicate this at the next prompt:
Do you want to enable BOOTP compatibility mode? (Y/[N]):
After configuring these nondefault options, you will be asked to configure the standard DHCP options. The first option is the default lease time, which is specified in days:
Enter default DHCP lease policy (in days) [3]:
This value is largely subjective , although it can be estimated from the address congestion of your network. If you are only using an average 50 percent of the addresses on your network, then you can probably set this value to 7 days without concern. If you are at the 75 percent level, you may wish to use the default value of 3 days. If you are approaching saturation, you should select daily lease renewal.
| Tip | If the number of hosts exceeds the number of available IP addresses, you may need to enter a fractional value to ensure the most equitable distribution of addresses. |
Most sites will wish to allow clients to renegotiate their existing leases:
Do you want to allow clients to renegotiate their leases? ([Y]/N):
However, just like a normal landlord, you may sometimes be compelled to reject requests for lease renewal-especially if your network is saturated . You must now enable DHCP support for at least one network for DHCP to operate :
Enable DHCP/BOOTP support of networks you select? ([Y]/N):
For an example local network of 192.65.34.0, you will be asked the following questions:
Configure BOOTP/DHCP on local LAN network: 192.65.34.0? ([Y]/N):
You should (of course!) answer yes if this is the network that you wish to configure DHCP for. Next, you will need to determine whether you wish DHCP to insert hostnames into the hosts file for you, based on the DHCP data:
Do you want hostnames generated and inserted in the files hosts table? (Y/[N]):
Most sites will use DNS or similar for name resolution, rather than the hosts file, so this option is not recommended. One situation where you may wish to generate hostnames is a terminal server or web server pool, where the hostnames are arbitrary and frequently change in number. In this case, you simply need to enter a sensible basename for the hostnames to generated from:
What rootname do you want to use for generated names? [yourserver-]:
For a web server bank, you could use a descriptive name like 'www-.' Next, you will be asked to define the IP address range that you want the DHCP server to manage, beginning with the starting address:
Enter starting IP address [192.65.34.0]:
Next, you must specify the number of clients. In our Class C network, this will be 254:
Enter the number of clients you want to add (x < 65535):
Once you have defined the network that you wish to support, you're ready to start using DHCP. An alternative method for invoking dhcpconfig is from the command line, passing key parameters as arguments. For example, to set up a DHCP server for the domain paulwatters.com , with the DNS server 204.56.54.22 and a lease time of 14,400 seconds (4 hours), the following command would be used:
# dhcpconfig -D -r SUNWbinfiles -p /var/dhcp -l 14400 \ -d paulwatters.com -a 204.56.54.22 -h dns -y paulwatters.com
To unconfigure a DHCP server, the following command should be executed:
# dhcpconfig -U -f -x -h
This command removes host entries from the name service, the dhcptab, and the network tables.
An alternative to the dhcpconfig command is the dhcpmgr GUI interface, which performs the following operations:
-
Configure DHCP
-
Configure BOOTP
-
Administer DHCP
-
Administer BOOTP
-
Administer DHCP addresses and macros
-
Administer DHCP options
-
Migrate DHCP data stores
-
Move data from one DHCP server to another
Figure 38-2 shows the GUI interface for dhcpmgr.
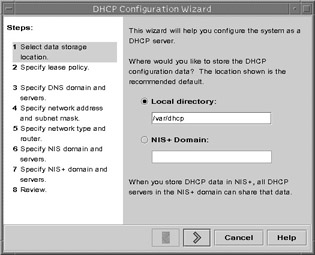
Figure 38-2: DHCP client for Microsoft Windows.
| EXAM TIP | You should be able to identify the main functions of dhcpmgr. |
EAN: 2147483647
Pages: 265