Router Configuration
 |
In order to configure routing, it is necessary to enable the appropriate network interfaces. In this chapter we will assume that an Ethernet network is being used; thus, each system that acts as a router must have at least two Ethernet interfaces installed. In addition, Solaris also supports multiple Ethernet interfaces to be installed on a single machine. These are usually designated by files like
/etc/hostname.hme n
or, for older machines,
/etc/hostname.le n
where n is the interface number. Interface files contain a single IP address (or fully qualified domain name ), with the primary network interface being designated with an interface number of zero. Thus, the primary interface of a machine called server would be defined by the file /etc/server.hme0 , which might contain the IP address 203.17.64.28 or the fully qualified domain name external.server.com . A secondary network interface, connected to a different subnet, might be defined in the file /etc/server.hme1 . In this case, the file might contain the IP address 10.17.65.28, or internal.server.com . Note that it is preferable to use fully qualified domain names to IP addresses, as the latter may be dynamically allocated using DHCP or a similar protocol. This setup is commonly used in organizations that have a provision for a failure of the primary network interface or to enable load balancing of server requests across multiple subnets (for example, for an intranet web server processing HTTP requests ).
A system with a second network interface can act as either a router or as a multihomed host. Hostnames and IP addresses are locally administered through a naming service, which is usually the Domain Name Service (DNS) for companies connected to the Internet, and the Network Information Service (NIS/NIS+) for companies with large internal networks that require administrative functions beyond what DNS provides, including centralized authentication. It is also worth mentioning at this point that it is quite possible to assign different IP addresses to the same network interface, which can be useful for hosting virtual domains that require their own IP address, rather than relying on application-level support for multihoming (for example, when using the Apache web server). Simply create a new /etc/hostname.hmeX:Y file for each IP address required, where X represents the physical device interface and Y represents the virtual interface number.
In the examples presented previously, each of the routers had two interfaces: one for the internal network and one for the external internet. The subnet mask used by each of these interfaces must also be defined in /etc/ netmasks . This is particularly important if the interfaces lie on different subnets or if they serve different network classes. In addition, it might also be appropriate to assign a fully qualified domain name to each of the interfaces, although this will depend on the purpose to which each interface is assigned. For the system router.department.gov , there will be two hostname files created in the /etc directory. The /etc/hostname.hme0 file will contain the entry 10.17.65.16, while the /etc/hostname.hme0 file will contain the entry 204.17.65.16.
When installing a system as a router, it is necessary to determine which network interface to use as the external interface for passing information between networks. This interface must be defined in the file /etc/defaultrouter by including that interface s IP address. These addresses can be matched to hostnames if appropriate. For example, the interfaces for router.department.gov will be defined in /etc/ hosts as
127.0.0.1 localhost loghost 10.17.65.16 internal 204.17.65.16 router router.department.gov
If the server is to be multihomed instead of being a router, ensure that /etc/ defaultrouter does not exist and create an /etc/notrouter file:
server# rm /etc/defaultrouter server# touch /etc/notrouter
Exercise 35-1 /etc/notrouter check Check to see if you have a notrouter file.
Exercise 35-2 Network Interface Status Check your network interface settings using ifconfig. Is your interface up or down?
Static Routes
On hosts, routing information can be extracted in two ways: by building a full routing table, exactly as it does on a router, or by creating a minimal kernel table containing a single default route for each available router (that is, static routing). The most common static route is from a host to a local router, as specified in the /etc/defaultrouter file. For example, for the host 204.12.60.24, the entry in /etc/defaultrouter might be
204.12.60.64
This places a single route in the local routing table. Responsibility for determining the next hop for the message is then passed to the router. Static routes can also be added for servers using in.routed by defining them in the /etc/gateways file. When using static routing, routing tables in the kernel are defined when the system boots and do not normally change unless modified by using the route or ifconfig command.
| Note | When a local network has a single gateway to the rest of the Internet, static routing is the most appropriate choice. |
Routing Protocols
The Routing Information Protocol (RIP) and the Router Discovery Protocol (RDISC) are some of the standard routing protocols for TCP/IP networks, and Solaris supports both. RIP is implemented by in.routed, the routing daemon, and is usually configured to start during multiuser mode startup (see Chapter 5 for more information). The route daemon always populates the routing table with a route to every reachable network, but whether or not it advertises its routing availability to other systems is optional.
Hosts use the RDISC daemon (in.rdisc) to collect information about routing availability from routers. in.rdisc typically creates a default route for each router that responds to requests: this discovery is central to the ability of RDISC-enabled hosts to dynamically adjust to network changes. Routers that only run in.routed cannot be discovered by RDISC-enabled hosts. For hosts running both in.rdisc and in.routed, the latter will operate until an RDISC-enabled router is discovered on the network, at which time RDISC will take over routing.
Viewing the Routing Table (netstat -r)
The command netstat “r shows the current routing table. Routes are always specified as a connection between the local server and a remote machine via some kind of gateway. The output from the netstat -r command contains several different flags: flag U indicates that the route between the destination and gateway is up, while flag G shows that the route passes through a gateway. Flag H indicates that the route connects to a host, while the D flag signifies that the route was dynamically created using a redirect. There are three other columns shown in the routing table: Ref indicates the number of concurrent routes occupying the same link layer, while Use indicates the number of packets transmitted along the route (on a specific Interface).
The following example shows an example server ( server.company.com ) that has four routes: the first is for the loopback address (lo0), which is Up and is connected through a host, and the second route is for the local Class C network (204.16.64.0), through the gateway gateway.company.com. , which is also Up. The third route is the special multicast route, which is also Up, while the fourth route is the default route, pointing to the local network router, which is also Up.
bash-2.01$ netstat -r Routing Table: Destination Gateway Flags Ref Use Interface -------------------- -------------------- ----- ----- ------ --------- 127.0.0.1 localhost UH 0 877 lo0 204.17.64.0 gateway.company.com U 3 85 hme0 BASE-ADDRESS.MCAST.NET host.company.com U 3 0 hme0 default router.company.com UG 0 303
Manipulating the Routing Table (route)
The route command is used to manually manipulate the routing tables. If dynamic routing is working correctly, it should not normally be necessary to do this. However, if static is being used, or the RDISC daemon does not discover any routes, it may be necessary to add routes manually. In addition, it may also be necessary to delete routes explicitly for security purposes. You should be aware, though, that except for interface changes, the routing daemon may not respond to any modifications to the routing table that may have been enacted manually. It is best to shut down the routing daemon first before making changes, and then restart it after all changes have been initiated.
Adding Host Routes
To add a direct route to another host, the route command is used with the following syntax:
route add -host destination_ip local_ip -interface interface
Thus, if we wanted to add a route between the local host (for example, 204.12.17.1) and a host on a neighboring Class C network (204.12.16.100) for the primary interface hme0, we would use this command:
add -host 204.12.16.100 204.12.17.1 -interface hme0
Adding Network Routes
To add a direct route to another network, the route command is used with this syntax:
route add -net destination_network_ip local_ip" netmask mask
If we wanted to add a route between the local host (for example, 204.12.17.1) and the same network as the host we specified previously (that is, the 204.12.16.0 network), for the Class C netmask (255.255.255.0), we would use the following command:
route add -net 204.12.16.0 204.12.17.1 -netmask 255.255.255.0
Adding a Default Route
To add a default route, the route command can be used with this syntax:
route add default hostname interface interface
For example, to add a default route to a local router (204.54.56.1) for a secondary interface hme1, you can use this command:
route add default 204.54.56.1 -interface hme1
Dynamic Routing
In this section, we will look more closely at the RIP and RDISC dynamic routing protocols. A prerequisite for dynamic routing to operate is that the /etc/defaultrouter file should be empty.
routed
in.routed is the network routing daemon and is responsible for dynamically managing entries in the kernel routing tables, as described previously. It is usually started from a line during multiuser boot ( /etc/rc2.d/S69inet ) using the following command:
/usr/sbin/in.routed -q
The routing daemon uses port 520 to route packets and to establish which interfaces are currently Up and which are Down. in.routed listens for requests for packets and for known routes from remote hosts. This supplies hosts on a network with the information they need to determine how many hops to a host. When it is initialized , the routing daemon checks both gateways specified in /etc/gateways . It is also possible to run the routing daemon in a special memory-saving mode that retains only the default routes in the routing table. While this may leave a system at the mercy of a faulty router, it does save memory and reduces the resources that in.routed requires to maintain lists of active routes, which are periodically updated. This can be enabled by initializing in.routed with the “S parameter.
rdisc
The rdisc daemon uses the ICMP router discovery protocol and is usually executed on both hosts and routers at boot time, at which time routers broadcast their availability and hosts start listening for available routers. Routers broadcast their availability using the 224.0.0.1 multicast address. Routers that share a network with a host are selected first as the default route, if one is found. Another approach is for the host to send out a broadcast on the 224.0.0.2 multicast address, to solicit any available routers. In either case, if a router is available, it will accept packet-forwarding requests from the host concerned .
Configuring the IPFilter Firewall
IPFilter is a popular freeware packet-filtering package for Solaris and is a kernel-loadable module that is attached at boot time. This makes IPFilter very secure because it cannot be tampered with by user applications. However, as we will see next, there are also problems with this approach because loading modules that are unstable into the kernel can cause a Solaris system to crash. The IPFilter distribution is available from http://coombs.anu.edu.au/~avalon/ .
The first step in creating an IPFilter configuration file is to consult with users and managers to determine a list of acceptable services. Many companies will already have an acceptable use policy that will govern which ports should be available and what permissions should be given for user-initiated services. After a list of ingoing and outgoing port requirements is determined, it is best to write a rule that first denies all packets and then to write rules that explicitly allow the services you identify. It is also important to enable allowed services in both directions: for example, it is usually necessary for users to both receive and send electronic mail, so an inbound and outbound rule needs to be included for sendmail (port 25).
IPFilter rules are processed in the order that they are specified in the configuration file. Every rule is processed , which means that more general rules (like blocking all connections) should precede specific rules (like allowing bidirectional sendmail connections) in the configuration file. If you have a very complicated configuration, it is also possible to specify that processing terminate at any point in the file if a condition is met by using the quick keyword. Other important keywords include block , to , and from to construct rules for limiting packet transmission. The block command blocks packets from a particular source to a particular destination. The from command specifies the source of these packets, while the to command specifies the destination of these packets. The following example prevents any packets from the Class B network 178.222.0.0:
block in quick from 178.222.0.0/16 to any
The pass command allows packets to pass the firewall. For example, the rule
pass in all
allows all packets to pass. Since routers by definition have more than two interfaces, it is also possible to specify a network interface to which a specific rule applies. For example, the rule
block in quick on hme2 all
prevents all transmissions on the hme2 interface. An interface specification can be mixed with a normal rule, so that one interface accepts traffic from one Class C network (178.222.1.0) but another interface may accept traffic only from a different Class C network (178.221.2.0):
block in quick on hme2 from 178.222.1.0/24 to any block in quick on hme1 from 178.222.2.0/24 to any
All of our examples so far have focused on inbound traffic using the in command. As we mentioned earlier, it is also possible to restrict outbound traffic in the same way by using the out command. The following example prevents traffic from the internal, nonroutable network (10.222.1.0) to pass through:
block out quick on hme0 from 10.222.1.0/24 to any
This rule would only be applied to organizations that didn t want their employees using the Internet. Perhaps it could be combined with a cron job, which would reconfigure the firewall to allow access during lunchtime and after work. It is also possible to limit particular protocols so that TCP applications (like SSH) would be allowed, but UDP applications (like some streamed audio applications) would be banned, by specifying proto udp in the rule:
block in quick on hme0 proto udp from 10.222.1.0/24 to any
The most complicated rule comes in the form of a port-by-port specification of what is allowed and disallowed on a protocol-by-protocol basis. For example, the following rule blocks all web server requests from the internal network from reaching their destination:
block in quick on hme0 proto tcp from any to 10.222.1.0/24 port = 80
This would allow telnet and FTP connections to proceed freely , as TCP is only restricted on port 80.
Although this technology is very comprehensive, and is very useful in placing very specific restrictions on network transmission, there are some drawbacks with configuring firewalls in general ”and IPFilter in particular. Since firewall configuration involves writing rules, the syntax of the commonly used rule languages is often difficult to understand; thus, packet filters can be difficult to configure correctly. Once you ve created a configuration, there is also no testbed provided that determines if your configuration is satisfactory. There may be contention between one or more rules that is incorrectly resolved. There are also bugs in packet-filtering packages, which means that administrators should not just rely on them to protect their network ”other measures, like disabling unrequired services in /etc/services and commenting out all unwanted daemons in /etc/inetd.conf , go a long way toward protecting a system. Bugs are more serious in IPFilter because it is a kernel-loadable module. Thus, instead of an application-level filtering program crashing and dumping core , IPFilter will sometimes crash the kernel and cause a panic. Be aware that some versions of IPFilter will cause panics on Solaris kernels , while others work happily. The output from a crash looks like this:
BAD TRAP: cpu=1 type=0x31 rp=0x3b103003 addr=0xe1 mmu_fsr=0x0 BAD TRAP occurred in module "ipf" due to an illegal access to a user address. sched: trap type = 0x31 addr=0x1e pid=0, pc=0x60bc8607, sp=0x33ba0300, tstate=0x1e02f000, context=0x0 g1-g7: 1c, 13578104, 0, 0, 0, 0, 333e8000 Begin traceback... sp = 3033ba00 Called from 1005cb74, fp=30033c20, args=0 60760b14 20 10418440 0 0 Called from 1005cc90, fp=30033c80, args=60098aa0 600992c0 60098ac0 40000000 60099328 8c2421a Called from 10026a48, fp=30033ce0, args=60098aa0 60098ab4 10418440 10418440 d 0 Called from 1005cc48, fp=0, args=60098aa0 0 0 0 0 0
This kind of problem is always a risk when installing kernel-loadable modules. However, Solaris does provide some tools to determine which modules are at fault. To examine the cause of the IPFilter problem, the following steps can be used:
-
Create the system crash directory, and enable the savecore facility in the system startup file ( /etc/init.d/ sysetup ).
-
Wait for a crash, and then let the system reboot.
-
Enter the crash directory and analyze the crash file with the iscda.sh script available from SunSolve ( http://sunsolve1.sun.com.au/sunsolve/us/iscda.html ).
-
Identify the offending command that caused the kernel panic. If it is IPFilter, download and test the most recent version..
Fortunately, there is a very active discussion group on IPFilter, with searchable archives available at http://false.net/ipfilter/ . The firewall mailing list is also good for more general discussion of firewall- related issues, and the contents are available at http://www.greatcircle.com/firewalls/ . If you are more interested in commercial firewall products, check out the comparisons with freeware at http://www.fortified.com/fwcklist.html/ .
Configuring the SunScreen Firewall
The best system for users who are new to Solaris is Sun s own SunScreen firewall ( http://www.sun.com/software/securenet/lite/download.html ). It comes in both a free and a commercial edition, with the latter more than adequate for protecting small networks. It is available for both Solaris Intel and Solaris SPARC. The current release version is 3.1, which supports Gigabit Ethernet, SNMP management, and direct editing of security policy tables. However, it does not currently support IPv6. The firewall may be administered locally or remotely by using a secure session.
There are several important limitations that are placed on the Lite version of SunScreen:
-
It is designed to work with a system that is already acting as a router (if it wasn t, why would you want SunScreen anyway?).
-
It does not operate in the special stealth mode employed by the commercial edition.
-
It does not support any of the High Availability features of the commercial version.
-
It does not support more than two network interfaces. However, as most routers only have two interfaces, this should not be an issue for small networks.
-
It does not provide support for proxying.
SunScreen can be operated in either GUI mode, through a standard web browser such as Netscape, or by directly editing the system s configuration files. It is easy to install using the Web Start Wizard, which is provided with the installation package.
To install the software, you need to run the /opt/SUNWicg/SunScreen/bin/ss_install script. There are several options that you need to configure for SunScreen to operate as desired:
-
Routing or stealth mode operation
-
Local or remote administration
-
Restrictive, secure, or permissive security level
-
Support for DNS resolution
After choosing the appropriate options for your system, the following message will be displayed:
--Adding interfaces & interface addresses --Initialize 'vars' databases --Initialize 'authuser' & 'proxyuser' databases --Initialize 'logmacro' database --Applying edits --Activating configuration loading skip keystore. Successfully initialized certificate database in /etc/skip/certdb starting skip key manager daemon. Configuration activated successfully on cassowary. Reboot the machine now for changes to take effect.
After rebooting the system, the firewall software will be loaded into the kernel, and you will then need to add rules to the firewall by using your browser to set the appropriate administration options. Figure 35-5 shows the browser starting on port 3852 on the localhost.

Figure 35-5: Starting the SunScreen administrative interface.
When first installed, the SunScreen username and password will be admin and admin, respectively. These should be entered into the Admin User and Password fields. After clicking the Login button, the SunScreen Information page is displayed, as shown in Figure 35-6. There are several options available at this point: firewall logs may be viewed , as may connection statistics. However, most users will want to create a set of security policies immediately upon starting the firewall service.
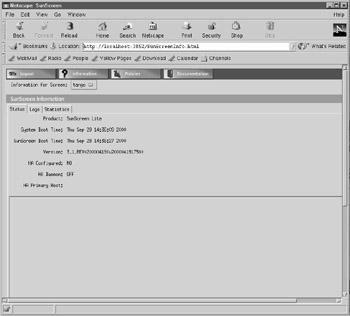
Figure 35-6: SunScreen Information interface.
Security policies are based on rules that either ALLOW or DENY a packet to be transmitted from a source to a destination address. Alternatively, an address class may be specified by using wildcards. The main actions associated with ALLOW rules are as follows :
-
LOG_NONE
-
LOG_SUMMARY
-
LOG_DETAIL
-
SNMP_NONE
-
SNMP
The main actions associated with DENY rules are as follows:
-
LOG_NONE
-
LOG_SUMMARY
-
LOG_DETAIL
-
SNMP_NONE
-
SNMP
-
ICMP_NONE
-
ICMP_NET_UNREACHABLE
-
ICMP_HOST_UNREACHABLE
-
ICMP_PORT_UNREACHABLE
-
ICMP_NET_FORBIDDEN
-
ICMP_HOST_FORBIDDEN
Figure 35-7 shows how to define a rule with actions for the SMTP service, which is operated by sendmail. This allows mail to be transferred from local users to remote hosts. However, it we wanted to block all mail being sent to and from our network, we could create a DENY action within the rule for the SMTP service. The rule could be applied selectively to specific local subnets or remote destinations. Another useful feature is the ability to apply rules only for specific time periods. For example, if you worked in a bank, you could prevent all e- mails from being sent externally after 5:00 P.M. at night and before 9:00 A.M. in the morning.
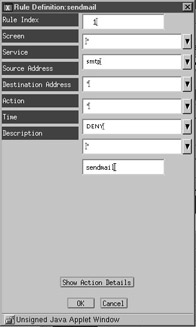
Figure 35-7: Rule definition.
Once the new rule has been entered, it can be viewed on the Policy Rules panel, along with any other rules, as shown in Figure 35-8. The panel allows new rules to be added and existing rules to be edited, moved, or deleted. For each packet-filtering rule, the service, source address, destination address, action timeframe, and name are shown.

Figure 35-8: Policy Rules interface.
SunScreen performs more than just packet filtering ”it can be used to set up a virtual private network (VPN) and can perform advanced network address translation (NAT) functions.
Viewing Router Status
For both routing and multihomed hosts, the status of all network interfaces can be checked by using the netstat -i command:
router# netstat -i Name Mtu Net/Dest Address Ipkts Ierrs Opkts Oerrs Collis Queue lo0 8232 loopback localhost 199875 0 199875 0 0 0 hme0 1500 203.17.65.0 department.gov 16970779 623190 19543549 0 0 0 hme1 1500 10.17.65.0 internal.gov 68674644 54543 65673376 0 0 0
In this example, Mtu is the maximum transfer rate, which is much higher for the loopback address than the network interface (as would be expected), and the number of Ipkts (inbound packets) and Opkts (outbound packets) is equivalent for lo0 (as one would hope). The loopback interface significantly increases the efficiency of a host that transmits packets to itself: in this example, there is an almost sixfold increase in the Mtu for the lo0 interface over either of the standard network interfaces. The primary network interface hme0 is connected to the 203.17.65.0 network, and transmitted a large number of packets in and out since booting (16970779 and 19543549, respectively). There have been a number of inbound errors (623190), but no outbound errors or collisions. Examining how these figures change over time can indicate potential problems in network topology, which may need to be addressed. For example, if you are testing a web server and it doesn t appear to be working, the Ipkts count can reveal whether or not the connections are actually being made ”if the counter does not increase as expected, it may indicate an intermediate hardware failure (for example, a dead hub). Another example of identifying intermittent hardware failure might be revealed by a large number of inbound packets, representing requests, but only a small number of outbound packets. In the following example, there are 1000847 inbound packets, but only 30159 outbound packets since boot. Because it is unlikely in most situations that a 33:1 imbalance exists in the ratio of inbound to outbound packets, the hme0 network interface should be checked. There are also many collisions being experienced by the hme0 interface ”between packets render them useless, and the figure reported here indicates a significant loss of bandwidth. If the interface is working as expected, it can also be worthwhile to investigate other causes arising from software (for example, incorrect configuration of a packet filter):
router# netstat -i Name Mtu Net/Dest Address Ipkts Ierrs Opkts Oerrs Collis Queue lo0 8232 loopback localhost 7513 0 7513 0 0 0 hme0 1500 204.17.64.0 1000847 5 30159 0 3979 0
netstat -s also allows these per-interface statistics to be viewed on a per-protocol basis, which can be very useful in determining potential problems with routing, especially if the router is packet filtering. The following example shows output from the netstat -s command, which displays the per-protocol statistics for the UDP, TCP, and ICMP protocols:
router# netstat -i UDP udpInDatagrams =502856 udpInErrors = 0 udpOutDatagrams =459357
The output from netstat “s begins with the UDP statistics, including the number of datagrams received and the number transmitted. The in/out ratio is fairly even at 1.09, and the networking appears to be working well ”there were no detected UDP errors (that is, udpInErrors=0 ):
TCP tcpRtoAlgorithm = 4 tcpRtoMin = 200 tcpRtoMax =240000 tcpMaxConn = -1 tcpActiveOpens = 33786 tcpPassiveOpens = 12296 tcpAttemptFails = 324 tcpEstabResets = 909 tcpCurrEstab = 384 tcpOutSegs =19158723 tcpOutDataSegs =13666668 tcpOutDataBytes =981537148 tcpRetransSegs = 33038 tcpRetransBytes =41629885 tcpOutAck =5490764 tcpOutAckDelayed =462511 tcpOutUrg = 51 tcpOutWinUpdate = 456 tcpOutWinProbe = 290 tcpOutControl = 92218 tcpOutRsts = 1455 tcpOutFastRetrans = 18954 tcpInSegs =15617893 tcpInAckSegs =9161810 tcpInAckBytes =981315052 tcpInDupAck =4559921 tcpInAckUnsent = 0 tcpInInorderSegs =5741788 tcpInInorderBytes =1120389303 tcpInUnorderSegs = 25045 tcpInUnorderBytes =16972517 tcpInDupSegs =4390218 tcpInDupBytes =4889714 tcpInPartDupSegs = 375 tcpInPartDupBytes =130424 tcpInPastWinSegs = 17 tcpInPastWinBytes =1808990872 tcpInWinProbe = 162 tcpInWinUpdate = 270 tcpInClosed = 313 tcpRttNoUpdate = 28077 tcpRttUpdate =9096791 tcpTimRetrans = 18098 tcpTimRetransDrop = 26 tcpTimKeepalive = 509 tcpTimKeepaliveProbe= 76 tcpTimKeepaliveDrop = 1 tcpListenDrop = 0 tcpListenDropQ0 = 0 tcpHalfOpenDrop = 0
The TCP statistics more mixed. There were 324 tcpAttemptFails , but given that there were 33,786 tcpActiveOpens at the time netstat was run, this is quite reasonable. The ratio of tcpInInorderSegs to tcpInUnorderSegs (that is, received in order versus not received in order) was 229:1, which is not uncommon:
IP ipForwarding = 2 ipDefaultTTL = 255 ipInReceives =16081438 ipInHdrErrors = 8 ipInAddrErrors = 0 ipInCksumErrs = 1 ipForwDatagrams = 0 ipForwProhibits = 2 ipInUnknownProtos = 274 ipInDiscards = 0 ipInDelivers =16146712 ipOutRequests =19560145 ipOutDiscards = 0 ipOutNoRoutes = 0 ipReasmTimeout = 60 ipReasmReqds = 0 ipReasmOKs = 0 ipReasmFails = 0 ipReasmDuplicates = 0 ipReasmPartDups = 0 ipFragOKs = 7780 ipFragFails = 0 ipFragCreates = 40837 ipRoutingDiscards = 0 tcpInErrs = 291 udpNoPorts =144065 udpInCksumErrs = 2 udpInOverflows = 0 rawipInOverflows = 0
There are some IP errors but they were quite minor. There were eight ipInHdr Errors but only one ipInCksumErrs , and two udpInCksumErrs .
ICMP icmpInMsgs = 17469 icmpInErrors = 0 icmpInCksumErrs = 0 icmpInUnknowns = 0 icmpInDestUnreachs = 2343 icmpInTimeExcds = 26 icmpInParmProbs = 0 icmpInSrcQuenchs = 0 icmpInRedirects = 19 icmpInBadRedirects = 19 icmpInEchos = 9580 icmpInEchoReps = 5226 icmpInTimestamps = 0 icmpInTimestampReps = 0 icmpInAddrMasks = 0 icmpInAddrMaskReps = 0 icmpInFragNeeded = 0 icmpOutMsgs = 11693 icmpOutDrops =140883 icmpOutErrors = 0 icmpOutDestUnreachs = 2113 icmpOutTimeExcds = 0 icmpOutParmProbs = 0 icmpOutSrcQuenchs = 0 icmpOutRedirects = 0 icmpOutEchos = 0 icmpOutEchoReps = 9580 icmpOutTimestamps = 0 icmpOutTimestampReps= 0 icmpOutAddrMasks = 0 icmpOutAddrMaskReps = 0 icmpOutFragNeeded = 0 icmpInOverflows = 0
On the ICMP front, icmpOutErrors and icmpInErrors are both zero, although there were 2,113 icmpOutDestUnreachs , indicating that at some point a network connection was not able to made when requested . This can be checked with the traceroute utility described in the following section. It also is often useful to run a cron job to extract these figures to a file, and then write a Perl script to compare the values of concern. This is because it is possible that errors could be masked by integers being "wrapped around" and starting at zero after they reach values that are greater than the maximum available for a machine s architecture. However, this should not be a problem for the new 64-bit kernels available with Solaris 7, 8, and 9.
traceroute
If the process of finding a route is difficult to conceptualize, Solaris provides the traceroute tool to literally display the route taken by a packet between two hosts. The traceroute utility measures the time taken to reach each intermediate host from source to destination. If an intermediate host cannot be reached in a specified time period (usually the ttl time to live field), an error message is reported. A maximum number of hops (usually 30) is specified to prevent traceroute from looping infinitely if an operational route cannot be found. traceroute is also very useful for determining network points of failure due to misconfiguration and hardware problems. Here is an example of a traceroute between a host on the AT&T network and a host on the Sun network:
client% traceroute www.sun.com Tracing route to wwwwseast.usec.sun.com [192.9.49.30] over a maximum of 30 hops: 1 184 ms 142 ms 138 ms 202.10.4.131 2 147 ms 144 ms 138 ms 202.10.4.129 3 150 ms 142 ms 144 ms 202.10.1.73 4 150 ms 144 ms 141 ms atm11-0-0-11.ia4.optus.net.au [202.139.32.17] 5 148 ms 143 ms 139 ms 202.139.1.197 6 490 ms 489 ms 474 ms hssi9-0-0.sf1.optus.net.au [192.65.89.246] 7 526 ms 480 ms 485 ms g-sfd-br-02-f12-0.gn.cwix.net [207.124.109.57] 8 494 ms 482 ms 485 ms core7-hssi6-0-0.SanFrancisco.cw.net [204.70.10.9] 9 483 ms 489 ms 484 ms corerouter2.SanFrancisco.cw.net [204.70.9.132] 10 557 ms 552 ms 561 ms xcore3.Boston.cw.net [204.70.150.81] 11 566 ms 572 ms 554 ms sun-micro-system.Boston.cw.net [204.70.179.102] 12 577 ms 574 ms 558 ms wwwwseast.usec.sun.com [192.9.49.30] Trace complete.
EAN: 2147483647
Pages: 265