| In this and the following section, I will demonstrate a couple of basic ways in which InfoPath form templates can be created. These examples are intended to fulfil two purposes. First, they will give you some initial experience in putting InfoPath to work. Second, studying these examples will help you better understand the discussion of InfoPath that follows in Chapter 2. The Access Database The Access database used in this example is a simplified human resources database that contains limited information about two employees . The database is included in the code download as SimpleHR.mdb . The data in the Employee table is shown in Figure 1.3. Now we have an Access data source to which we can connect using InfoPath 2003. Figure 1.3. The data in the Employee table. 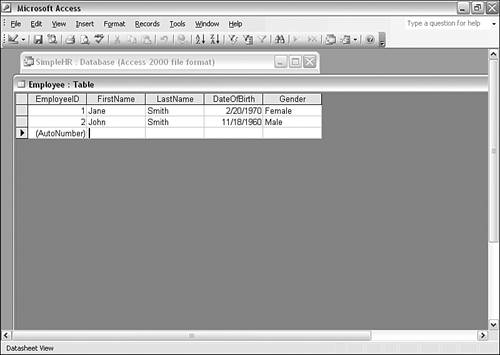 Connecting Using the Data Source Setup Wizard Follow these steps: -
If the task pane is not already open, open it either by selecting the File menu and clicking Design a Form (which opens the Design a Form task pane) or by using the keyboard shortcut Ctrl+F1 and then choosing Design a Form from the task pane drop-down menu. -
The Design a Form task pane offers several ways to design a new form. We will use the New from Data Source option, as shown in Figure 1.4. Figure 1.4. Selecting the New from Data Source option. 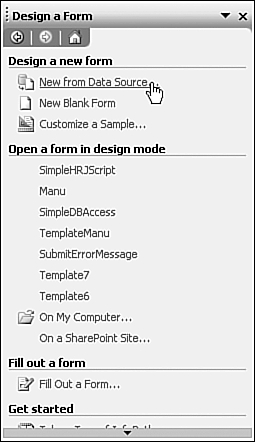 -
After we click on New from Data Source, the Data Source Setup Wizard opens (see Figure 1.5). It's important to select the appropriate option. In our case, we want to connect to an Access database, so we select the middle option, Database (Microsoft SQL Server or Microsoft Office Access Only). Click Next . Figure 1.5. The Data Source Setup Wizard. 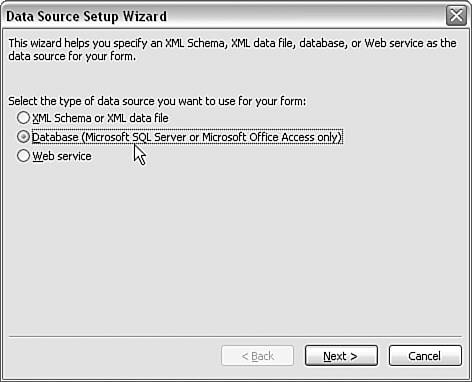 -
On the next screen, choose the Select Database button. -
In the Select Data Source window, navigate to the folder containing the Access database, in this case c:\IKS\Ch01 , select the SimpleHR.mdb file, and click Open. If you have installed the samples in another folder, adjust the path accordingly . -
In the next window that opens, the columns contained in the Employee table are displayed (see Figure 1.7). There's only one table in this database: Employee. Figure 1.7. Displaying the columns of the Employee table. 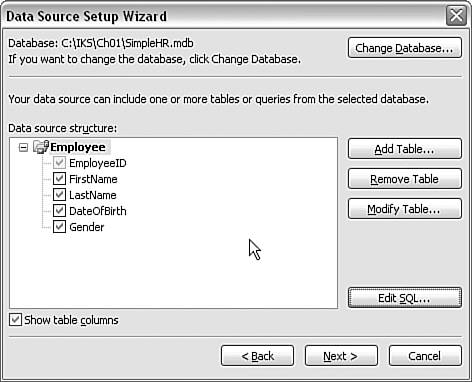 -
We will use all four columns of the Employee table, so leave the columns checked. Additional options to select multiple tables and so on are offered . We won't use those options in this example, so you can click Next to proceed to the next window. -
If everything has gone well, the window should display the message You have successfully set up your data source . Toward the bottom of the window are two radio buttons offering a choice of setting up a Query view or a Data view first (see Figure 1.8). Select Design Query View First and click the Finish button. Figure 1.8. Select Design Query View First. 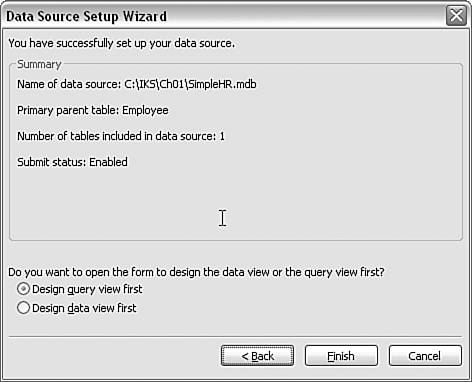 ALTERNATIVE CONNECTION TECHNIQUE There is an alternative connection technique that allows you to test the database connection in the design mode. When you navigate to the C:\IKS\Ch01 directory (adjust if you installed elsewhere), click the New Source button. Select the Other/Advanced option in the Data Connection Wizard window, and click Next. On the next screen, select the Microsoft Jet 4.0 OLE DB Provider option, and click Next. On the Connection tab, use the button marked with an ellipsis. The Data Link Properties window opens. The SimpleHR.mdb database is not password-protected, so we do not need to specify a password. However, we can test the connection to the database by clicking the Test Connection button. If the connection is successful, a message box with the text Test connection succeeded displays (see Figure 1.6). Be sure that you don't have the database open in Access when you test the connection, or the attempted connection will fail. Figure 1.6. The Data Link Properties window indicating a successful connection to the Access database. 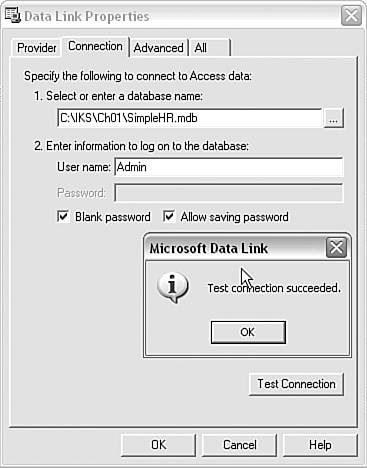 We don't need to alter settings on any of the other tabs. After successfully testing the connection to the database, click OK. |
Almost immediately, a Query view is displayed in the form area of the InfoPath client window (see Figure 1.9). InfoPath has created a working form to query the Access database automatically. Figure 1.9. The Query view created by InfoPath. 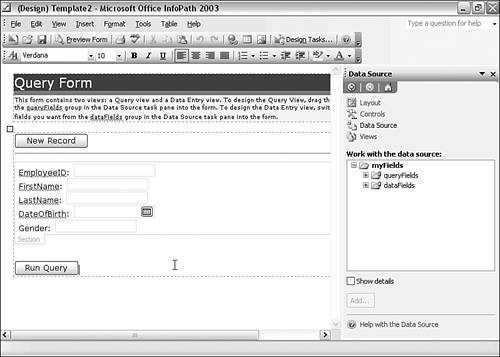 We have a couple of other things to do, but first take a close look at the Query view that InfoPath has created. Notice the queryFields group displayed in the task pane. Click on the node next to queryFields and then click on the node next to q:Employee . You should see query fields corresponding to the columns in the Employee table in the Access database (see Figure 1.10). Holding the mouse pointer over each query field shows information about it. Figure 1.10. The query fields contained in q:Employee . 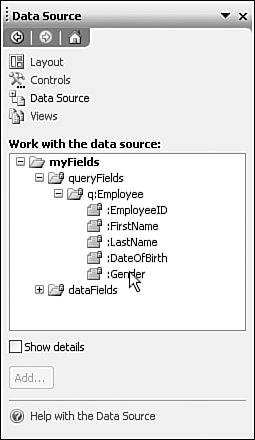 Notice that there is also a dataFields group, which we will use to create another view that displays the data returned from the query. Adding a Second View Now we will add a second view that will hold data returned from the query. It can also be used to enter new data to enter into the Employee table. Follow these steps: -
Choose Views from the drop-down menu at the top of the task pane. -
Click on the Data Entry view (see Figure 1.11), and the form area should go blank. This blank form area is where we will create the view to hold data returned from a query. Figure 1.11. Switching to the Data Entry view. 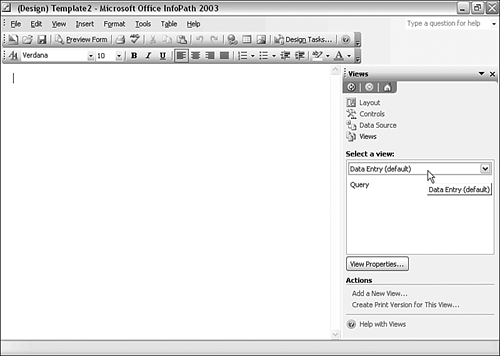 -
From the task pane, select Data Source from the drop-down menu, and the Data Source task pane opens. -
Click on the node beside the dataFields group, and then click on the node beside the d:Employee group. The result should be similar to that shown in Figure 1.12. Figure 1.12. The data fields in the d:Employee group. 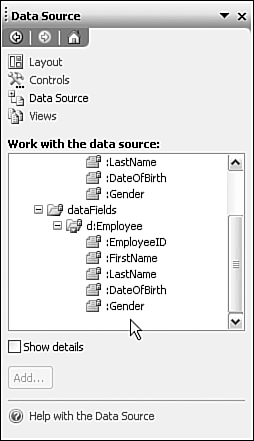 -
Drag the FirstName data field to the form area. A repeating section form control is automatically created, and a text box form control is inserted inside the repeating section. Notice too that the label for the text box intelligently splits FirstName into two separate English words. -
Drag the LastName , DateOfBirth , and Gender fields into the repeating section. Text box form controls are inserted into the repeating section for LastName and for Gender . A date picker control is inserted for the DateOfBirth field. We will look at the function of a repeating section a little later in this example. For now, simply ensure that the form controls have been created inside the repeating section. -
Remember that this view, which can hold the result of queries, can also be used to submit data. Next we will add a button control so we can use the view to submit data to the Access database. In the Data Source task pane, click on Controls, and the Controls task pane opens. -
From the Controls task pane, drag a button control onto the form area, making sure that the button is outside the repeating sectionjust below the repeating section is fine. The InfoPath client should look similar to Figure 1.13. Figure 1.13. The Data Entry view immediately after a button control is added. 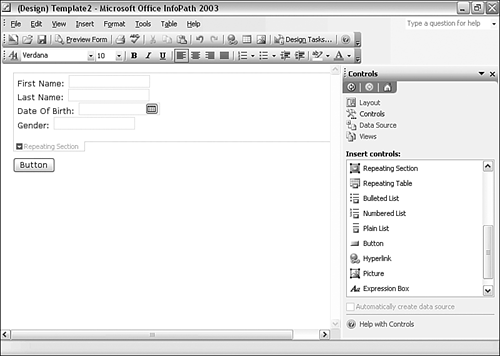 -
A button control labelled Button that doesn't do anything isn't very useful. Right-click on the button control and choose Button Properties. The Button Properties window opens. -
On the General tab, choose the Action drop-down menu and select Submit (see Figure 1.14). Figure 1.14. Changing the Action button to Submit. 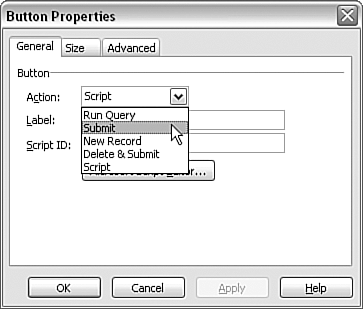 -
The Submitting Forms window opens. The default values suit our purposes for this example, so we can simply click OK. -
When we return to the Button Properties window, notice that the value of the Label box has changed automatically from Button to Submit. Click OK. -
Now we are ready to test the form we've created. First we will save the form template as the file c:\IKS\Ch01\SimpleHR.xsn . From the File menu, select Save. In the window that opens, click the Save button, and then navigate to the appropriate directory and name the file SimpleHR.xsn . -
Select Views from the task pane drop-down menu. Click Query View once to switch to the Query view. -
In the toolbar immediately below the menu bar, click the large button labelled Preview Form. -
Enter John into the FirstName text box and enter Smith into the LastName text box. Your form should now look like Figure 1.15. Figure 1.15. Ready to submit a query about John Smith.  -
Click the Run Query button. If all has gone well, the Data Entry view opens with the information from the SimpleHR.mdb Access database, as shown in Figure 1.16. Figure 1.16. The result of the query about John Smith. 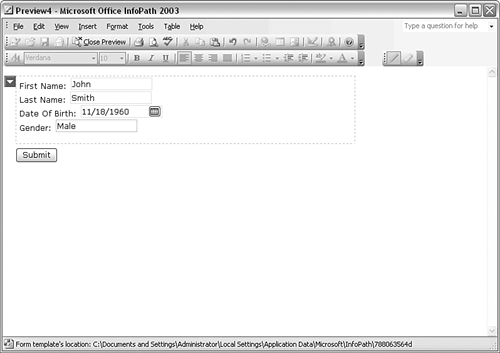 CHOOSING A DIFFERENT DIRECTORY If you choose a different directory in which to install the Access database, you can expect to be asked to specify the location of the database, because it isn't located where InfoPath expects to find it. You might also receive security warnings depending on the security settings for your machine. |
Testing the Form We have rapidly created a functioning query form for an Access database. We can now look at the purpose of a repeating section. Switch back to the Query view by selecting the View menu and then selecting Query. Delete John from the FirstName text box, but leave Smith in the LastName text box. Click Run Query. The result of the query is two records, one for John Smith and one for Jane Smith. Each record is displayed in its own repeating section, which repeats as often as needed. The form should now look similar to Figure 1.17. Figure 1.17. Results of the query for Smith, showing repeating sections. 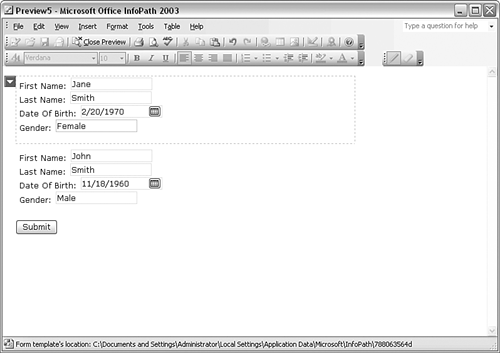 Now let's test whether we can add new records to the Employee table: -
Select the View menu and choose Query. -
Click the New Record button. A view with four fields opens (the EmployeeID field is not displayed because it's auto-incremented by the Access database). -
Our first new employee is John Jones, whose date of birth is December 25, 1965, and whose gender is male. Enter the appropriate values into the form controls, but don't click Submit yet. -
To the left of the First Name label, right-click on the down arrow. A menu opens, as shown in Figure 1.18. Figure 1.18. Adding another repeating section. 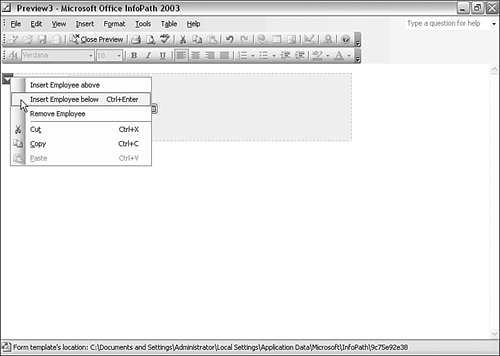 -
Select the Insert Employee Below option, and an additional repeating section appears below the original to which you have already added data. -
Our second new employee is Jane Jones, whose date of birth is December 31, 1965 and whose gender is female . Enter the appropriate values into the form controls. Click the Submit button. -
If all has gone well, the message box shown in Figure 1.19 displays. Click OK to dismiss the message box. Figure 1.19. The message box indicating a successful submission. 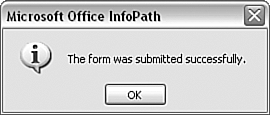 -
We want to be sure that the data has been added to the database. Switch back to Query view, enter Jones in the LastName text box, and click the Run Query button. The result is shown in Figure 1.20. Figure 1.20. Confirming successful submission by querying the database.  If you are still skeptical, you can open the Employee database in Access (see Figure 1.21) and see that the two Jones records have been added to the Employee database. Figure 1.21. The Jones records successfully added to the Employee table. 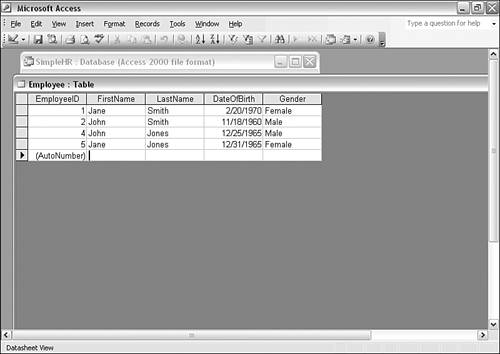 If you have followed the instructions step by step, you are probably impressed by how easy it has been to create forms to query and to add data to the Access database. SHOP TALK
A USER INTERFACE THAT MEANS LESS HAND CODING When I first used the InfoPath beta, I had been hand-coding XForms forms for many months. XForms is an XML forms technology from the W3C. The way InfoPath seemed to automatically associate data with layout was very impressive. In that initial glow, everything seemed almost automatic and very, very easy. As you will see later in the book, not everything is automatic with InfoPaththere is plenty of opportunity for serious coding if you use InfoPath to create forms applications that go beyond the functionality the wizards support. If you are a power user rather than a full-time developer, the wizard-supported functionality is great. It lets you create straightforward working forms very easily. |
InfoPath can use multiple tables in an Access database. We will look at how that's done in Chapter 7, "Connecting to a Database." |