Member Definitions
Within a class definition, you provide definitions for all members of the class, including fields, methods, and properties. All members have their own accessibility level, defined in all cases by one of the following keywords:
-
public: Member is accessible from any code
-
private: Member is accessible only from code that is part of the class (the default if no keyword is used)
-
internal: Member is accessible only from code within the project (assembly) where it is defined
-
protected: Member accessible only from code that is part of either the class or a derived class
The last two of these can be combined, so protected internal members are also possible. These are only accessible from code-derived classes within the project (more accurately, the assembly — you will cover assemblies in Chapter 26).
Fields, methods, and properties can also be declared using the keyword static, which means that they will be static members owned by the class rather than by object instances, as discussed in Chapter 8.
Defining Fields
Fields are defined using standard variable declaration format (with optional initialization), along with the modifiers discussed previously. For example:
class MyClass { public int MyInt; } | Note | Public fields in the .NET Framework are named using PascalCasing rather than camelCasing, and I'll use this casing methodology here. This is why the field in this example is called MyInt instead of myInt. This is only a suggested casing scheme, but it makes a lot of sense. There is no recommendation for private fields, which are usually named using camelCasing. |
Fields can also use the keyword readonly, meaning that the field may be assigned a value only during constructor execution or by initial assignment. For example:
class MyClass { public readonly int MyInt = 17; } As noted in the introduction to this chapter, fields may be declared as static using the static keyword, for example:
class MyClass { public static int MyInt; } Static fields may be accessed via the class that defines them (MyClass.MyInt in the preceding example), not through object instances of that class.
In addition, you can use the keyword const to create a constant value. const members are static by definition, so there is no need to use the static modifier (indeed, it is an error to do so).
Defining Methods
Methods use standard function format, along with accessibility and optional static modifiers. For example:
class MyClass { public string GetString() { return "Here is a string."; } } | Note | Public methods in the .NET framework, like fields, are named using PascalCasing rather than camelCasing. |
Note that if you use the static keyword this method will only be accessible through the class, not the object instance.
You can also use the following keywords with method definitions:
-
virtual: Method may be overridden
-
abstract: Method must be overridden in nonabstract derived classes (only permitted in abstract classes)
-
override: Method overrides a base class method (must be used if a method is being overridden)
-
extern: Method definition is found elsewhere
The following code shows an example of a method override:
public class MyBaseClass { public virtual void DoSomething() { // Base implementation. } } public class MyDerivedClass : MyBaseClass { public override void DoSomething() { // Derived class implementation, overrides base implementation. } }
If override is used, then sealed may also be used to specify that no further modifications can be made to this method in derived classes, that is, this method can't be overridden by derived classes. For example:
public class MyDerivedClass : MyBaseClass { public override sealed void DoSomething() { // Derived class implementation, overrides base implementation. } } Using extern allows you to provide the implementation of a method externally to the project. This is an advanced topic, and I won't go into any more detail here.
Defining Properties
Properties are defined in a similar way to fields, but there's more to them. Properties, as already discussed, are more involved than fields in that they can perform additional processing before modifying state — and, indeed, might not modify state at all. They achieve this by possessing two function-like blocks, one for getting the value of the property and one for setting the value of the property.
These blocks, also known as accessors, defined using get and set keywords, respectively, may be used to control the access level of the property. It is possible to omit one or the other of these blocks to create read-only or write-only properties (where omitting the get block gives you write-only access, and omitting the set block gives you read-only access). Of course, this only applies to external code, because code elsewhere within the class will have access to the same data that these code blocks have. You can also include accessibility modifiers on accessors, for example making a get block that is public while the set block is protected. You must include at least one of these blocks to obtain a valid property (and, let's face it, a property you can neither read nor change wouldn't be that useful).
The basic structure of a property consists of the standard access modifying keyword (public, private, and so on), followed by a type name, the property name, and one or both of the get and set blocks that contain the property processing, for example:
public int MyIntProp { get { // Property get code. } set { // Property set code. } }
| Note | Public properties in the .NET Framework are also named using PascalCasing rather than camelCasing, and as with fields and methods, I'll use this casing here. |
The first line of the definition is the bit that is very similar to a field definition. The difference is that there is no semicolon at the end of the line; instead, you have a code block containing nested get and set blocks.
get blocks must have a return value of the type of the property. Simple properties are often associated with a single private field controlling access to that field, in which case the get block may return the value of that field directly, for example:
// Field used by property. private int myInt; // Property. public int MyIntProp { get { return myInt; } set { // Property set code. } }
Note that code external to the class cannot access this myInt field directly due to its accessibility level (it's private). Instead external code must use the property to get access to the field.
The set function assigns a value to the field in a similar way. Here, you can use the keyword value to refer to the value received from the user of the property:
// Field used by property. private int myInt; // Property. public int MyIntProp { get { return myInt; } set { myInt = value; } } value equates to a value of the same type as the property, so if the property uses the same type as the field, you never have to worry about casting in situations like this.
This simple property does little more than shield direct access to the myInt field. The real power of properties comes when you exert a little more control over the proceedings. For example, you might implement your set block using:
set { if (value >= 0 && value <= 10) myInt = value; } Here, you only modify myInt if the value assigned to the property is between 0 and 10. In situations like this, you have an important design choice to make: what should you do if an invalid value is used? You have four options:
-
Do nothing (as in the preceding code).
-
Assign a default value to the field.
-
Continue as if nothing had gone wrong but log the event for future analysis.
-
Throw an exception.
In general, the last two options are the preferable ones. The choice between these two options depends on how the class will be used, and how much control should be assigned to the users of the class. Exception throwing gives users a fair amount of control and lets them know what is going on so that they can respond appropriately. You can use a standard System exception for this, for example:
set { if (value >= 0 && value <= 10) myInt = value; else throw (new ArgumentOutOfRangeException("MyIntProp", value, "MyIntProp must be assigned a value between 0 and 10.")); } This can be handled using try. . . catch . . . finally logic in the code that uses the property, as you saw in Chapter 7.
Logging data, perhaps to a text file, can be useful in (for example) production code where problems really shouldn't occur. They allow developers to check up on performance and perhaps debug existing code if necessary.
Properties can use the virtual, override, and abstract keywords just like methods, something that isn't possible with fields.
Finally, as mentioned earlier, accessors can have their own accessibility, for example:
// Field used by property. private int myInt; // Property. public int MyIntProp { get { return myInt; } protected set { myInt = value; } } Here, only code within the class or derived classes can use the set accessor.
The accessibilities that are permitted for accessors depend on the accessibility of the property, and it is forbidden to make an accessor more accessible than the property it belongs to. This means that a private property cannot contain any accessibility modifiers for its accessors, while public properties can use all modifiers on their accessors.
In the following Try It Out, you experiment with defining and using fields, methods, and properties.
Try It Out – Using Fields, Methods, and Properties
-
Create a new console application project called Ch10Ex01 in the directory C:\BegVCSharp\ Chapter10.
-
Add a new class called MyClass, using the VS shortcut, which will cause the new class to be defined in a new file called MyClass.cs.
-
Modify the code in MyClass.cs as follows:
public class MyClass { public readonly string Name; private int intVal; public int Val { get { return intVal; } set { if (value >= 0 && value <= 10) intVal = value; else throw (new ArgumentOutOfRangeException("Val", value, "Val must be assigned a value between 0 and 10.")); } } public override string ToString() { return "Name: " + Name + "\nVal: " + Val; } private MyClass() : this("Default Name") { } public MyClass(string newName) { Name = newName; intVal = 0; } }
-
Modify the code in Program.cs as follows:
static void Main(string[] args) { Console.WriteLine("Creating object myObj..."); MyClass myObj = new MyClass("My Object"); Console.WriteLine("myObj created."); for (int i = -1; i <= 0; i++) { try { Console.WriteLine("\nAttempting to assign {0} to myObj.Val...", i); myObj.Val = i; Console.WriteLine("Value {0} assigned to myObj.Val.", myObj.Val); } catch (Exception e) { Console.WriteLine("Exception {0} thrown.", e.GetType().FullName); Console.WriteLine("Message:\n\"{0}\"", e.Message); } } Console.WriteLine("\nOutputting myObj.ToString()..."); Console.WriteLine(myObj.ToString()); Console.WriteLine("myObj.ToString() Output."); Console.ReadKey(); } -
Run the application. The result is shown in Figure 10-1.
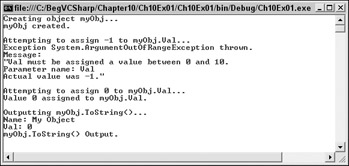
Figure 10-1
How It Works
The code in Main() creates and uses an instance of the MyClass class defined in MyClass.cs. Instantiating this class must be performed using a nondefault constructor, because the default constructor of MyClass is private:
private MyClass() : this("Default Name") { } Note that I've used this("Default Name") to ensure that Name gets a value if this constructor ever gets called, which is possible if this class is used to derive a new class. This is necessary because not assigning a value to the Name field could be a source of errors later.
The nondefault constructor used assigns values to the readonly field Name (you can only do this by assignment in the field declaration or in a constructor) and the private field intVal.
Next, Main() attempts two assignments to the Val property of myObj (the instance of MyClass). A for loop is used to assign the values -1 and 0 in two cycles, and a try . . . catch structure is used to check for any exception thrown. When -1 is assigned to the property an exception of type System.ArgumentOutOfRangeException is thrown, and code in the catch block outputs information about the exception to the console window. In the next loop cycle, the value 0 is successfully assigned to the Val property, and through that property to the private intVal field.
Finally, you use the overridden ToString() method to output a formatted string representing the contents of the object:
public override string ToString() { return "Name: " + Name + "\nVal: " + Val; } This method must be declared using the override keyword, because it is overriding the virtual ToString() method of the base System.Object class. The code here uses the property Val directly rather than the private field intVal. There is no reason why you shouldn't use properties from within classes in this way, although there may be a small performance hit (so small that you are unlikely to notice it). Of course, using the property also gives you the validation inherent in property use, which may be beneficial for code within the class as well.
Adding Members from a Class Diagram
In the last chapter, you saw how you can use the class diagram to explore the classes in a project. I also mentioned that the class diagram could be used to add members, and this is what you will look at in this section.
All the tools for adding and editing members are shown in the Class Details window in the Class Diagram View. To see this in action, create a class diagram for the MyClass class created in Ch10Ex01. You can see the existing members by expanding the view of the class in the class designer (by clicking on the icon that looks like two downward pointing chevrons). The resultant view is shown in Figure 10-2.
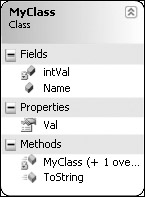
Figure 10-2
In the Class Details window, you can see the information shown in Figure 10-3 when the class is selected.
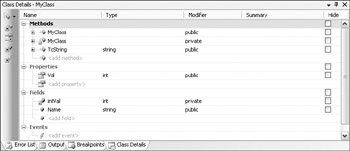
Figure 10-3
This shows all the currently defined members for the class and has spaces for you to add new members simply by typing in the relevant spaces. In the next sections, you look at adding methods, properties, and fields using this window.
Adding Methods
Simply typing in the box labeled <add method> results in a method being added to your class. Once you have named a method, you can use the Tab key to navigate to subsequent settings, starting with the return type of the method, and moving on to the accessibility of the method, summary information (which translates to XML documentation, which you look at in Chapter 28), and whether to hide the method in the class diagram.
Once you have added a method, you can expand the entry and add parameters in the same way. For parameters, you also have the option to use the modifiers out, ref, and params. An example of a new method is shown in Figure 10-4.
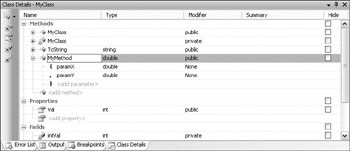
Figure 10-4
With this new method, the following code is added to your class:
public double MyMethod(double paramX, double paramY) { throw new System.NotImplementedException(); }
Additional configuration of a method can be done in the Properties window, shown in Figure 10-5.
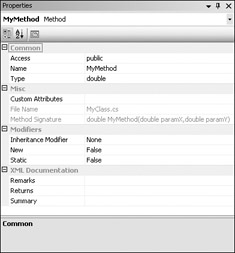
Figure 10-5
Here you can, among other things, make the method static.
Obviously, this technique can't provide the method implementation for you, but it does provide the basic structure, and certainly cuts down on typing errors!
Adding Properties
Adding properties is achieved in much the same way. Figure 10-6 shows a new property added using the Class Details window.
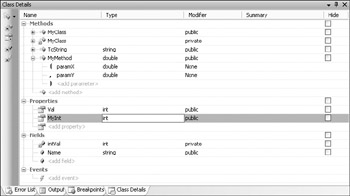
Figure 10-6
This adds a property as shown here:
public int MyInt { get { throw new System.NotImplementedException(); } set { } }
Note that you are left to provide the complete implementation yourself, which includes matching up the property with a field for simple properties, removing an accessor if you want the property to be read- or write-only, or applying accessibility modifiers to accessors. However, the basic structure is provided for you.
Adding Fields
Adding fields is just as simple. You just have to type the name of the field, choose a type and access modifier, and away you go.
Refactoring Members
One tool that comes in handy when adding properties is the ability to generate a property from a field. This is an example of refactoring, which in general simply means modifying your code using a tool rather than by hand. This can be accomplished using a class diagram by right-clicking on a member or simply by right-clicking on a member in code view.
For example, if the MyClass class contained the following field:
public string myString; You could right-click on the field and select Refactor Encapsulate Field. . . . This would bring up the dialog shown in Figure 10-7.
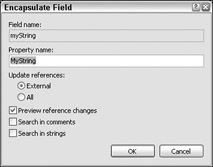
Figure 10-7
Accepting the default options modifies the code for MyClass as follows:
private string myString; public string MyString { get { return myString; } set { myString = value; } }
The myString field has had its accessibility changed to private, and a public property called MyString has been created and automatically linked to myString.
Believe me — cutting down on the time required to monotonously create properties for fields is a big plus!
EAN: N/A
Pages: 278