Adding a DataGridView
The DataGridView displays all of the records in a spreadsheet-like format. Although not typically added to a form that is as complete as yours, the DataGridView is a fast and convenient object that can be added to Windows forms to display data and even provide a user interface for changes.
To add the DataGridView, first make the GettingData form larger, keeping the three fields you've already defined at the top.
Then simply drag the Customers table itself from the Data Source window to the area you've added at the bottom, as shown in Figure 25-24.
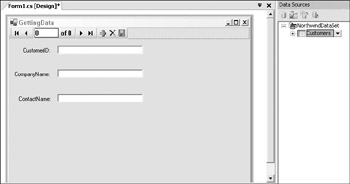
Figure 25-24
Resize the grid to fill the bottom of the form and line up nicely, and your form should now look something like that shown in Figure 25-25.
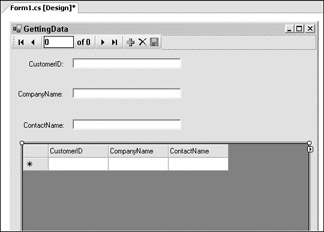
Figure 25-25
Go ahead and run the program now in the debugger by pressing F5. You can see that the DataGridView is already connected with the database, and if you click on a particular row in the grid the data in the other controls change to match the selected row (see Figure 25-26).
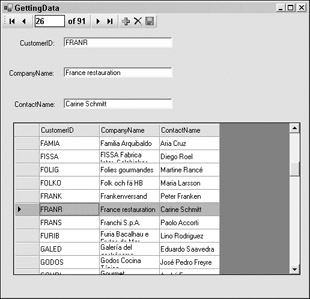
Figure 25-26
You'd expect that you'd have to write some code to synchronize all the controls, but VS2005 has already done that for you. What could be simpler?
Formatting the DataGridView
The formatting of the DataGridView does leave a little bit to be desired. For example, the default column widths as shown don't make for the prettiest formatting. You can change this by right-clicking the DataGridView and choosing Edit Columns, as shown in Figure 25-27.
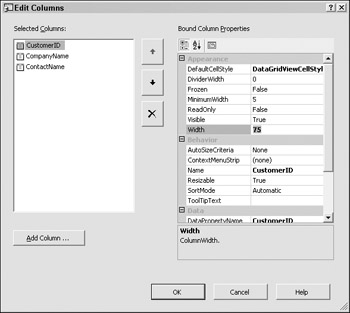
Figure 25-27
Try setting the default width for the CustomerID column to 75, the width for CompanyName to 200, and ContactName to 150. Run the program again with F5 — doesn't that look nicer?
You can also change the default appearance of the DataGridView to make your application look more polished. The easiest way to do this is simply to apply one of the many templates built into the object. For example, if you do not like the basic blue and gray, you can modify the template. Begin by right- clicking the DataGridView and selecting Auto Format, as shown in Figure 25-28.
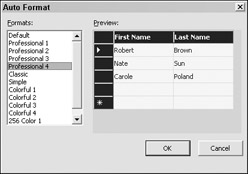
Figure 25-28
Within the Auto Format dialog, you can select any of the predefined templates to spruce up your DataGridView. However, if you'd prefer to alter the look manually, you can adjust all the properties for the background colors or font styles — for example if you have a corporate color scheme you would like to match. You can go into quite elaborate detail, all without touching a line of code.
For example, let's change the background color for the column headers. Right-click again on the DataGridView and choose Properties. Scroll through the properties until you find ColumnHeadersDefaultCellStyle. This brings up the CellStyle Builder, in which you can click the BackColor property. Within the color dialog, you will see a color list with three tabs: Custom, Web, and System, as shown in Figure 25-29.
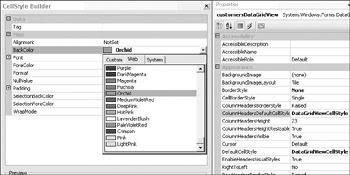
Figure 25-29
The System has predefined colors, supplied by Windows. For example, if you select the color Desktop from System, this color will change if the user alters the color of his or her desktop. This can sometimes cause unexpected side effects, such as poor legibility. Therefore, be careful when you alter these values. For now, select the color Orchid on the Web tab. The color across the top of the grid will turn to this interesting shade of purple.
Adding Different Types of Controls
Data-bound controls are not limited to controls created by dragging items off the data source. You can also bind any control you create with the Toolbox by setting its data binding properties in the Data section of its properties. For example, you can create a data-bound ListBox by selecting ListBox from the Toolbox, dragging it onto your form to create ListBox1, then right-clicking to view its properties. In the Data section of the properties, you can set the Data Source property to your existing customerDataConnection data source, and set the Display Member property to the CustomerID column, as shown in Figure 25-30.

Figure 25-30
This creates a data-bound list box, which will display the CustomerID synchronized with the current row just as with the data grid and text box controls, as shown in Figure 25-31.
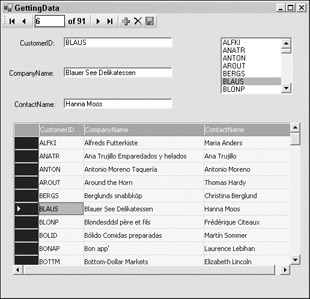
Figure 25-31
You could fiddle with properties and colors all day long, but that's quite enough to make the point. You can accomplish a tremendous amount of what would otherwise be laborious work through VS2005's data wizards and data-bound control properties.
A Quick Look at the Generated Code
Just to see the work you're missing, choose File Open File, and open the file NorthwindDataSet. Designer.cs in your project directory. This C# code is generated from your project form (via the NorthwindDataSet.xsd file mentioned earlier). Choose Edit Find and search for partial class; you'll see class definitions for NorthwindDataSet, CustomersDataTable, CustomersTableAdapter, and so on:
namespace GettingData { . . . public partial class NorthwindDataSet : System.Data.DataSet { private CustomersDataTable tableCustomers; public NorthwindDataSet() { this.BeginInit(); this.InitClass(); . . . public partial class CustomersDataTable : System.Data.DataTable . . . public partial class CustomersTableAdapter : . . . ICustomersTableAdapter { This is several hundred lines of database code that you didn't have to write! Similarly, there are several hundred lines generated in Form1.Designer.cs as well that would have been murder to write by hand! You've gone about as far as you can without writing code, but you will see how adding just a few lines of code to what VS2005 has done can get you that much closer to having exactly the application behavior you want.
Updating the Database
So far, you can read the data from the database, and you can change it in the text boxes and the DataGridView, but that's not much use if you can't save the changes you make to the database itself. You may have noticed that any changes you type into the text boxes or data grid disappear when you exit the application and restart it.
Therefore, you will quickly see how to update and validate the data in the database with the data in your DataSet. For this portion, you use a little bit of your own code, in addition to the wizard-generated code.
The BindingNavigator bar has a Save Data button at the right, as shown on Figure 25-32.
![]()
Figure 25-32
In an early beta of VS2005 the Save button was disabled and additional code needed to be added to enable the save functionality. In the final edition of VS2005 the Save code is generated automatically so this additional code is not necessary. However, you may want to add additional code to validate any data changes made by your user before saving the changes to the database. Let's look at a simple example of this so that you can see how easy it is to modify the code generated by VS2005.
For example, suppose that the user types a change into the CustomerID text box. The values for the CustomerID columns in the Northwind database must each be exactly 5 characters long. You can add a handler to the Save button to ensure that the CustomerID entered by the user conforms to this requirement. To do this, go up to the Save Data button and double-click it.
The VS2005-generated bindingNavigatorSaveItem_Click method appears in the code view window It begins with an if statement calling the form's Validate method, followed by a call to the customersBindingSource EndEdit method and customersTableAdapter Update method. To enter your own validation logic, type in the following code at the beginning of bindingNavigatorSaveItem_Click, before the if statement calling Validate:
private void bindingNavigatorSaveItem_Click(object sender, EventArgs e) { if (this.customerIDTextBox.Text.Length != 5)) { MessageBox.Show(this, "CustomerID must be 5 characters long", "Save"); return; } if (this.Validate()) { this.customersBindingSource.EndEdit(); this.customersTableAdapter.Update(this.northwindDataSet.Customers); } } Now, build and run the application and attempt to change the customer ID in the CustomerID text box for one of the records. If you enter a value less than 5 characters long the message shown in the code appears and the change is not saved to the database.
Any changes made to the DataSet will be passed back to the database with the Update() method when the Save button is pressed. You used the Update() method with the DataAdapter in Chapter 24; the customersTableAdapter inherits the Update() method from the parent DataAdapter class.
You would need to add similar handling for all the text box controls, of course, to fully flesh out the application. I'll leave that as an exercise for you!
EAN: N/A
Pages: 278