6.5 Other Helpful Includes
| WML comes with many standard include files that implement commonly used functions. Here we discuss a few of them, but there are more available than we can talk about. See the documents ( wmd is your friend) for a complete list and more information. 6.5.1 wml::std::pageThe wml::std::page include file produces a standard HTML page, complete with <html> , <head> , and <body> tags. Here is a very simple example, found in /var/www/html/wml/page1.wml : #use wml::std::page <page> hello, <b>world!</b> This include file defines a new <page> tag. Using this tag at the top of our WML file, as in the previous example, generates all the HTML necessary to produce a basic page. The text after the <page> tage is placed between the <body> ... </body> tags, so the usual hello, world will be right where it's supposed to be, in the body of the document. Build the HTML: $ wmk page1.wml wml -n -o page1.html page1.wml That generates this HTML: <html> <head> </head> <body bgcolor="#ffffff" text="#000000" link="#333399" alink="#9999ff" vlink="#000066"> hello, <b>world!</b> </body> </html> The <page> tag generates the <body> tag with default attributes. You can probably guess what this will look like in the browser, but if you want to check it out, see www.opensourcewebbook.com/wml/page1.html or http://localhost/wml/page1.html . The <page> tag does not generate a title for the document in this example by default. There are two ways to generate it: either use the <title> ... </title> tag or provide attributes to the <page> tag. We use the latter approach. This example sets the title as well as the background color in the <page> tag: #use wml::std::page <page title="Page 2 in WML" bgcolor="#ffffcc"> hello, <b>world!</b> Build the HTML: $ wmk page2.wml wml -n -o page2.html page2.wml That results in /var/www/html/wml/page2.html : <html> <head> <title>Page 2 in WML</title> </head> <body bgcolor="#ffffcc" text="#000000" link="#333399" alink="#9999ff" vlink="#000066"> hello, <b>world!</b> </body> </html> Excellent ”both the title and the background color have been set. Take a look by loading either http://localhost/wml/page2.html or www.opensourcewebbook.com/wml/page2.html. 6.5.2 wml::std::tocHTML allows named anchors, and wml::std::toc provides an easy way to implement something similar. Named anchors allow one to use URLs to reference specific points in an HTML page so that clients can jump and link to the relevant part of the page. An example of the concept can be found at www.opensourcewebbook.com/wml/toc.html. This page has a number of links at the top that, when clicked, jump to a section of the same document below (a named anchor). If you have a complex or often changing web page, keeping this sort of page working can be a nightmare, but wml::std::toc makes this easy. This include file provides a new tag, <toc> , which builds a table of contents of all <hN> tags: <h1> , <h2> , etc. The level of N also controls the indentation of the table of contents. Here is an example, found in /var/www/html/wml/toc.wml : #use wml::std::page #use wml::std::toc style=pre <page title="toc example"> Table of Contents: <toc> <hr> <h1>Chapter 1</h1> <h2>Section 1</h2> <h3>Subsection 1</h3> <h2>Section 2</h2> <h1>Chapter 2</h1> <h2>Section 1</h2> <h2>Section 2</h2> Obviously, this page is devoid of content, [3] having only the <hN> tags.
The <page> tag builds all the good HTML tags that we need for our page. Our title is set to "toc example." (Still devoid of content.) "Table of Contents" is the header for the table of contents. The <toc> tag builds the Table of Contents' content, pointing to all the <hN> tags below. When the <hN> tags are processed , WML automatically adds HTML named anchors (e.g., <a name ="ToC1"> ... </a> ) to which the links of the Table of Contents point. To build the HTML, use this: $ wmk toc.wml wml -n -o toc.html toc.wml The resulting code can be seen in /var/www/html/wml/toc.html , an example portion of which is shown here: . . . Table of Contents: <pre> <a href="#ToC1"><strong>Chapter 1</strong></a> <a href="#ToC2"><strong>Section 1</strong></a> <a href="#ToC3"><strong>Subsection 1</strong></a> <a href="#ToC4"><strong>Section 2</strong></a> <a href="#ToC5"><strong>Chapter 2</strong></a> <a href="#ToC6"><strong>Section 1</strong></a> <a href="#ToC7"><strong>Section 2</strong></a> </pre> <hr> <h1><a name="ToC1">Chapter 1</a></h1> <h2><a name="ToC2">Section 1</a></h2> . . . To see the result in action, go to either http://localhost/wml/toc.html or www.opensourcewebbook.com/wml/toc.html. The result is shown in Figure 6.4. Figure 6.4. wml::std::toc in action There are several different ways to use this include file. Try this: #use wml::std::toc style=ol type=A1ai You can probably figure out what happened . 6.5.3 wml::des::navbarLet's say you want to create a nifty navigation bar of the type often seen on web sites: When you roll over one of the links, the image becomes highlighted, hence the name "image rollover." A perfect example can be see at www.hackinglinuxexposed.com/, shown in Figure 6.5. Figure 6.5. Screen capture from www.hackinglinuxexposed.com/ You can see the navigation bar along the left rail, showing links to the About page, the Contents page, and so on. When the mouse is moved over a link, the image changes to another image, one that is a different color, usually brighter, which basically says, "Hey, you are now over this link; click here and go somewhere important." It happens that www.hackinglinuxexposed.com/ is built with WML, so we can peek at a subset of the WML code that built that navigation. The code uses the include file wml::des::navbar . The des in the name stands for "design." In other words, this include file contains the definition for helpful tags in designing navigation bars. The example can be found in the file /var/www/html/wml/navbar.wml : #use wml::des::navbar # # here is the navbar definition # <navbar:define name=navbar imgstar=":_on:_on" imgbase="/icons/" urlbase="/"> <navbar:header>This is the Header<br></navbar:header> # button epilog <navbar:epilog><br></navbar:epilog> # the buttons <navbar:button id=about url=about/ txt="About" img=nv_about*.gif> <navbar:button id=contents url=contents/ txt="Contents" img=nv_contents*.gif> <navbar:button id=foreword url=foreword/ txt="Foreword" img=nv_foreword*.gif> <navbar:button id=reviews url=reviews/ txt="Reviews" img=nv_reviews*.gif> <navbar:button id=authors url=authors/ txt="Authors" img=nv_authors*.gif> # bar footer <navbar:footer>This is the Footer</navbar:footer> </navbar:define> In the navigation bar definition, there are several obvious attributes: name is the name of the navigation bar, imgbase is the base URI for the image locations, and urlbase is the starting point for the URLs for the buttons. The other attribute, imgstar , might not be so obvious. It is a string of three values, each separated by a colon . The first part is the suffix for the image displayed normally (no mouse over the item). The second is the suffix of the image to be displayed when a mouse hovers over the button. The third is the suffix of the image displayed when it is selected (being clicked by the mouse). [4]
For instance, if the image button is called foo.gif , the first part of imgstar , the empty string, is the suffix of the image, so the result is foo.gif . When the image is hovered over, foo_on.gif is displayed (because _on is the second part of imgstar ). When the button is clicked, the client sees foo_on.gif (because _on is the third part of imgstar ). The next bit is <navbar:header> , which defines a header for the collection of buttons. Later comes <navbar:footer> , the footer text. The tag <navbar:prolog> , which is not used in this example, enables the navigation bar to have HTML that comes before each button, while <navbar:epilog> , which is used, enables the navigation bar to have HTML that comes after each button. Then each button is defined, given an id , url , and txt , which are displayed in the browser status bar they are hovered over, and img , which uses imgstar because it has the asterisk, or star character, in the names . The previous code set up the WML, and continuing on in navbar.wml , we reach the main part of the code, which renders the all-important message we wish to deliver: # # here is the main stuff # <html> <head> <title>navbar example</title> <navbar:jsfuncs> </head> <body bgcolor="#ff0000" text="#ffffff"> hello, world <hr> <navbar:render name=navbar Within the HTML proper is <navbar:jsfuncs> , which generates the JavaScript functions (shown shortly). Finally, <navbar:render> generates the HTML to render the navigation bar. To build this code, use: $ wmk navbar.wml wml -n -o navbar.html navbar.wml WML builds a plethora of stuff for us, including all the necessary JavaScript code in the header: <script type="text/javascript" language="JavaScript"> <!-- Hiding the code function nb_imgNormal(imgName) { if (document.images) { document[imgName].src = eval(imgName + _n.src); self.status = ; } } function nb_imgSelect(imgName) { if (document.images) { document[imgName].src = eval(imgName + _s.src); self.status = ; } } function nb_imgOver(imgName, nohints, descript) { if (document.images) { document[imgName].src = eval(imgName + _o.src); if (! nohints) self.status = descript; } } // done hiding --> </script> And some JavaScript on the body: <script type="text/javascript" language="JavaScript"> <!-- Hiding the code if (document.images) { nb_img1_about_n=new Image(); nb_img1_about_n.src = /icons/nv_about.gif; nb_img1_about_o=new Image(); nb_img1_about_o.src = /icons/nv_about_on.gif; nb_img1_contents_n=new Image(); nb_img1_contents_n.src = /icons/nv_contents.gif; nb_img1_contents_o=new Image(); nb_img1_contents_o.src = /icons/nv_contents_on.gif; nb_img1_foreword_n=new Image(); nb_img1_foreword_n.src = /icons/nv_foreword.gif; nb_img1_foreword_o=new Image(); nb_img1_foreword_o.src = /icons/nv_foreword_on.gif; nb_img1_reviews_n=new Image(); nb_img1_reviews_n.src = /icons/nv_reviews.gif; nb_img1_reviews_o=new Image(); nb_img1_reviews_o.src = /icons/nv_reviews_on.gif; nb_img1_authors_n=new Image(); nb_img1_authors_n.src = /icons/nv_authors.gif; nb_img1_authors_o=new Image(); nb_img1_authors_o.src = /icons/nv_authors_on.gif; } // done hiding --> </script> And all the links. Here is an example of one: <a href="/about/" onmouseover="nb_imgOver(nb_img1_about, 0, About); return true" onmouseout="nb_imgNormal(nb_img1_about); return true" onfocus="nb_imgOver(nb_img1_about, 0, About); return true" onblur="nb_imgNormal(nb_img1_about); return true"> <img name="nb_img1_about" src="/icons/nv_about.gif" alt="About" border="0"> </a><br> WML is building all that JavaScript. Nice for us, because we don't have to worry about it. And look at all the HTML for the links and images (we cleaned it up a bit so you can read it ”it really comes out all on one line). To see the result of this code, go to http://localhost/wml/navbar.html or www.opensourcewebbook.com/wml/navbar.html. The result is shown in Figure 6.6. Figure 6.6. The wml::des::navbar in action 6.5.4 wml::fmt::xtableIf you've written HTML, you know how tedious it is to create tables using the <table> ... </table> tags. If you haven't, take our word for it. All the <tr> and </tr> tags must be included in the proper order, not to mention the <th> , </th> , <td> , and </td> tags. When you make a mistake in your table tags, finding the place where you failed to open or close a cell can be a nightmare. WML provides a nice solution in wml::fmt::xtable . The include file wml::fmt::xtable defines <xtable> ... </xtable> tags to ameliorate these headaches . Other tags for table headers, table data, and more can also be defined. Let's start with a simple example, which can be found in /var/www/html/wml/xtable1.wml or online at http://localhost/wml/xtable1.wml or www.opensourcewebbook.com/wml/xtable1.wml. The contents of this file are as follows : #use wml::fmt::xtable <xtable> ((1,1)) first - header (1,2) second - data ((2,1)) third - header (2,2) fourth - data </xtable> To build the file, use: $ wmk xtable1.wml wml -n -o xtable1.html xtable1.wml This build results in this output: <!-- WARNING: The following table was produced by freetable. --> <!-- Unless you know what you are doing, you should not edit it here, --> <!-- but edit sources and then run freetable to rebuild this table --> <table summary=""> <tr> <th>first - header</th> <td>second - data</td> </tr> <tr> <th>third - header</th> <td>fourth - data</td> </tr> </table> The observant reader will see a comment within the generated tables that starts with WARNING . This should be heeded. [5] It tells the reader that the table was generated with freetable . <xtable> .. </xtable> is a wrapper around freetable .
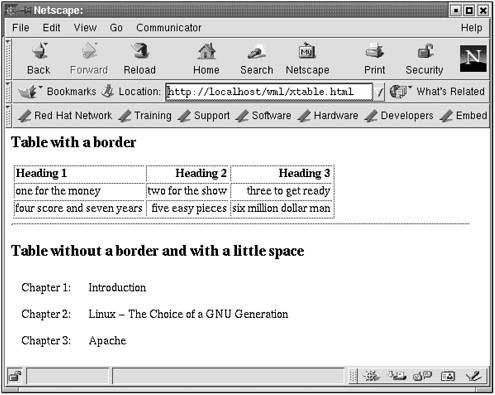
The starting tag is <xtable> . This begins the table, because it causes WML to output the <table> tag. In the example, the <xtable> tag generates: <table summary=""> ... </table> The summary attribute is added automatically. Any attributes that are provided to <xtable> are passed along to <table> . For instance: <xtable border="1"> creates: <table border="1" summary=""> Within the <xtable> ... </xtable> tags, each table cell is defined. The table headers, <th> elements, are defined as: ((ROW, COL)) header text Note the use of double parentheses on ((ROW, COL)) . The text for the element is on the next line after the double-parentheses pair, as in the example: ((1,1)) first - header creates <th>first - header</th> for the upper left cell. The table data elements, <td> , are defined as: (ROW, COL) data text Now notice the use of single parentheses. Again, the text to be put in that cell is provided on the next line. Thus in our example: (1,2) second - data creates <td>second - data</td> for the upper right cell. In HTML tables, cells can be formatted with different attributes ”the elements can be aligned right or left, or centered. The same thing can be done with WML. For example: (1,2) align=right second - data That generates <td align="right">second - data</td> . WML also makes it easy to assign an attribute to multiple cells at once. At the top of the <xtable> definition, the following could be placed to provide an attribute for every cell in the first row: (1,*) valign=top The text (1,*) tells WML to apply the attribute to all columns in the first row. The " * " is a wildcard meaning all elements. For all these columns in the specified row, valign="top" is set. Similarly, (*,1) align=left does the same thing for rows. In the first column of every row, WML applies the attribute align="left" . One can get even more complicated; the formulation (*,23) align= right means that for every row, the second and third columns get the attribute align="right" . An example that illustrates all these concepts can be found in /var/www/html/wml/xtable2.wml . This example creates two tables. The first table creates a border (by using border="1" ). Every element in the first row, (1,*) , is given the attribute valign="top" . The first column in all rows, (*,1) , is granted align="left" . For all rows, the second and third columns, (*,23) , are align="right" . A table of three rows and three columns is created. The second table is given a little spacing and padding with cellpadding ="5" and cellspacing="5" . Then all columns in all rows ( (*,*) ) have valign="top" . We then define a table with three rows and two columns. Here is the example: #use wml::std::page #use wml::fmt::xtable # get the standard page html <page> <h3>Table with a border</h3> <xtable border="1"> (1,*) valign=top (*,1) align=left (*,23) align=right ((1,1)) Heading 1 ((1,2)) Heading 2 ((1,3)) Heading 3 (2,1) one for the money (2,2) two for the show (2,3) three to get ready (3,1) four score and seven years (3,2) five easy pieces (3,3) six million dollar man </xtable> <hr> <h3>Table without a border and with a little space</h3> <xtable cellpadding="5" cellspacing="5"> (*,*) valign=top (1,1) Chapter 1: (1,2) Introduction (2,1) Chapter 2: (2,2) Linux - The Choice of a GNU Generation (3,1) Chapter 3: (3,2) Apache </xtable> The HTML is generated from the wml in the usual manner: $ wmk xtable2.wml wml -n -o xtable2.html xtable2.wml The file /var/www/html/wml/xtable2.html contains the resulting HTML. The tables are built as follows: <h3>Table with a border</h3> <!-- WARNING: The following table was produced by freetable. --> <!-- Unless you know what you are doing, you should not edit it here, --> <!-- but edit sources and then run freetable to rebuild this table --> <table border="1" summary=""> <tr> <th valign="top" align="left">Heading 1</th> <th valign="top" align="right">Heading 2</th> <th valign="top" align="right">Heading 3</th> </tr> <tr> <td align="left">one for the money</td> <td align="right">two for the show</td> <td align="right">three to get ready</td> </tr> <tr> <td align="left">four score and seven years</td> <td align="right">five easy pieces</td> <td align="right">six million dollar man</td> </tr> </table> and: <h3>Table without a border and with a little space</h3> <!-- WARNING: The following table was produced by freetable. --> <!-- Unless you know what you are doing, you should not edit it here, --> <!-- but edit sources and then run freetable to rebuild this table --> <table cellpadding="5" cellspacing="5" summary=""> <tr> <td valign="top">Chapter 1: </td> <td valign="top">Introduction</td> </tr> <tr> <td valign="top">Chapter 2: </td> <td valign="top">Linux - The Choice of a GNU Generation</td> </tr> <tr> <td valign="top">Chapter 3: </td> <td valign="top">Apache</td> </tr> </table> To see the result, go to www.opensourcewebbook.com/wml/xtable2.html or http://localhost/wml/xtable2.html . The result can be seen in Figure 6.7. Figure 6.7. The wml::fmt::xtable in action 6.5.5 wml::des::allThis include file includes all the Web design category includes. These are as follows:
Although these are worthwhile, we'll not go into them here. For details about them, use the wmd browser. |
 navbar> <hr> </body> </html>
EAN: 2147483647
Pages: 136