Accepting File Uploads
| The FileUpload control enables users to upload files to your web application. After the file is uploaded, you can store the file anywhere you please. Normally, you store the file either on the file system or in a database. This section explores both options. The FileUpload control supports the following properties (this is not a complete list):
The FileUpload control also supports the following methods:
The FileUpload control's PostedFile property enables you to retrieve the uploaded file wrapped in an HttpPostedFile object. This object exposes additional information about the uploaded file. The HttpPostedFile class has the following properties (this is not a complete list):
The HttpPostedFile class also supports the following method: SaveAsEnables you to save the uploaded file to the file system. Notice that there is some redundancy here. For example, you can get the name of the uploaded file by using either the FileUpload.FileName property or the HttpPostedFile.FileName property. You can save a file by using either the FileUpload.SaveAs() method or the HttpPostedFile.SaveAs() method. Note Adding a FileUpload control to a page automatically adds a enctype="multipart/form-data" attribute to the server-side <form> tag. Saving Files to the File SystemThe page in Listing 4.1 illustrates how you can upload images to an application by using the FileUpload control. Listing 4.1. FileUploadFile.aspx
Listing 4.1 includes both a FileUpload control and a DataList control. When you upload a file, the file is saved to a folder named ImageUploads. The DataList control automatically displays the contents of the ImageUploads folder. The result is an image gallery (see Figure 4.1). Figure 4.1. Displaying a photo gallery.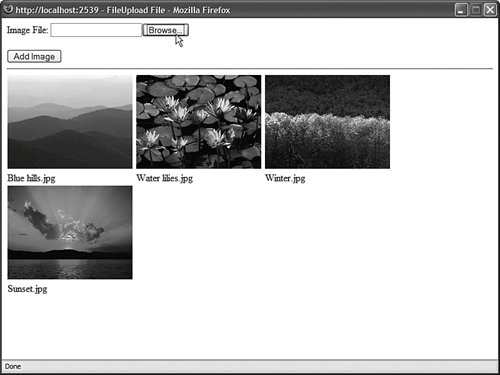 Notice that the page includes a method named CheckFileType(), which prevents users from uploading a file that does not have the .gif, .jpeg, .jpg, or .png extension. The method restricts the type of file that can be uploaded based on the file extension. Note The HTML 4.01 specifications define an accept attribute that you should be able to use to filter the files that can be uploaded. Unfortunately, no browser supports the accept attribute, so you must perform filtering on the server (or use some JavaScript to check the filename extension on the client). To save a file to the file system, the Windows account associated with the ASP.NET page must have sufficient permissions to save the file. For Windows 2003 Servers, an ASP.NET page executes in the security context of the NETWORK SERVICE account. In the case of every other operating system, an ASP.NET page executes in the security context of the ASPNET account. To enable the ASP.NET framework to save an uploaded file to a particular folder, you need to right-click the folder within Windows Explorer, select the Security tab, and provide either the NETWORK SERVICE or ASPNET account Write permissions for the folder (see Figure 4.2). Figure 4.2. Adding Write permissions for the ASPNET account.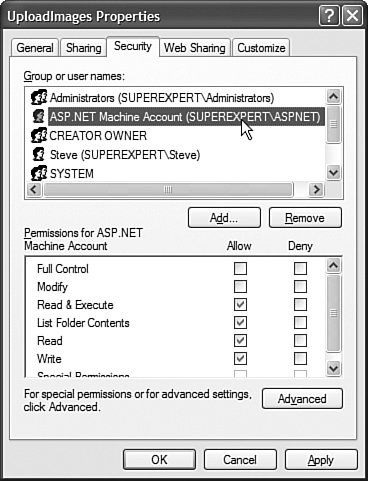 Saving Files to a DatabaseYou also can use the FileUpload control to save files to a database table. Saving and retrieving files from a database can place more stress on your server. However, it does have certain advantages. First, you can avoid file system permissions issues. Second, saving files to a database enables you to more easily back up your information. The page in Listing 4.2 enables you to save Microsoft Word documents to a database table (see Figure 4.3). Listing 4.2. FileUploadDatabase.aspx
Figure 4.3. Uploading Microsoft Word documents.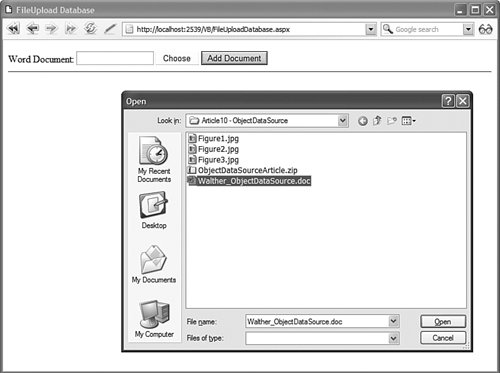 When you submit the form in Listing 4.2, the btnAdd_Click() method executes. This method checks the file extension to verify that the file is a Microsoft Word document. Next, the SqlDataSource control's Insert() method is called to insert the values of the FileUpload control's FileName and FileBytes properties into a local SQL Express database table. The SQL Express database table, named Files, looks like this:
The page also displays a list of the current Microsoft Word documents in the database. You can click any file and view the contents of the file. Exactly what happens when you click a file is browser (and browser settings) dependent. With Microsoft Internet Explorer, for example, the document opens directly in the browser. Clicking the name of a document links you to a page named FileHandler.ashx. The FileHandler.ashx file is a generic HTTP Handler file. Chapter 25 discusses HTTP Handlers in detail. An HTTP Handler enables you to execute code when someone makes a request for a file with a certain path. The FileHandler.ashx file is contained in Listing 4.3. Listing 4.3. FileHandler.ashx
When the FileHandler.aspx page is requested, the ProcessRequest() method executes. This method grabs a query string item named Id and retrieves the matching record from the Files database table. The record contains the contents of a Microsoft Word document as a byte array. The byte array is sent to the browser with the Response.BinaryWrite() method. Uploading Large FilesYou must do extra work when uploading large files. You don't want to consume all your server's memory by placing the entire file in memory. When working with a large file, you need to work with the file in more manageable chunks. First, you need to configure your application to handle large files. Two configuration settings have an effect on posting large files to the server: the httpRuntime maxRequestLength and httpRuntime requestLengthDiskThreshold settings. The maxRequestLength setting places a limit on the largest form post that the server will accept. By default, you cannot post a form that contains more than 4MB of dataif you try, you'll get an exception. If you need to upload a file that contains more than four megabytes of data, then you need to change this setting. The requestLengthDiskThreshold setting determines how a form post is buffered to the file system. In the previous version of ASP.NET (ASP.NET 1.1), uploading a large file could do horrible things to your server. The entire file was uploaded into the server memory. While a 10-megabyte video file was uploaded, for example, 10 megabytes of server memory was consumed. The ASP.NET 2.0 Framework enables you to buffer large files onto the file system. When the size of the file passes the requestLengthDiskThreshold setting, the remainder of the file is buffered to the file system (in the Temporary ASP.NET Files folder). By default, the ASP.NET framework is configured to buffer any post larger than 80KB to a file buffer. If you are not happy with this setting, then you can modify the requestLengthDiskThreshold to configure a new threshold. (The requestLengthDiskThreshold setting must be less than the maxRequestLength setting.) The web configuration file in Listing 4.4 enables files up to 10MB to be posted. It also changes the buffering threshold to 100KB. Listing 4.4. Web.Config
When working with large files, you must be careful about the way that you handle the file when storing or retrieving the file from a data store. For example, when saving or retrieving a file from a database table, you should never load the entire file into memory. The page in Listing 4.5 demonstrates how you can save a large file to a database table efficiently. Listing 4.5. FileUploadLarge.aspx
In Listing 4.5, the AddFile() method is called. This method adds a new row to the Files database table that contains the filename. Next, the StoreFile() method is called. This method adds the actual bytes of the uploaded file to the database. The file contents are divided into 8040-byte chunks. Notice that the SQL UPDATE statement includes a .WRITE clause that is used when the FileBytes database column is updated. Note Microsoft recommends that you set the buffer size to multiples of 8040 when using the .WRITE clause to update database data. The page in Listing 4.5 never represents the entire uploaded file in memory. The file is yanked into memory from the file system in 8040-byte chunks and fed to SQL Server in chunks. When you click a filename, the FileHandlerLarge.ashx HTTP Handler executes. This handler retrieves the selected file from the database and sends it to the browser. The handler is contained in Listing 4.6. Listing 4.6. FileHandlerLarge.ashx
The HTTP Handler in Listing 4.6 uses a SqlDataReader to retrieve a file from the database. Notice that the SqlDataReader is retrieved with a CommandBehavior.SequentialAccess parameter. This parameter enables the SqlDataReader to load data as a stream. The contents of the database column are pulled into memory in 8040-byte chunks. The chunks are written to the browser with the Response.BinaryWrite() method. Notice that response buffering is disabled for the handler. The Response.Buffer property is set to the value False. Because buffering is disabled, the output of the handler is not buffered in server memory before being transmitted to the browser. Warning The method of working with large files described in this section works only with SQL Server 2005. When using earlier versions of SQL Server, you need to use the TEXTPTR() function instead of the .WRITE clause. |