Understanding ASP.NET Pages
| This section examines ASP.NET pages in more detail. You learn about dynamic compilation and code-behind files. We also discuss the events supported by the Page class. Understanding Dynamic CompilationStrangely enough, when you create an ASP.NET page, you are actually creating the source code for a .NET class. You are creating a new instance of the System.Web.UI.Page class. The entire contents of an ASP.NET page, including all script and HTML content, are compiled into a .NET class. When you request an ASP.NET page, the ASP.NET Framework checks for a .NET class that corresponds to the page. If a corresponding class does not exist, the Framework automatically compiles the page into a new class and stores the compiled class (the assembly) in the Temporary ASP.NET Files folder located at the following path: \WINDOWS\Microsoft.NET\Framework\[version]\Temporary ASP.NET Files The next time anyone requests the same page in the future, the page is not compiled again. The previously compiled class is executed and the results are returned to the browser. Even if you unplug your web server, move to Borneo for 3 years, and start up your web server again, the next time someone requests the same page, the page does not need to be re-compiled. The compiled class is preserved in the Temporary ASP.NET Files folder until the source code for your application is modified. When the class is added to the Temporary ASP.NET Files folder, a file dependency is created between the class and the original ASP.NET page. If the ASP.NET page is modified in any way, the corresponding .NET class is automatically deleted. The next time someone requests the page, the Framework automatically compiles the modified page source into a new .NET class. This process is called dynamic compilation. Dynamic compilation enables ASP.NET applications to support thousands of simultaneous users. Unlike an ASP Classic page, for example, an ASP.NET page does not need to be parsed and compiled each and every time it is requested. An ASP.NET page is compiled only when an application is modified. Note You can precompile an entire ASP.NET application by using the aspnet_compiler.exe command-line tool. If you precompile an application, users don't experience the compilation delay resulting from the first page request. Note You can disable dynamic compilation for a single page, the pages in a folder, or an entire website with the CompilationMode attribute. When the CompilationMode attribute is used with the <%@ Page %> directive, it enables you to disable dynamic compilation for a single page. When the compilationMode attribute is used with the pages element in a web configuration file, it enables you to disable dynamic compilation for an entire folder or application. Disabling compilation is useful when you have thousands of pages in a website and you don't want to load an assembly into memory for every page. When the CompilationMode attribute is set to the value Never, the page is never compiled and an assembly is never generated for the page. The page is interpreted at runtime. You cannot disable compilation for pages that include server-side code. In particular, a no compile page cannot include a server-side <script>...</script> block. On the other hand, a no compile page can contain ASP.NET controls and databinding expressions. In case you are curious, I've included the source code for the class that corresponds to the FirstPage.aspx page in Listing 1.12 (I've cleaned up the code slightly to make it shorter). I copied this file from the Temporary ASP.NET Files folder after enabling debugging for the application. Listing 1.12. FirstPage.aspx Source
The class in Listing 1.12 inherits from the System.Web.UI.Page class. The ProcessRequest() method is called by the ASP.NET Framework when the page is displayed. This method builds the page's control tree, which is the subject of the next section. Understanding Control TreesIn the previous section, you learned that an ASP.NET page is really the source code for a .NET class. Alternatively, you can think of an ASP.NET page as a bag of controls. More accurately, because some controls might contain child controls, you can think of an ASP.NET page as a control tree. For example, the page in Listing 1.13 contains a DropDownList control and a Button control. Furthermore, because the <%@ Page %> directive has the TRace="true" attribute, tracing is enabled for the page. Listing 1.13. ShowControlTree.aspx
When you open the page in Listing 1.12 in your browser, you can see the control tree for the page appended to the bottom of the page. It looks like this: __Page ASP.showcontroltree_aspx ctl02 System.Web.UI.LiteralControl ctl00 System.Web.UI.HtmlControls.HtmlHead ctl01 System.Web.UI.HtmlControls.HtmlTitle ctl03 System.Web.UI.LiteralControl form1 System.Web.UI.HtmlControls.HtmlForm ctl04 System.Web.UI.LiteralControl DropDownList1 System.Web.UI.WebControls.DropDownList ctl05 System.Web.UI.LiteralControl Button1 System.Web.UI.WebControls.Button ctl06 System.Web.UI.LiteralControl ctl07 The root node in the control tree is the page itself. The page has an ID of __Page. The page class contains all the other controls in its child controls collection. The control tree also contains an instance of the HtmlForm class named form1. This control is the server-side form tag contained in the page. It contains all the other form controlsthe DropDownList and Button controlsas child controls. Notice that there are several LiteralControl controls interspersed between the other controls in the control tree. What are these controls? Remember that everything in an ASP.NET page is converted into a .NET class, including any HTML or plain text content in a page. The LiteralControl class represents the HTML content in the page (including any carriage returns between tags). Note Normally, you refer to a control in a page by its ID. However, there are situations in which this is not possible. In those cases, you can use the FindControl() method of the Control class to retrieve a control with a particular ID. The FindControl() method is similar to the JavaScript getElementById() method. Using Code-Behind PagesThe ASP.NET Framework (and Visual Web Developer) enables you to create two different types of ASP.NET pages. You can create both single-file and two-file ASP.NET pages. All the code samples in this book are written as single-file ASP.NET pages. In a single-file ASP.NET page, a single file contains both the page code and page controls. The page code is contained in a <script runat="server"> tag. As an alternative to a single-file ASP.NET page, you can create a two-file ASP.NET page. A two-file ASP.NET page is normally referred to as a code-behind page. In a code-behind page, the page code is contained in a separate file. Note Code-behind pages work in a different way in the ASP.NET 2.0 Framework than they did in the ASP.NET 1.x Framework. In ASP.NET 1.x, the two halves of a code-behind page were related by inheritance. In the ASP.NET 2.0 Framework, the two halves of a code-behind page are related by a combination of partial classes and inheritance. For example, Listing 1.14 and Listing 1.15 contain the two halves of a code-behind page. Visual Web Developer Note When using Visual Web Developer, you create a code-behind page by selecting Website, Add New Item, selecting the Web Form Item, and checking the Place Code in Separate File check box before adding the page. Listing 1.14. FirstPageCodeBehind.aspx
Listing 1.15. FirstPageCodeBehind.aspx.vb
The page in Listing 1.14 is called the presentation page. It contains a Button control and a Label control. However, the page does not contain any code. All the code is contained in the code-behind file. Visual Web Developer Note You can flip to the code-behind file for a page by right-clicking a page and selecting View Code. The code-behind file in Listing 1.15 contains the Page_Load() and Button1_Click() handlers. The code-behind file in Listing 1.15 does not contain any controls. Notice that the page in Listing 1.14 includes both a CodeFile and Inherits attribute in its <%@ Page %> directive. These attributes link the page to its code-behind file. How Code-Behind Works: The Ugly DetailsIn the previous version of the ASP.NET Framework (ASP.NET 1.x), two classes were generated by a code-behind page. One class corresponded to the presentation page and one class corresponded to the code-behind file. These classes were related to one another through class inheritance. The presentation page class inherited from the code-behind file class. The problem with this method of associating presentation pages with their code-behind files was that it was very brittle. Inheritance is a one-way relationship. Anything that is true of the mother is true of the daughter, but not the other way around. Any control that you declared in the presentation page was required to be declared in the code-behind file. Furthermore, the control had to be declared with exactly the same ID. Otherwise, the inheritance relationship would be broken and events raised by a control could not be handled in the code-behind file. In the beta version of ASP.NET 2.0, a completely different method of associating presentation pages with their code-behind files was used. This new method was far less brittle. The two halves of a code-behind page were no longer related through inheritance, but through a new technology supported by the .NET 2.0 Framework called partial classes. Note Partial classes are discussed in Chapter 14, "Building Components." Partial classes enable you to declare a class in more than one physical file. When the class gets compiled, one class is generated from all the partial classes. Any members of one partial classincluding any private fields, methods, and propertiesare accessible to any other partial classes of the same class. This makes sense because partial classes are combined eventually to create one final class. The advantage of using partial classes is that you don't need to worry about declaring a control in both the presentation page and code-behind file. Anything that you declare in the presentation page is available automatically in the code-behind file, and anything you declare in the code-behind file is available automatically in the presentation page. The beta version of the ASP.NET 2.0 Framework used partial classes to relate a presentation page with its code-behind file. However, certain advanced features of the ASP.NET 1.x Framework were not compatible with using partial classes. To support these advanced features, a more complex method of associating presentation pages with code-behind files is used in the final release of the ASP.NET 2.0 Framework. Note The ASP.NET 1.x Framework enabled you to create a custom base Page class and inherit every ASP.NET page in an application from the custom Page class. Relating pages and code-behind files with partial classes conflicted with inheriting from a custom base Page class. In the final release of the ASP.NET 2.0 Framework, you can once again create custom base Page classes. For a sample of a custom base Page class, see the final section of Chapter 5, "Designing Websites with Master Pages." The final release of the ASP.NET 2.0 Framework uses a combination of inheritance and partial classes to relate presentation pages and code-behind files. The ASP.NET 2.0 Framework generates three classes whenever you create a code-behind page. The first two classes correspond to the presentation page. For example, when you create the FirstPageCodeBehind.aspx page, the following two classes are generated automatically in the Temporary ASP.NET Files folder: Partial Public Class FirstPageCodeBehind Protected WithEvents Button1 As Global.System.Web.UI.WebControls.Button Protected WithEvents Label1 As Global.System.Web.UI.WebControls.Label ... additional class code ... End Class Public Class firstpagecodebehind_aspx Inherits FirstPageCodeBehind ... additional class code ... End Class A third class is generated that corresponds to the code-behind file. Corresponding to the FirstPageCodeBehind.aspx.vb file, the following class is generated: Partial Class FirstPageCodeBehind Inherits System.Web.UI.Page Protected Sub Button1_Click(ByVal sender As Object, ByVal e As System.EventArgs) Handles Button1.Click Label1.Text = "Thanks!" End Sub End Class The firstpagecodebehind_aspx class is executed when the FirstPageCodeBehind.aspx page is requested from a browser. This class inherits from the FirstPageCodeBehind class. The FirstPageCodeBehind class is a partial class. It gets generated twice: once by the presentation page and once by the code-behind file. The final release of the ASP.NET 2.0 Framework uses a combination of partial classes and inheritance to relate presentation pages and code-behind files. Because the page and code-behind classes are partial classes, unlike the previous version of ASP.NET, you no longer need to declare controls in both the presentation and code-behind page. Any control declared in the presentation page is accessible in the code-behind file automatically. Because the page class inherits from the code-behind class, the ASP.NET 2.0 Framework continues to support advanced features of the ASP.NET 1.x Framework such as custom base Page classes. Deciding Between Single-File and Code-Behind PagesSo, when should you use single-file ASP.NET pages and when should you use code-behind pages? This decision is a preference choice. There are intense arguments over this topic contained in blogs spread across the Internet. I've heard it argued that code-behind pages are superior to single-file pages because code-behind pages enable you to more cleanly separate your user interface from your application logic. The problem with this argument is that the normal justification for separating your user interface from your application logic is code reuse. Building code-behind pages really doesn't promote code reuse. A better way to reuse application logic across multiple pages is to build separate component libraries. (Part IV of this book explores this topic.) My personal preference is to build ASP.NET applications using single-file ASP.NET pages because this approach requires managing fewer files. However, I've built many applications using the code-behind model (such as some of the ASP.NET Starter Kits) without suffering dire consequences. Note The previous version of Visual Studio .NET did not support building single-file ASP.NET pages. If you wanted to create single-file ASP.NET pages in the previous version of ASP.NET, you had to use an alternate development environment such as Web Matrix or Notepad. Handling Page EventsWhenever you request an ASP.NET page, a particular set of events is raised in a particular sequence. This sequence of events is called the page execution lifecycle. For example, we have already used the Page Load event in previous code samples in this chapter. You normally use the Page Load event to initialize the properties of controls contained in a page. However, the Page Load event is only one event supported by the Page class. Here is the sequence of events that are raised whenever you request a page:
Why so many events? Different things happen and different information is available at different stages in the page execution lifecycle. For example, View State is not loaded until after the InitComplete event. Data posted to the server from a form control, such as a TextBox control, is also not available until after this event. Ninety-nine percent of the time, you won't handle any of these events except for the Load and the PreRender events. The difference between these two events is that the Load event happens before any control events and the PreRender event happens after any control events. The page in Listing 1.16 illustrates the difference between the Load and PreRender events. The page contains three event handlers: one for the Load event, one for the Button Click event, and one for the PreRender event. Each handler adds a message to a Label control (Figure 1.12). Figure 1.12. Viewing the sequence of page events.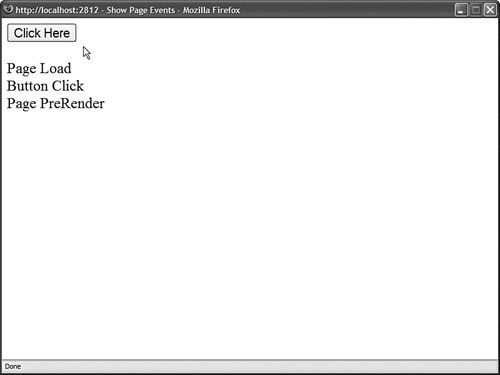 Listing 1.16. ShowPageEvents.aspx
When you click the Button control, the Click event does not happen on the server until after the Load event and before the PreRender event. The other thing you should notice about the page in Listing 1.16 is the way the event handlers are wired to the Page events. ASP.NET pages support a feature named AutoEventWireUp, which is enabled by default. If you name a subroutine Page_Load(), the subroutine automatically handles the Page Load event; if you name a subroutine Page_PreRender(), the subroutine automatically handles the Page PreRender event, and so on. Warning AutoEventWireUp does not work for every page event. For example, it does not work for the Page_InitComplete() event. Using the Page.IsPostBack PropertyThe Page class includes a property called the IsPostBack property, which you can use to detect whether the page has already been posted back to the server. Because of View State, when you initialize a control property, you do not want to initialize the property every time a page loads. Because View State saves the state of control properties across page posts, you typically initialize a control property only once, when the page first loads. In fact, many controls don't work correctly if you re-initialize the properties of the control with each page load. In these cases, you must use the IsPostBack property to detect whether or not the page has been posted. The page in Listing 1.17 illustrates how you can use the Page.IsPostBack property when adding items to a DropDownList control. Listing 1.17. ShowIsPostBack.aspx
In Listing 1.17, the code in the Page_Load() event handler executes only once when the page first loads. When you post the page again, the IsPostBack property returns TRue and the code contained in the Page_Load() handler is skipped. If you remove the IsPostBack check from the Page_Load() method, then you get a strange result. The DropDownList always displays its first item as the selected item. Binding the DropDownList to a collection of items re-initializes the DropDownList control. Therefore, you want to bind the DropDownList control only once, when the page first loads. Debugging and Tracing ASP.NET PagesThe sad fact of life is that you spend the majority of your development time when building applications debugging the application. In this section, you learn how to get detailed error messages when developing ASP.NET pages. You also learn how you can display custom trace messages that you can use when debugging a page. Debugging ASP.NET PagesIf you need to view detailed error messages when you execute a page, you need to enable debugging for either the page or your entire application. You can enable debugging for a page by adding a Debug="true" attribute to the <%@ Page %> directive. For example, the page in Listing 1.18 has debugging enabled. Listing 1.18. ShowError.aspx
When you open the page in Listing 1.18 in your web browser, a detailed error message is displayed (see Figure 1.13). Figure 1.13. Viewing a detailed error message.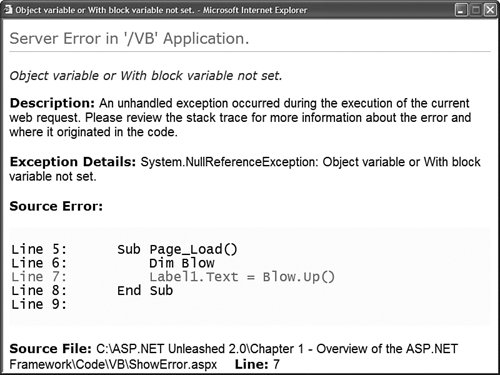 Warning Make sure that you disable debugging before placing your application into production. When an application is compiled in debug mode, the compiler can't make certain performance optimizations. Rather than enable debugging for a single page, you can enable debugging for an entire application by adding the web configuration file in Listing 1.19 to your application. Listing 1.19. Web.Config
When debugging an ASP.NET application located on a remote web server, you need to disable custom errors. For security reasons, by default, the ASP.NET Framework doesn't display error messages when you request a page from a remote machine. When custom errors are enabled you don't see errors on a remote machine. The modified web configuration file in Listing 1.20 disables custom errors. Listing 1.20. Web.Config
Debugging Pages with Visual Web DeveloperIf you are using Visual Web Developer, then you can display compilation error messages by performing a build on a page or an entire website. Select the menu option Build, Build Page or the menu option Build, Build Web Site. A list of compilation error messages and warnings appears in the Error List window (see Figure 1.14). You can double-click any of the errors to navigate directly to the code that caused the error. Figure 1.14. Performing a build in Visual Web Developer. If you need to perform more advanced debugging, you can use the Visual Web Developer's debugger. The debugger enables you to set breakpoints and step line by line through your code. You set a breakpoint by double-clicking the left-most column in Source view. When you add a breakpoint, a red circle appears (see Figure 1.15). Figure 1.15. Setting a breakpoint.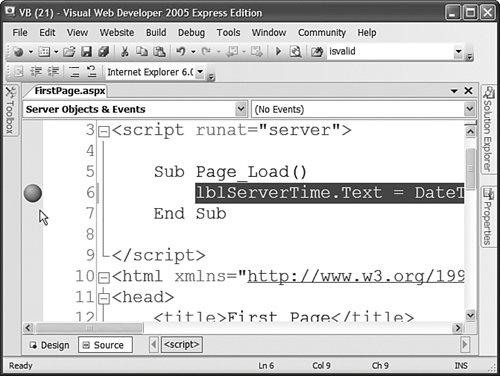 After you set a breakpoint, run your application by selecting the menu option Debug, Start Debugging. Execution stops when the breakpoint is hit. At that point, you can hover your mouse over any variable or control property to view the current value of the variable or control property. Note You can designate one of the pages in your application as the Start Page. That way, whenever you run your application, the Start Page is executed regardless of the page that you have open. Set the Start Page by right-clicking a page in the Solution Explorer window and selecting the menu option Set As Start Page. After you hit a breakpoint, you can continue execution by selecting Step Into, Step Over, or Step Out from the Debug menu or the toolbar. Here's an explanation of each of these options:
When you are finished debugging a page, you can continue, stop, or restart your application by selecting a particular option from the Debug menu or the toolbar. Tracing Page ExecutionIf you want to output trace messages while a page executes, then you can enable tracing for a particular page or an entire application. The ASP.NET Framework supports both page-level tracing and application-level tracing. The page in Listing 1.21 illustrates how you can take advantage of page-level tracing. Listing 1.21. PageTrace.aspx
Notice that the <%@ Page %> directive in Listing 1.21 includes a TRace="true" attribute. This attribute enables tracing and causes a Trace Information section to be appended to the bottom of the page (see Figure 1.16). Figure 1.16. Viewing page trace information.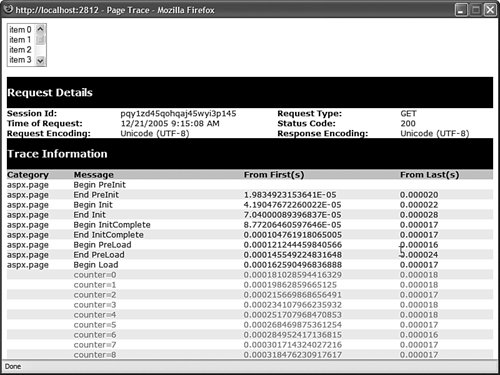 Notice, furthermore, that the Page_Load() handler uses the trace.Warn() method to write messages to the Trace Information section. You can output any string to the Trace Information section that you please. In Listing 1.21, the current value of a variable named counter is displayed. You'll want to take advantage of page tracing when you need to determine exactly what is happening when a page executes. You can call the TRace.Warn() method wherever you need in your code. Because the Trace Information section appears even when there is an error in your page, you can use tracing to diagnose the causes of any page errors. One disadvantage of page tracing is that everyone in the world gets to see your trace information. You can get around this problem by taking advantage of application-level tracing. When application-level tracing is enabled, trace information appears only when you request a special page named TRace.axd. To enable application-level tracing, you need to add the web configuration file in Listing 1.22 to your application. Listing 1.22. Web.Config
After you add the Web.Config file in Listing 1.22 to your application, you can request the trace.axd page in your browser. The last 10 page requests made after application-level tracing is enabled are displayed (see Figure 1.17). Figure 1.17. Viewing application trace information.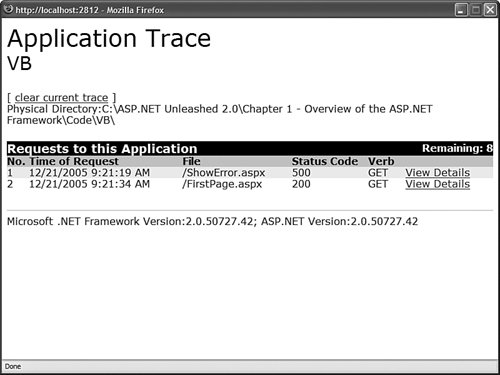 Warning By default, the trace.axd page cannot be requested from a remote machine. If you need to access the trace.axd page remotely, you need to add a localOnly="false" attribute to the trace element in the web configuration file. If you click the View Details link next to any of the listed page requests, you can view all the trace messages outputted by the page. Messages written with the trace.Warn() method are displayed by the trace.axd page even when page-level tracing is disabled. Note You can use the new writeToDiagnosticsTrace attribute of the trace element to write all trace messages to the Output window of Visual Web Developer when you run an application. You can use the new mostRecent attribute to display the last 10 page requests rather than the 10 page requests after tracing was enabled. |
- Structures, Processes and Relational Mechanisms for IT Governance
- Integration Strategies and Tactics for Information Technology Governance
- An Emerging Strategy for E-Business IT Governance
- A View on Knowledge Management: Utilizing a Balanced Scorecard Methodology for Analyzing Knowledge Metrics
- Technical Issues Related to IT Governance Tactics: Product Metrics, Measurements and Process Control