Advanced Site Map Configuration


This section explores several advanced features of Site Maps. For example, you learn how to display different SiteMap nodes, depending on the roles associated with the current user. You also learn how to create multiple Site Maps for a single application. Finally, you learn how you can extend Site Maps with custom attributes.

Using Security Trimming

You might want to display different navigation links to different users, depending on their roles. For example, if a user is a member of the Administrators role, you might want to display links to pages for administrating the website. However, you might want to hide these links from other users.

To display different links to different users depending on their roles, you must enable a feature of Site Maps named Security Trimming. This feature is disabled by default. The web configuration file in Listing 18.8 enables Security Trimming.

Listing 18.8. Web.Config

<?xml version="1.0"?> <configuration>   <system.web>     <authentication mode="Windows" />     <roleManager enabled="true" />     <siteMap defaultProvider="MySiteMapProvider">       <providers>         <add           name="MySiteMapProvider"           type="System.Web.XmlSiteMapProvider"           securityTrimmingEnabled="true"           siteMapFile="Web.sitemap" />       </providers>     </siteMap>   </system.web> </configuration> 

Notice that the configuration file in Listing 18.8 includes a <siteMap> element that configures a new SiteMapProvider named MySiteMapProvider. The new provider enables Security Trimming with its securityTrimmingEnabled property.

After you enable Security Trimming, any pages a user is not allowed to view are automatically hidden. For example, imagine that your website includes a folder named Admin that contains the web configuration file in Listing 18.9.

Listing 18.9. Web.Config

<?xml version="1.0"?> <configuration xmlns="http://schemas.microsoft.com/.NetConfiguration/v2.0"> <system.web>   <authorization>     <allow users="WebAdmin" />     <deny users="*" />   </authorization> </system.web> </configuration> 

The configuration file in Listing 18.9 prevents anyone who is not a member of the WebAdmin role from viewing pages in the same folder (and below) as the configuration file. Even if the Web.sitemap file includes nodes that represent pages in the Admin folder, the links don't appear for anyone except members of the WebAdmin role.

Another option is to explicitly associate roles with nodes in a Site Map. This is useful in two situations. First, if your website contains links to another website, then you can hide or display these links based on the user role. Second, if you explicitly associate roles with pages, then you hide page links even when a user has permission to view a page.

The Web.sitemap file in Listing 18.10 contains links to the Microsoft, Google, and Yahoo! websites. A different set of roles is associated with each link.

Listing 18.10. Web.sitemap

<?xml version="1.0" encoding="utf-8" ?> <siteMap xmlns="http://schemas.microsoft.com/AspNet/SiteMap-File-1.0" >   <siteMapNode     title="External Links"     description="Links to external Websites"     roles="RoleA,RoleB,RoleC">     <siteMapNode       title="Google"       url="http://www.Google.com"       description="The Google Website"       roles="RoleA" />     <siteMapNode       title="Microsoft"       url="http://www.Microsoft.com"       description="The Microsoft Website"       roles="RoleB" />     <siteMapNode       title="Yahoo"       url="http://www.Yahoo.com"       description="The Yahoo Website"       roles="RoleC" />   </siteMapNode> </siteMap> 

The page in Listing 18.11 enables you to add yourself and remove yourself from different roles. Notice that different links appear in the treeView control, depending on which roles you select.

Listing 18.11. ShowSecurityTrimming.aspx

[View full width]

<%@ Page Language="VB" %> <!DOCTYPE html PUBLIC "-//W3C//DTD XHTML 1.1//EN" "http://www.w3.org/TR/ xhtml11/DTD /xhtml11.dtd"> <script runat="server">     Sub Page_Load()         If Not Page.IsPostBack Then             For Each item As ListItem In cblSelectRoles.Items                 If Not Roles.RoleExists(item.Text) Then                     Roles.CreateRole(item.Text)                     Roles.AddUserToRole(User.Identity.Name, item.Text)                 End If             Next         End If     End Sub     Sub btnSelect_Click(ByVal sender As Object, ByVal e As EventArgs)         For Each item As ListItem In cblSelectRoles.Items             If item.Selected Then                 If Not User.IsInRole(item.Text) Then                     Roles.AddUserToRole(User.Identity.Name, item.Text)                 End If             Else                 If User.IsInRole(item.Text) Then                     Roles.RemoveUserFromRole(User.Identity.Name, item.Text)                 End If             End If         Next         Response.Redirect(Request.Path)     End Sub     Sub Page_PreRender()         For Each item As ListItem In cblSelectRoles.Items             item.Selected = User.IsInRole(item.Text)         Next     End Sub </script> <html xmlns="http://www.w3.org/1999/xhtml" > <head  runat="server">     <style type="text/css">         html         {             background-color:silver;         }         .column         {             float:left;             width:300px;             border:Solid 1px black;             background-color:white;             padding:10px;         }     </style>     <title>Show Security Trimming</title> </head> <body>     <form  runat="server">     <div >     <asp:Label                  Text="Select Roles:"         AssociatedControl         Runat="server" />     <br />     <asp:CheckBoxList                  Runat="server">         <asp:ListItem Text="RoleA" />         <asp:ListItem Text="RoleB" />         <asp:ListItem Text="RoleC" />     </asp:CheckBoxList>     <asp:Button                  Text="Select"         OnClick="btnSelect_Click"         Runat="server" />     </div>     <div >     <asp:TreeView                  DataSource         Runat="server" />     <asp:SiteMapDataSource                  Runat="server" />     </div>     </form> </body> </html> 

When you first open the page in Listing 18.11, the Page_Load() handler creates three rolesRoleA, RoleB, and RoleCand adds the current user to each role.

The CheckBoxList control in the body of the page enables you to select the roles that you want to join. Notice that different links to external websites appear, depending on which roles you select (see Figure 18.6).

Figure 18.6. Hiding Site Map nodes by user role.
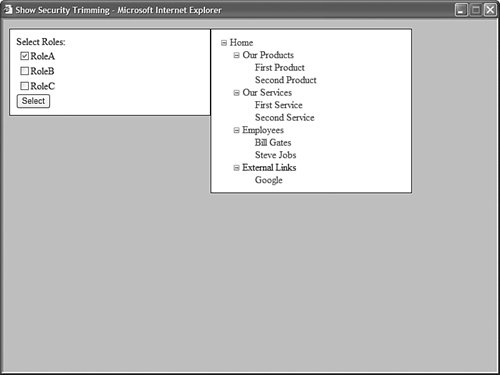

Merging Multiple Site Maps

To make it easier to manage a large application, you can store Site Maps in more than one location and merge the Site Maps at runtime. For example, if you are using the default SiteMapProviderthe XmlSiteMapProviderthen you can create multiple sitemap files that describe the navigation structure of different sections of your website.

For example, the Web.sitemap file in Listing 18.12 includes a node that points to another sitemap file.

Listing 18.12. Web.sitemap

<?xml version="1.0" encoding="utf-8" ?> <siteMap xmlns="http://schemas.microsoft.com/AspNet/SiteMap-File-1.0" > <siteMapNode   url="Default.aspx"   title="Home"   description="The Home Page">   <siteMapNode     url="Products/Default.aspx"     title="Our Products"     description="Products that we offer">     <siteMapNode       url="Products/FirstProduct.aspx"       title="First Product"       description="The description of the First Product" />     <siteMapNode       url="Products/SecondProduct.aspx"       title="Second Product"       description="The description of the Second Product" />   </siteMapNode>   <siteMapNode     url="Services"     title="Our Services"     description="Services that we offer">     <siteMapNode       url="Services/FirstService.aspx"       title="First Service"       description="The description of the First Service"       metaDescription="The first service" />     <siteMapNode       url="Services/SecondService.aspx"       title="Second Service"       description="The description of the Second Service" />   </siteMapNode>   <siteMapNode     siteMapFile="Employees/Employees.sitemap" /> </siteMapNode> </siteMap> 

The sitemap in Listing 18.12 includes the following node:

<siteMapNode siteMapFile="Employees/Employees.sitemap" />


This node includes a siteMapFile attribute that points to a sitemap located in the Employees subdirectory of the current application. The contents of the Employees.sitemap are automatically merged with the default Web.sitemap.

The Employees.sitemap is contained in Listing 18.13.

Listing 18.13. Employees/Employees.sitemap

<?xml version="1.0" encoding="utf-8" ?> <siteMap xmlns="http://schemas.microsoft.com/AspNet/SiteMap-File-1.0" >   <siteMapNode     url="Employees/Default.aspx"     title="Employees"     description="Contains descriptions of employees">     <siteMapNode       url="Employees/BillGates.aspx"       title="Bill Gates"       description="Bill Gates Page" />     <siteMapNode       url="Employees/SteveJobs.aspx"       title="Steve Jobs"       description="Steve Jobs Page" />   </siteMapNode> </siteMap> 

Notice that there is nothing special about the sitemap in Listing 18.13. It contains a description of the two pages in the Employees subdirectory.

This is a great feature for working with large websites. Each section of the website can be managed by a different developer. When the website is accessed by a user, the contents of the different sitemaps are seamlessly stitched together.

Note

You also can associate different SiteMapProviders with different nodes in a sitemap file by taking advantage of the provider attribute. For example, a Site Map might be stored in a database table for one section of your website and stored in an XML file for another section of your website.


Creating Custom Site Map Attributes

You can extend a Site Map with your own custom attributes. You can use a custom attribute to represent any type of information that you want.

For example, imagine that you want to associate <meta> Description tags with each page in your web application to make it easier for search engines to index your website. In that case, you can add a metaDescription attribute to the nodes in a Web.sitemap file.

The Web.sitemap file in Listing 18.14 includes metaDescription attributes for the two Services pages.

Listing 18.14. Web.sitemap

<?xml version="1.0" encoding="utf-8" ?> <siteMap xmlns="http://schemas.microsoft.com/AspNet/SiteMap-File-1.0" >   <siteMapNode     url="Default.aspx"     title="Home"     description="The Home Page">     <siteMapNode       url="Products/Default.aspx"       title="Our Products"       description="Products that we offer">       <siteMapNode         url="Products/FirstProduct.aspx"         title="First Product"         description="The description of the First Product" />       <siteMapNode         url="Products/SecondProduct.aspx"         title="Second Product"         description="The description of the Second Product" />     </siteMapNode>     <siteMapNode       url="Services/Default.aspx"       title="Our Services"       description="Services that we offer">       <siteMapNode         url="Services/FirstService.aspx"         title="First Service"         description="The description of the First Service"         metaDescription="The first service" />       <siteMapNode         url="Services/SecondService.aspx"         title="Second Service"         description="The description of the Second Service"         metaDescription="The second service"  />     </siteMapNode>   </siteMapNode> </siteMap> 

Visual Web Developer Note

Visual Web Developer displays blue squiggles (warning messages) under any custom attributes in a SiteMap file. You can safely ignore these warnings.


Any custom attributes that you add to a Site Map are exposed by instances of the SiteMapNode class. For example, the page in Listing 18.15 retrieves the value of the metaDescription attribute from the current node and displays the value in an actual <meta> tag.

Listing 18.15. Services/FirstService.aspx

[View full width]

<%@ Page Language="VB" %> <!DOCTYPE html PUBLIC "-//W3C//DTD XHTML 1.1//EN" "http://www.w3.org/TR/ xhtml11/DTD /xhtml11.dtd"> <script runat="server">     Private Sub Page_Load()         Dim meta As HtmlMeta = New HtmlMeta()         meta.Name = "Description"         meta.Content = SiteMap.CurrentNode("metaDescription")         head1.Controls.Add(meta)     End Sub </script> <html xmlns="http://www.w3.org/1999/xhtml" > <head  runat="server">     <title>First Service</title> </head> <body>     <form  runat="server">     <div>     <h1>The First Service</h1>     </div>     </form> </body> </html> 

After you open the page in Listing 18.15 in a web browser, you can select View, Source to see the <meta> tag added to the source of the page (see Figure 18.7).

Figure 18.7. Extending a Site Map with a <meta> tag.


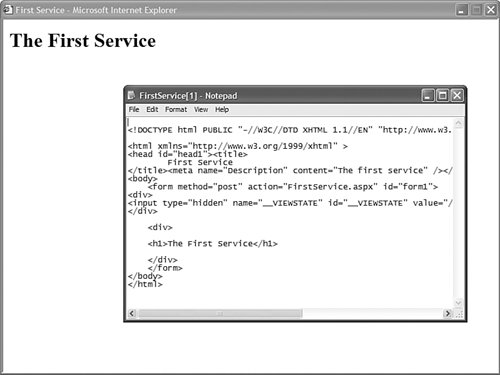
It is important emphasize that you can do anything you want with custom SiteMapNode attributes. You can represent page titles, section titles, product icons, or anything else with a custom attribute.


ASP. NET 2.0 Unleashed
ASP.NET 2.0 Unleashed
ISBN: 0672328232
EAN: 2147483647
Year: 2006
Pages: 276

flylib.com © 2008-2017.
If you may any questions please contact us: flylib@qtcs.net