Using ASP.NET Mobile Controls
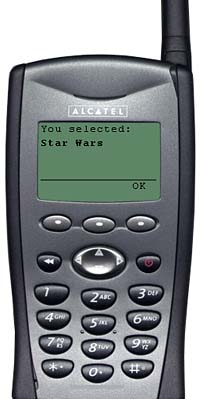
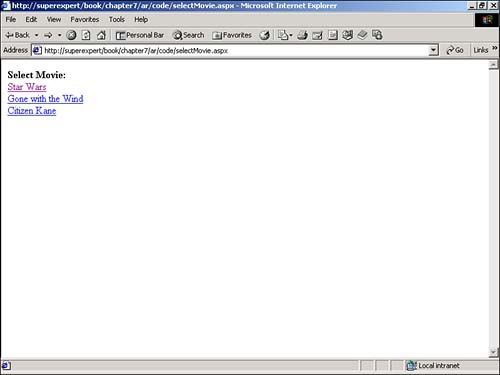
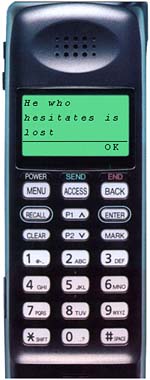
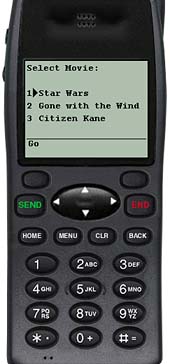
| The ASP.NET mobile controls were designed to be compatible with a wide variety of mobile devices. The controls will render WML 1.1, HTML 3.2, or XHTML content, depending on the device. NOTE The mobile controls also support cHTML (compact HTML). cHTML works with i-Mode devices, which are very popular in Japan. For example, if you request a page with a cell phone, the mobile controls will render WML- or XHTML-compliant content. If you request a page using a Palm Pilot or Pocket PC browser, HTML 3.2 content will be displayed. You can also display ASP.NET pages that contain mobile controls in Internet Explorer 6.0 (or higher). This is useful for debugging pages because full error messages can be displayed. NOTE In version 1.0 of the .NET Framework, you had to download a separate assembly to use the ASP.NET Mobile Controls. Now, with version 1.1, of the .NET Framework, the ASP.NET Mobile Controls have been integrated with the rest of the .NET Framework. You can use the mobile controls in a page by including the following page directive: <%@ Page Inherits="System.Web.UI.MobileControls.MobilePage" %> All pages that use the mobile controls must inherit from a Code-Behind page called System.Web.UI.MobileControls.MobilePage . Before you use the ASP.NET mobile controls, you'll need to make some configuration changes to your application. These are necessary to handle some of the limitations of mobile devices. First, you'll need to enable cookieless sessions. Not all mobile devices support browser cookies. In order for session state to work with these devices, you'll need to use cookieless sessions. Furthermore, unlike a normal ASP.NET page, a mobile page uses session state for storing view state (this is done to preserve bandwidth). Since some of the mobile controls depend on view state, you'll need to enable cookieless sessions in order for these controls to function correctly. A second change that you'll need to make involves the manner in which URLs are automatically generated. Some mobile devices require fully qualified URLs instead of relative URLs. You can enable both cookieless sessions and fully qualified URLs by adding the following Web.Config file to the root directory of your application: <configuration> <system.web> <httpRuntime useFullyQualifiedRedirectUrl="true" /> <sessionState cookieless="true" /> </system.web> </configuration> Creating Mobile FormsUnlike a normal ASP.NET page, a mobile page can contain more than one form. There is a good reason for this. Mobile devices typically have very slow connection speeds. If more than one form can be transferred to a mobile device at once, then response times when users navigate to different forms can be improved. The page in Listing 7.1 illustrates how to create a simple page that displays movie choices using the mobile controls. Listing 7.1 SelectMovie.aspx<%@ Page Inherits="System.Web.UI.MobileControls.MobilePage" %> <Mobile:Form runat="server" id="form1"> <b>Select Movie:</b><br/> <Mobile:Link runat="server" NavigateURL="#form2">Star Wars</Mobile:Link> <Mobile:Link runat="server" NavigateURL="#form3">Gone with the Wind</Mobile:Link> <Mobile:Link runat="server" NavigateURL="#form4">Citizen Kane</Mobile:Link> </Mobile:Form> <Mobile:Form runat="server" id="form2"> You selected: <b>Star Wars</b> </Mobile:Form> <Mobile:Form runat="server" id="form3"> You selected: <b>Gone with the Wind</b> </Mobile:Form> <Mobile:Form runat="server" id="form4"> You selected: <b>Citizen Kane</b> </Mobile:Form> The C# version of this code can be found on the CD-ROM. The page in Listing 7.1 contains four forms. The first form is a menu of three movie choices. Each choice is a link to one of the other three forms on the page. For example, if you click the Star Wars link, the mobile form labeled form2 is activated and the text "You selected: Star Wars" is displayed (see Figure 7.3). Figure 7.3. A simple mobile ASP.NET page displayed in a cell phone. Image courtesy Openwave Systems Inc. The page in Listing 7.1 will work with a number of mobile devices including devices that support XHTML, WML, cHTML or HTML 3.2. In addition to cell phones, the page in Listing 7.1 is compatible with Internet Explorer 6.0 (see Figure 7.4) and the Palm Pilot Web browser. Figure 7.4. A simple mobile ASP.NET page displayed in Internet Explorer 6.0. You should notice that each form is created with a mobile form tag. For example, the first form displayed by the page is created with the following tag: <Mobile:Form runat="server" id="form1"> ... </Mobile:Form> When you first open a mobile ASP.NET page, the first form in the page automatically becomes the active form. You can cause other forms to become active by linking to them or by modifying a page's ActiveForm property. The links in Listing 7.1 are created with the Link control. For example, a link to form3 is created with the following tag: <Mobile:Link runat="server" NavigateURL="#form3">Gone with the Wind</Mobile:Link> When the target of a link begins with the # character, the link activates the corresponding form on the page. This link activates form3 . Dynamically Activating a Mobile FormWhen you include multiple forms in a mobile control page, you can make any of the forms active by using the ActiveForm property. For example, the page in Listing 7.2 randomly displays one of three forms whenever the page is requested . Listing 7.2 ShowQuote.aspx<%@ Page Inherits="System.Web.UI.MobileControls.MobilePage" %> <Script Runat="Server"> Sub Page_Load Dim myRand As New Random Select Case myRand.Next( 3 ) Case 0 ActiveForm = form0 Case 1 ActiveForm = form1 Case 2 ActiveForm = form2 End Select End Sub </Script> <Mobile:Form runat="server" id="form0"> <i>Look before you leap!</i> </Mobile:Form> <Mobile:Form runat="server" id="form1"> <i>He who hesitates is lost</i> </Mobile:Form> <Mobile:Form runat="server" id="form2"> <i>The early bird gets the worm</i> </Mobile:Form> The C# version of this code can be found on the CD-ROM. The page in Listing 7.2 randomly displays one of three quotations (see Figure 7.5). Whenever the page is requested, the Page_Load subroutine is executed and one of the three forms in the page is activated. A form is activated using the ActiveForm property. Notice that the ActiveForm property does not take a string as its value. Because the value is a mobile form control, it does not appear within quotation marks. Figure 7.5. A random quotation displayed by a mobile form. Image courtesy Openwave Systems Inc. Displaying TextYou have three ways to display text in a mobile form control:
For example, if you simply need to display some bold text within a form, you can display the text like this: <%@ Page Inherits="System.Web.UI.MobileControls.MobilePage" %> <Mobile:Form runat="server"> Here is some text: <b>Hello World!</b> </Mobile:Form> If you want to display a small amount of text without any formatting, and you need to have programmatic access to the text, you can use a Label control. For example, the page in Listing 7.3 displays the phrase "Hello World!" in a Label control. Listing 7.3 Label.aspx<%@ Page Inherits="System.Web.UI.MobileControls.MobilePage" %> <Mobile:Form runat="server"> <Mobile:Label Runat="Server" /> Hello World! </Mobile:Label> </Mobile:Form> The C# version of this code can be found on the CD-ROM. One disadvantage of the Label control is that it cannot contain any HTML tags. You cannot use such tags as the <b> or <i> tags within a Label control. You'll receive an error if you try. The main advantage of a Label control is that you can modify the control's content within your code. For example, the page in Listing 7.4 displays the current date and time in a Label control. Listing 7.4 LabelDateTime.aspx<%@ Page Inherits="System.Web.UI.MobileControls.MobilePage" %> <Script runat="Server"> Sub Page_Load lblDateTime.Text = DateTime.Now() End Sub </Script> <Mobile:Form runat="server"> <Mobile:Label ID="lblDateTime" Runat="Server"/> </Mobile:Form> The C# version of this code can be found on the CD-ROM. If you need to programmatically assign text that contains HTML formatting to a control, you can use the TextView control. The TextView control can contain the following HTML tags:
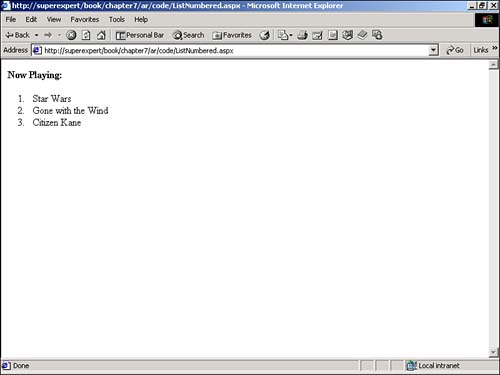
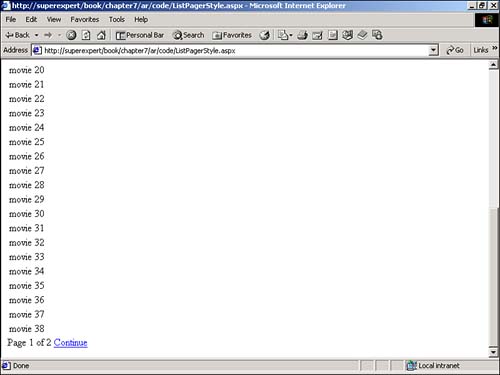
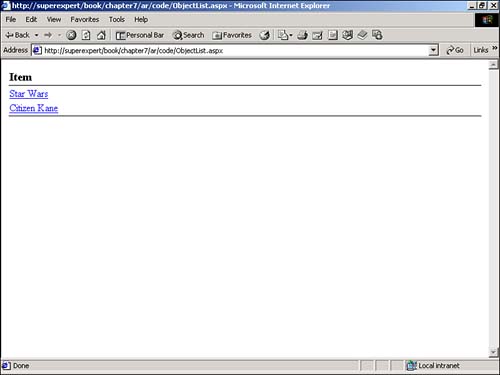
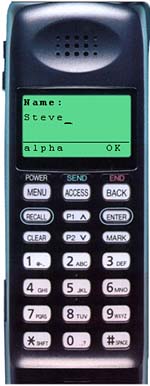
For example, the following declaration of a TextView control is perfectly valid: <Mobile:TextView runat="Server"> Here is some text: <b>Hello World!</b> </Mobile:TextView> Controlling Text Alignment and WrappingYou can control the alignment of the text in either a Label or TextView control by modifying the control's Alignment property. Possible values for Alignment are NotSet , Left , Center , and Right . The text displayed in the Label control in Listing 7.5 uses Center alignment. Listing 7.5 Alignment.aspx<%@ Page Inherits="System.Web.UI.MobileControls.MobilePage" %> <Mobile:Form runat="server"> <Mobile:Label Alignment="Center" Runat="Server"> Hello! </Mobile:Label> </Mobile:Form> The C# version of this code can be found on the CD-ROM. You can control the way that text word-wraps in either a Label or TextView control by modifying the control's Wrapping property. Possible values for the Wrapping property are NotSet , Wrap , and NoWrap . If you set the Wrapping property to NoWrap , then the lines of text contained in a form are not automatically wrapped to a new line. For example, the page in Listing 7.6 contains a long line of text in a form with wrapping disabled. When used with the OpenWave emulator, a long line of text will continue to scroll across the screen, creating a marquee effect. Listing 7.6 Wrapping.aspx<%@ Page Inherits="System.Web.UI.MobileControls.MobilePage" %> <Mobile:Form runat="server"> <Mobile:TextView Wrapping="NoWrap" Runat="Server"> This is a line of text that goes off the side of the page because it is very long </Mobile:TextView> </Mobile:Form> The C# version of this code can be found on the CD-ROM. Displaying ListsIncluded with the mobile controls is a List control that enables you to display lists of items. Imagine, for example, that you need to display a list of movies currently playing at a movie theater. Listing 7.7 demonstrates how you can display a list of information using the List mobile control. Listing 7.7 CurrentMovies.aspx<%@ Page Inherits="System.Web.UI.MobileControls.MobilePage" %> <Mobile:Form runat="server"> <b>Now Playing:</b> <br/> <Mobile:List runat="Server"> <Item Text="Star Wars" /> <Item Text="Gone with the Wind" /> <Item Text="Citizen Kane" /> </Mobile:List> </Mobile:Form> The C# version of this code can be found on the CD-ROM. The List control is used in Listing 7.7 to display a list of three movies. When the page is opened in a device that supports HTML 3.2 or XHTML, the list is displayed within an HTML table. When displayed in a WML-compatible device, each list item is automatically separated by <br/> tags. You can modify the manner in which each list item is displayed by changing the List control's Decoration property. This property can have the value None , Bulleted , or Numbered . For example, the page in Listing 7.8 displays the three movies in a numbered list. Listing 7.8 ListNumbered.aspx<%@ Page Inherits="System.Web.UI.MobileControls.MobilePage" %> <Mobile:Form runat="server"> <b>Now Playing:</b> <br/> <Mobile:List Decoration="Numbered" Runat="Server"> <Item Text="Star Wars" /> <Item Text="Gone with the Wind" /> <Item Text="Citizen Kane" /> </Mobile:List> </Mobile:Form> The C# version of this code can be found on the CD-ROM. Figure 7.6 illustrates how the Decoration property modifies the appearance of a list on Internet Explorer 6.0. Figure 7.6. Setting Decoration to Numbered on Internet Explorer 6.0. NOTE Currently, the Decoration property only affects how a page is rendered in an HTML or XHTML-compatible device. The Decoration property is ignored when rendering WML content. Binding a List to a Data SourceYou can bind a List control to a data source such as a database table or an ArrayList collection. For example, if you were really creating a page that displays a list of movies, you would most likely retrieve the list of movies from a database table rather than include a static list of movies. We cover data binding in detail in Chapter 10, "Binding Data to Web Controls." However, I'll include a quick example using mobile controls here. The page in Listing 7.9 demonstrates how you can bind a List control named movies to an ArrayList collection named myArrayList . Listing 7.9 ListBinding.aspx<%@ Page Inherits="System.Web.UI.MobileControls.MobilePage" %> <Script Runat="Server"> Sub Page_Load Dim colArrayList As New ArrayList colArrayList.Add( "Star Wars" ) colArrayList.Add( "Gone with the Wind" ) colArrayList.Add( "Citizen Kane" ) lstMovies.DataSource = colArrayList lstMovies.DataBind() End Sub </Script> <Mobile:Form runat="server"> <b>Now Playing:</b> <br/> <Mobile:List ID="lstMovies" Runat="Server"/> </Mobile:Form> The C# version of this code can be found on the CD-ROM. In the Page_Load subroutine, an ArrayList collection is created and bound to the List control named lstMovies . When DataBind is called, the items in the List control are populated from the items in ArrayList . Paging Through a ListIf you want to display a list that contains a lot of items, you can divide the list into multiple pages. When you enable paging for a form that contains a list, Next and Previous links are automatically created at set intervals in the list. For example, the List control in Listing 7.10 displays 50 movies (named movie 1, movie 2, and so on). Because the Mobile Form's Paginate property has the value True , the list items are divided into multiple pages. Listing 7.10 ListPaginate.aspx<%@ Page Inherits="System.Web.UI.MobileControls.MobilePage" %> <Script Runat="Server"> Sub Page_Load Dim colArrayList As New ArrayList Dim intCounter As Integer For intCounter = 1 to 50 colArrayList.Add( "movie " & intCounter.ToString() ) Next lstMovies.DataSource = colArrayList lstMovies.DataBind() End Sub </Script> <Mobile:Form Paginate="true" runat="server"> <b>Now Playing:</b> <br/> <Mobile:List ID="lstMovies" Runat="Server"/> </Mobile:Form> The C# version of this code can be found on the CD-ROM. You can control the user interface displayed for paging through a form by setting properties of the PagerStyle element. For example, if you want to display a page number that indicates the current page, you can do this by displaying the value of the PageLabel property of the PagerStyle element. If you want to specify the text used for the next and previous page links, you can set the value of the NextPageText and PreviousPageText properties (see Figure 7.7). The page in Listing 7.11 illustrates how to set all three of these properties in a form. Listing 7.11 ListPagerStyle.aspx <%@ Page Inherits="System.Web.UI.MobileControls.MobilePage" %> <Script Runat="Server"> Sub Page_Load Dim colArrayList As New ArrayList Dim intCounter As Integer For intCounter = 1 to 50 colArrayList.Add( "movie " & intCounter.ToString() ) Next lstMovies.DataSource = colArrayList lstMovies.DataBind() End Sub </Script> <Mobile:Form Paginate="True" PagerStyle-PageLabel="Page {0} of {1}" PagerStyle-NextPageText="Continue" PagerStyle-PreviousPageText="Back" Runat="server"> <b>Now Playing:</b> <br/> <Mobile:List ID="lstMovies" Runat="Server"/> </Mobile:Form> The C# version of this code can be found on the CD-ROM. Figure 7.7. Controlling pagination style. Creating Interactive ListsYou can also use the List control to display a list of choices. The choices appear as links when displayed in WML, XHTML or HTML devices. NOTE As an alternative to the List control, you can use the SelectionList control to render an interactive list. The SelectionList control, unlike the List control, supports selecting multiple items at a time. For example, the page in Listing 7.12 uses the List control to display a list of movie choices. Listing 7.12 ListLinks.aspx<%@ Page Inherits="System.Web.UI.MobileControls.MobilePage" %> <Script runat="Server"> Sub List_ItemCommand( s As object, e As ListCommandEventArgs ) lblMovie.Text = e.ListItem.Text ActiveForm = form2 End Sub </Script> <Mobile:Form runat="server" id="form1"> <b>Select Movie:</b><br/> <Mobile:List OnItemCommand="List_ItemCommand" Runat="Server"> <Item text="Star Wars"/> <Item text="Gone with the Wind"/> <Item text="Citizen Kane"/> </Mobile:List> </Mobile:Form> <Mobile:Form runat="server" id="form2"> <b>You selected:</b> <br/> <Mobile:Label ID="lblMovie" Runat="Server"/> </Mobile:Form> The C# version of this code can be found on the CD-ROM. When a List control has an event handler, each list item is displayed as a link (see Figure 7.8). In Listing 7.12, the OnItemCommand method associates the List_ItemCommand subroutine with the ItemCommand event. When you click any of the movie links, the ItemCommand event is raised and the List_ItemCommand subroutine is executed. Figure 7.8. Displaying a list of links. Image courtesy Openwave Systems Inc. The List_ItemCommand subroutine retrieves the value of the Text property of the selected item and assigns the text to a Label control named lblMovie . Next, the List_ItemCommand subroutine activates form2 , so that the Label control is displayed. Individual list items can have distinct Text and Value properties. The Text property is always displayed when an item is displayed and the Value property is hidden. You can use the Value property to pass additional information when an item is selected. For example, in Listing 7.13, the Value property is used to pass the category of each movie. Listing 7.13 ListValue.aspx<%@ Page Inherits="System.Web.UI.MobileControls.MobilePage" %> <Script runat="Server"> Sub List_ItemCommand( s As object, e As ListCommandEventArgs ) lblMovie.Text = e.ListItem.Text lblMovieCategory.Text = e.ListItem.Value ActiveForm = form2 End Sub </Script> <Mobile:Form runat="server" id="form1"> <b>Select Movie:</b><br/> <Mobile:List OnItemCommand="List_ItemCommand" Runat="Server"> <Item text="Star Wars" value="scifi"/> <Item text="Gone with the Wind" value="romance"/> <Item text="Citizen Kane" value="drama"/> </Mobile:List> </Mobile:Form> <Mobile:Form runat="server" id="form2"> <b>You selected:</b> <br/> <Mobile:Label ID="lblMovie" Runat="Server"/> <br/> <b>Category:</b> <br/> <Mobile:Label ID="lblMovieCategory" Runat="Server"/> </Mobile:Form> The C# version of this code can be found on the CD-ROM. Each of the three items contained in the List control in Listing 7.13 has both a Text and a Value property. When an item is selected, the ItemCommand event is raised and the List _ ItemCommand subroutine is executed. This subroutine assigns the value of the Text property to a Label control named lblMovie and the value of the Value property to a Label control named lblMovieCategory . Creating Object ListsOne significant limitation of the List control is that it enables you to select only one option for each item in the list. You click a list item and something happens. Imagine, however, that you need to display multiple options for each list item. For example, when displaying a list of movies, you might want the user to be able to view the description of the movie or buy a ticket for the movie. In other words, you might want two options associated with each list item. To create more complicated lists, you need to use the ObjectList control instead of the List control. The ObjectList control is similar to the List control in that it enables you to display a list of links. However, unlike the List control, the ObjectList control enables you to associate multiple commands with each link. Also, unlike the List control, the ObjectList control requires you to bind the list to a data source. NOTE Data binding is discussed in Chapter 10, "Binding Data to Web Controls." The page in Listing 7.14 illustrates how you can use the ObjectList control to associate multiple commands with each list item. Listing 7.14 ObjectList.aspx<%@ Page Inherits="System.Web.UI.MobileControls.MobilePage" %> <Script Runat="Server"> Sub Page_Load Dim colArrayList As New ArrayList If Not Page.IsPostBack Then colArrayList.Add( "Star Wars" ) colArrayList.Add( "Citizen Kane" ) lstMovies.Datasource = colArrayList lstMovies.Databind() End If End Sub Sub ObjectList_ItemCommand( s As Object, e As ObjectListCommandEventArgs ) If e.CommandName = "Buy" Then ActiveForm = frmBuyTicket Else ActiveForm = frmShowDesc End If End Sub </Script> <Mobile:Form id="displayMovies" runat="Server"> <Mobile:ObjectList ID="lstMovies" OnItemCommand="ObjectList_ItemCommand" Runat="Server"> <Command Name="Buy" Text="Buy" /> <Command Name="Desc" Text="Desc" /> </Mobile:ObjectList> </Mobile:Form> <Mobile:Form id="frmShowDesc" runat="Server"> <b>Great Movie!</b> </Mobile:Form> <Mobile:Form id="frmBuyTicket" runat="Server"> <b>Buy Ticket!</b> </Mobile:Form> The C# version of this code can be found on the CD-ROM. The ObjectList control in Listing 7.14 is bound to an ArrayList collection named colArrayList . This ArrayList collection consists of movie titles. Within the ObjectList control, two Command controls are declared. The first command is labeled Buy , and the second command is labeled Desc . If you select a movie title or you select either of the two commands, the ObjectList_ItemCommand subroutine is executed. When the page in Listing 7.14 is displayed, each list item is rendered as a link (see Figure 7.9). When you click a link, the page in Figure 7.10 is displayed. Figure 7.9. Displaying ObjectList links. Figure 7.10. Output of ObjectList after clicking link. Unlike the List control, the ObjectList control can display multiple fields from a data source. For example, you can bind an ObjectList to a database table that contains movieTitle , movieCat , and ticketPrice columns and displays all these columns by using the ObjectList . The ObjectList in Listing 7.15 is bound to an ArrayList collection. Each item in the ArrayList collection is an instance of a class defined within the page named the Movie class (we need to create a class so that we can represent multiple fields for each item in the ArrayList collection). The Movie class has movieTitle , movieCat , and ticketPrice properties. When you select an item in the ObjectList , the values of all three of the properties are displayed. Listing 7.15 ObjectListMultiple.aspx<%@ Page Inherits="System.Web.UI.MobileControls.MobilePage" %> <Script Runat="Server"> Public class Movie Private _movieTitle, _movieCat, _ticketPrice As String ReadOnly Property movieTitle As String Get Return _movieTitle End Get End Property ReadOnly Property movieCat As String Get Return _movieCat End Get End Property ReadOnly Property ticketPrice As String Get Return _ticketPrice End Get End Property Sub New( movieTitle As String, _ movieCat As String, _ ticketPrice As String ) _movieTitle = movieTitle _movieCat = movieCat _ticketPrice = ticketPrice End Sub End Class Sub Page_Load Dim colArrayList As New ArrayList If Not Page.IsPostBack Then colArrayList.Add( new Movie( "Star Wars", "SciFi", ".98" ) ) colArrayList.Add( new Movie( "Citizen Kane", "Drama", ".00" ) ) lstMovies.Datasource = colArrayList lstMovies.Databind End If End Sub Sub ObjectList_ItemCommand( s As Object, e As ObjectListCommandEventArgs ) ActiveForm = frmSelectMovie End Sub </Script> <Mobile:Form id="frmDisplayMovies" runat="Server"> <Mobile:ObjectList id="lstMovies" AutoGenerateFields="False" LabelField="movieTitle" OnItemCommand="ObjectList_ItemCommand" Runat="Server"> <Field DataField="movieTitle" Title="Movie" /> <Field DataField="movieCat" Title="Category" /> <Field DataField="ticketPrice" Title="Price" /> </Mobile:ObjectList> </Mobile:Form> <Mobile:Form id="frmSelectMovie" runat="Server"> <b>Movie Selected!</b> </Mobile:Form> The C# version of this code can be found on the CD-ROM. Creating Text BoxesEntering text into most mobile devices is a cumbersome experience. For example, entering large amounts of text with a cell phone's numeric keypad is close to impossible . In most cases, you should enable users to make choices with the List controls discussed in the previous section. However, there are certain circumstances in which you have no choice but to force the users of your application to enter text. For example, you might need the user to enter a password, a phone number, or some other type of data that cannot be selected from a list. In these situations, you will need to use the mobile TextBox control. The mobile TextBox control is similar to the ASP.NET TextBox control. However, it does not support multiline input. All text must be entered into a single line (see Figure 7.11). Figure 7.11. Entering text on a cell phone. Image courtesy Openwave Systems Inc. The page in Listing 7.16 illustrates how you can use the TextBox control. The first mobile form contains two mobile TextBox controls: one for a contact name and one for a contact phone. A Command control is used to enable the user to submit the form. When the Command control is clicked, the Command_Click subroutine is executed and the second Mobile Form is displayed. This form simply redisplays the values entered into the txtContactName and txtContactPhone TextBox controls. Listing 7.16 TextBox.aspx<%@ Page Inherits="System.Web.UI.MobileControls.MobilePage" %> <Script Runat="Server"> Sub Command_Click( s As Object, e As EventArgs ) lblContactName.Text = txtContactName.Text lblContactPhone.Text = txtContactPhone.Text ActiveForm = frmDisplayContact End Sub </Script> <Mobile:Form id="frmAddContact" runat="Server"> <b>Name:</b> <Mobile:Textbox ID="txtContactName" Runat="Server"/> <br/> <b>Phone:</b> <Mobile:Textbox ID="txtContactPhone" Runat="Server"/> <br/> <Mobile:Command Text="Submit!" OnClick="Command_Click" Runat="Server" /> </Mobile:Form> <Mobile:Form id="frmDisplayContact" runat="Server"> <b>You Entered:</b> <br/> <Mobile:Label ID="lblcontactName" Runat="Server"/> <br/> <Mobile:Label ID="lblContactPhone" Runat="Server"/> </Mobile:Form> The C# version of this code can be found on the CD-ROM. Displaying Different TextBox TypesThe mobile TextBox control has two properties, Numeric and Password , that indicate the type of information that can be entered into the text box. The Password value works with HTML, XHTML, and WML clients . The Numeric value is unique to WML devices. When the Password property is assigned the value True , any text entered into the text box is hidden (typically, the asterisk character is used to echo each character entered). When the Numeric property is assigned the value True , and the text box is rendered on a WML device, only numerals can be entered into the text box. The page in Listing 7.17 illustrates how to use both of these properties. The first TextBox control, labeled txtUsername , has the default values for Password and Numeric (False). The txtUsername TextBox control can accept any text input. The second TextBox control, labeled txtPassword , will hide any text entered into it. The final TextBox control, labeled txtPIN , accepts only numeric values when rendered on a WML device. When rendered on an HTML device, a Numeric TextBox control behaves like a normal text box. Listing 7.17 TextBoxTypes.aspx<%@ Page Inherits="System.Web.UI.MobileControls.MobilePage" %> <Mobile:Form id="frmAddContact" runat="Server"> <b>User Name:</b> <Mobile:Textbox ID="txtUsername" Runat="Server"/> <br/> <b>Password:</b> <Mobile:Textbox ID="txtPassword" Password="True" Runat="Server"/> <br/> <b>PIN:</b> <Mobile:Textbox ID="txtPIN" Numeric="True" Runat="Server"/> </Mobile:Form> The C# version of this code can be found on the CD-ROM. Validating User InputAll the ASP.NET Validation controls are shadowed in the mobile controls. For each of the ASP.NET Validation controls, there is a corresponding Mobile Validation control. The six Mobile Validation controls are detailed in the following list:
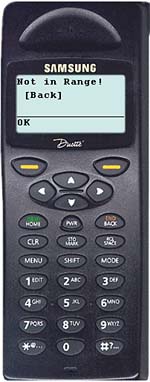
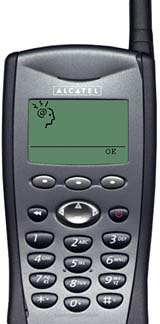
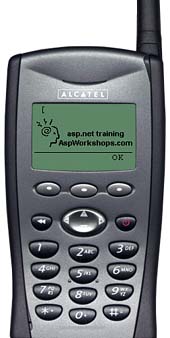
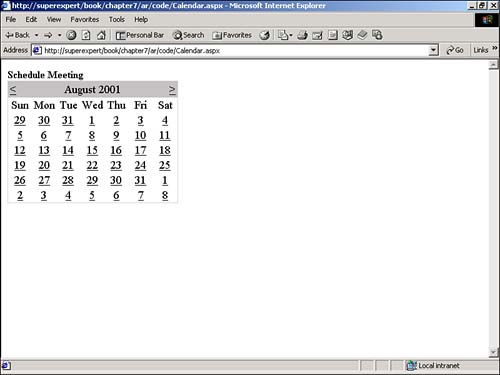
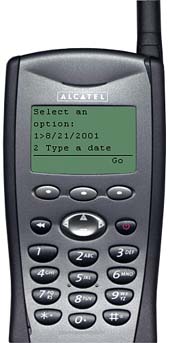
NOTE To learn more about the standard ASP.NET Validation controls, see Chapter 3, "Performing Form Validation with Validation Controls." These Mobile Validation controls work almost, but not exactly, like the standard Validation controls. First, unlike the standard Validation controls, the Mobile Validation controls do not use client-side JavaScript to display error messages. Error messages are not automatically displayed as you move from TextBox control to TextBox control. Furthermore, the Mobile ValidationSummary control behaves differently than the standard ASP.NET ValidationSummary control. The Mobile ValidationSummary control is typically placed in a separate form and has a property named FormToValidate that indicates the form against which to perform validation. The page in Listing 7.18 illustrates how to use the Mobile RequiredFieldValidator , RangeValidator , and ValidationSummary Validation controls. Listing 7.18 Validation.aspx<%@ Page Inherits="System.Web.UI.MobileControls.MobilePage" %> <Script Runat="Server"> Sub Command_Click( s As Object, e As EventArgs ) If Not isValid Then ActiveForm = frmBad Else ActiveForm = frmGood End If End Sub </Script> <Mobile:Form id="frmInput" runat="Server"> <b>Enter a number between 3 and 12:</b> <Mobile:Textbox ID="txtNumber" Runat="Server"/> <Mobile:RequiredFieldValidator ErrorMessage="Input Required!" ControlToValidate="txtNumber" Runat="Server" /> <Mobile:RangeValidator ErrorMessage="Not in Range!" ControlToValidate="txtNumber" Type="Integer" MinimumValue="3" MaximumValue="12" Runat="Server" /> <Mobile:Command Text="Submit!" OnClick="Command_Click" Runat="Server"/> </Mobile:Form> <Mobile:Form id="frmBad" runat="Server"> <Mobile:ValidationSummary formToValidate="frmInput" Runat="Server" /> </Mobile:Form> <Mobile:Form id="frmGood" runat="Server"> <i>Good Job!</i> </Mobile:Form> The C# version of this code can be found on the CD-ROM. The first form in Listing 7.18 contains a mobile TextBox control. Both RequiredFieldValidator and RangeValidator Mobile Validation controls are associated with the TextBox control. The RequiredFieldValidator Validation control is used to check whether a value has been entered into the control. The RangeValidator Validation control is used to ensure that the entered value is between 3 and 12. When you submit the form, the Command_Click subroutine executes. If the IsValid property is not true, there is an error in the form. In that case, the second form is displayed. This form contains a ValidationSummary control that displays all the validation errors (see Figure 7.12). Figure 7.12. Displaying a Validation Summary. Image courtesy Openwave Systems Inc. If there are no validation errors, the third form is displayed, which simply displays the message "Good Job!" . Displaying ImagesDisplaying images is a complicated proposition when it comes to mobile devices. The problem is that there are several different incompatible image formats that mobile devices support. Most Web browsers support GIF and JPEG image files. Many mobile devices, on the other hand, only support BMP or WBMP. The mobile controls need to support all these formats. Microsoft's solution to this problem is elegant ”a Mobile Image control. The Image control can detect different devices and display the proper image file format for the detected device. The page in Listing 7.19 illustrates how the Image control can be used with multiple devices. Listing 7.19 Image.aspx<%@ Page Inherits="System.Web.UI.MobileControls.MobilePage" %> <Mobile:Form runat="Server"> <Mobile:Image ImageUrl="myImage.gif" AlternateText="myImage" Runat="Server"> <DeviceSpecific> <Choice Filter="PrefersBmp" ImageURL="myImage.bmp" /> <Choice Filter="PrefersWBmp" ImageURL="myImage.bmp" /> </DeviceSpecific> </mobile:Image> </Mobile:Form> The C# version of this code can be found on the CD-ROM. By default, the Image control in Listing 7.19 displays the myImage.gif image. However, the Image control also contains a <DeviceSpecific> tag. When a device that prefers a BMP image requests the page, a BMP image is displayed instead of the GIF image. NOTE The <DeviceSpecific> element makes use of a filter section in the Web.Config file. (This Web.Config file is included on the CD-ROM.) For more information on the <DeviceSpecific> element, see the last section of this chapter, "Creating Cross-Device-Compatible Mobile Pages." When a WML-compatible cell phone is detected, a BMP image is displayed (see Figure 7.13). When an Internet Explorer 6.0 browser or XHTML-compatible cell phone is detected, a GIF image is displayed. Figure 7.13. Image displayed in a cell phone. Image courtesy Openwave Systems Inc. NOTE You have to create an image in each of the formats. The Image control isn't smart enough to generate the different image types for you. If a device does not support any of the image formats, text is displayed instead. This alternative text is specified by the AlternateText property of the Image control. Placing Phone CallsOne interesting thing you can do with mobile controls that you cannot do in a normal ASP.NET page is place phone calls. When you use the PhoneCall control with a device such as a cell phone, the control enables you to place a call. When the PhoneCall control is used with a device that doesn't support placing phone calls, such as Internet Explorer, either a label or link is displayed. You can use the PhoneCall control to automatically call a phone number in a list of contacts. Or, you can imagine adding a customer service number to your mobile application. The page in Listing 7.20 illustrates how to use the PhoneCall control. Listing 7.20 Call.aspx<%@ Page Inherits="System.Web.UI.MobileControls.MobilePage" %> <Mobile:Form runat="Server"> <Mobile:PhoneCall Text="Call Information" PhoneNumber="411" Runat="Server" /> </Mobile:Form> The C# version of this code can be found on the CD-ROM. Displaying Advertisements with Mobile ControlsThe Mobile controls include an AdRotator control that corresponds to the standard ASP.NET AdRotator control. The mobile AdRotator control displays links on WML devices and images on HTML devices. Like the standard AdRotator control, the mobile AdRotator control uses an external XML file to list the banner advertisements that it displays. The XML file is contained in Listing 7.21. Listing 7.21 myAds.xml<Advertisements> <Ad> <ImageUrl>ad1.gif</ImageUrl> <BmpImageUrl>ad1.bmp</BmpImageUrl> <NavigateUrl>http://www.AspWorkshops.com</NavigateUrl> <AlternateText>Click here for ASP.NET Training!</AlternateText> <Impressions>60</Impressions> </Ad> <Ad> <ImageUrl>ad2.gif</ImageUrl> <BmpImageUrl>ad2.bmp</BmpImageUrl> <NavigateUrl>http://www.superexpert.com</NavigateUrl> <AlternateText> Click here to visit superexpert.com! </AlternateText> <Impressions>60</Impressions> </Ad> </Advertisements> The C# version of this code can be found on the CD-ROM. This advertisement file contains two banner advertisements. The ImageURL , TargetURL , and AlternateText , as well as the relative number of impressions to display are declared for both banner advertisements. Notice that two images are specified for each advertisement. A GIF image is contained in the ImageUrl tag and a BMP image is contained in the BmpImageUrl and WBmpImageUrl tag. After you have created an advertisement file, you can use the file with the mobile AdRotator control by setting the AdRotator control's AdvertisementFile property. This is illustrated in Listing 7.22. Listing 7.22 AdRotator.aspx<%@ Page Inherits="System.Web.UI.MobileControls.MobilePage" %> <Mobile:Form runat="Server"> <Mobile:AdRotator AdvertisementFile="myAds.xml" Runat="Server"> <DeviceSpecific> <Choice Filter="PrefersBmp" ImageKey="BmpImageUrl"/> <Choice Filter="PrefersWBmp" ImageKey="WBmpImageUrl"/> </DeviceSpecific> </Mobile:AdRotator> </Mobile:Form> The C# version of this code can be found on the CD-ROM. The output of Listing 7.22 is displayed in Figure 7.14. The AdRotator control in Listing 7.22 uses the DeviceSpecific tag to display the appropriate image for different devices. This page depends on the Filter section declared in the Web.Config file. (This _ Web.Config file is included on the CD-ROM that accompanies this book.) Figure 7.14. Displaying a banner advertisement. Image courtesy Openwave Systems Inc. Displaying Calendars with Mobile ControlsThe mobile controls include a Calendar control that corresponds to the standard ASP.NET Calendar control. You can use the Calendar control to select particular days, weeks, or months. It's useful for performing such activities as scheduling meetings and appointments. When the Mobile Calendar control is displayed in an HTML or XHTML-compatible device, a full calendar is rendered on the screen (see Figure 7.15). When the Calendar control is displayed in a WML device, you have a couple of options for selecting the date (see Figure 7.16). For example, you can select a date by typing the date or you can go through a series of menus and select a date without ever pressing a single number key. Figure 7.15. Calendar control displayed in Internet Explorer 6.0. Figure 7.16. Calendar control displayed in cell phone. Image courtesy Openwave Systems Inc. The page in Listing 7.23 illustrates how to add a mobile Calendar control to a form. Listing 7.23 Calendar.aspx<%@ Page Inherits="System.Web.UI.MobileControls.MobilePage" %> <Script Runat="Server"> Sub Calendar_SelectionChanged( s As Object, e As EventArgs ) lblDate.Text = calSchedule.SelectedDate ActiveForm = frmResults End Sub </Script> <Mobile:Form runat="Server"> <b>Schedule Meeting</b> <br/> <Mobile:Calendar ID="calSchedule" OnSelectionChanged="Calendar_SelectionChanged" Runat="Server" /> </Mobile:Form> <Mobile:Form id="frmResults" runat="Server"> <i>You selected:</i> <br/> <Mobile:Label ID="lblDate" Runat="Server" /> </Mobile:Form> The C# version of this code can be found on the CD-ROM. When the page in Listing 7.23 is opened, you can select a date. Once a date is selected, the Calendar_SelectionChanged subroutine is executed and the selected date is displayed in the second form. |

EAN: 2147483647
Pages: 263