Exposing Web Controls in User Controls
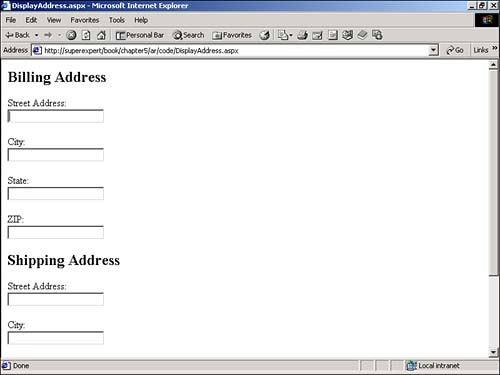
Exposing Web Controls in User ControlsA user control can contain both HTML and Web controls. For example, you can place multiple Web Form controls in a user control and expose them as a single control. Why would you want to use controls this way? Imagine that you need to display the same group of Web controls over and over again in different pages at your Web site. For example, many forms contain multiple form fields for address information. You can build a single Web control that contains all the necessary form fields and use the control whenever you need to request address information. The user control in Listing 5.10 illustrates how you can create one control for address information. Listing 5.10 Address.ascx<p>Street Address: <br> <asp:TextBox ID="txtStreet" Runat="Server" /> <p>City: <br> <asp:TextBox ID="txtCity" Runat="Server" /> <p>State: <br> <asp:TextBox ID="txtState" Runat="Server" /> <p>ZIP: <br> <asp:TextBox ID="txtZIP" Runat="Server" /> The C# version of this code can be found on the CD-ROM. After you create the address user control, you can use it in multiple forms, or you can even use it multiple times in the same form. The page in Listing 5.11 uses the address control twice, once for the shipping address and once for the billing address (see Figure 5.3). Listing 5.11 DisplayAddress.aspx<%@ Register TagPrefix="SuperCompany" TagName="Address" Src="Address.ascx" %> <html> <head><title>DisplayAddress.aspx</title> <body> <form Runat="Server"> <h2>Billing Address</h2> <SuperCompany:Address ID="ctlBillingAddress" Runat="Server" /> <h2>Shipping Address</h2> <SuperCompany:Address ID="ctlShippingAddress" Runat="Server" /> <p> <asp:Button Text="Submit" Runat="Server" /> </form> </body> </html> The C# version of this code can be found on the CD-ROM. Figure 5.3. Displaying multiple address forms with a single user control. Notice how both address controls are declared within the form contained in Listing 5.11. You should never declare a form within the user control itself. Instead, you should always create the form in the page that contains the user control. Now that you have added the address controls to the page, you need a method of accessing the values of the form fields from within the containing page. For example, you might want to submit the customer's shipping and billing address information to a database table. Retrieving the values of the address form fields is more difficult than you might think. The TextBox controls for the address form fields are located within the user control. You cannot access the properties of these controls outside the user control. For example, you cannot read the Text property of the TextBox control named txtCity directly from the containing page. To retrieve the values from the TextBox controls within the address user control, you need to add properties to the user control that expose the properties of the form controls. The page contained in Listing 5.12 illustrates how you can create the necessary properties. Listing 5.12 AddressProperties.ascx<Script Runat="Server"> Public Property Street As String Get Return txtStreet.Text End Get Set txtStreet.Text = Value End Set End Property Public Property City As String Get Return txtCity.Text End Get Set txtCity.Text = Value End Set End Property Public Property State As String Get Return txtState.Text End Get Set txtState.Text = Value End Set End Property Public Property ZIP As String Get Return txtZIP.Text End Get Set txtZIP.Text = Value End Set End Property </Script> <p>Street Address: <br> <asp:TextBox ID="txtStreet" Runat="Server" /> <p>City: <br> <asp:TextBox ID="txtCity" Runat="Server" /> <p>State: <br> <asp:TextBox ID="txtState" Runat="Server" /> <p>ZIP: <br> <asp:TextBox ID="txtZIP" Runat="Server" /> The C# version of this code can be found on the CD-ROM. The modified version of the address user control in Listing 5.12 uses property accessor functions to expose the properties of the TextBox controls. Each property on the page is declared with both Get and Set functions. When you read a property, the Get function is called, and when you set a property, the Set function is called. The Street property, for example, acts as a proxy for the Text property of the TextBox control named txtStreet . The Street property is declared as follows : Public Property Street As String Get Return txtStreet.Text End Get Set txtStreet.Text = Value End Set End Property When you read the Street property, the Street 's Get function retrieves the correct value from the Text property of the TextBox control named txtStreet . When you set the Street property, the Street 's Set function sets the Text property of the TextBox control. After you create proxy properties for each control contained within the user control, you can access the address information from the containing page. The page contained in Listing 5.13 illustrates how you can do so. Listing 5.13 DisplayAddressProperties.aspx<%@ Register TagPrefix="SuperCompany" TagName="Address" Src="AddressProperties.ascx" %> <Script Runat="Server"> Sub Button_Click( s As Object, e As EventArgs ) lblOutput.Text = "<h2>You entered the following values:</h2>" lblOutput.Text &= "<b>Billing Address:</b>" lblOutput.Text &= "<li> Street: " & ctlBillingAddress.Street lblOutput.Text &= "<li> City: " & ctlBillingAddress.City lblOutput.Text &= "<li> State: " & ctlBillingAddress.State lblOutput.Text &= "<li> ZIP: " & ctlBillingAddress.ZIP lblOutput.Text &= "<p>" lblOutput.Text &= "<b>Shipping Address:</b>" lblOutput.Text &= "<li> Street: " & ctlShippingAddress.Street lblOutput.Text &= "<li> City: " & ctlShippingAddress.City lblOutput.Text &= "<li> State: " & ctlShippingAddress.State lblOutput.Text &= "<li> ZIP: " & ctlShippingAddress.ZIP End Sub </Script> <html> <head><title>DisplayAddressProperties.aspx</title> <body> <form Runat="Server"> <h2>Billing Address</h2> <SuperCompany:Address ID="ctlBillingAddress" Runat="Server" /> <h2>Shipping Address</h2> <SuperCompany:Address ID="ctlShippingAddress" Runat="Server" /> <p> <asp:Button Text="Submit" OnClick="Button_Click" Runat="Server" /> <p> <asp:Label ID="lblOutput" Runat="Server" /> </form> </body> </html> The C# version of this code can be found on the CD-ROM. When you click the Submit button on the page contained in Listing 5.13, the Button_Click subroutine is executed. This subroutine displays the values of the properties of the shipping and billing address user controls within a Label control. Creating a proxy property for every TextBox control in a user control can be a long and tedious process. For example, if a user control contains 20 form fields, you would have to create 20 properties. Instead of creating a separate property for each control, you can create one property that represents the values of all the controls. The page in Listing 5.14 illustrates how you would do so. Listing 5.14 AddressHashTable.ascx<Script Runat="Server"> Public ReadOnly Property Values As HashTable Get Dim colHashTable As New HashTable Dim ctlControl As Control Dim txtTextBox As TextBox For each ctlControl in Controls If TypeOf ctlControl Is TextBox Then txtTextBox = ctlControl colHashTable.Add( txtTextBox.ID, txtTextBox.Text ) End If Next Return colHashTable End Get End Property </Script> <p>Street Address: <br> <asp:TextBox ID="Street" Runat="Server" /> <p>City: <br> <asp:TextBox ID="City" Runat="Server" /> <p>State: <br> <asp:TextBox ID="State" Runat="Server" /> <p>ZIP: <br> <asp:TextBox ID="ZIP" Runat="Server" /> The C# version of this code can be found on the CD-ROM. The address user control in Listing 5.14 returns the values of the TextBox controls in a HashTable . The user control has a single read-only property named Values . In the Get function of the Values property, a HashTable is constructed by looping through all the TextBox controls. NOTE A HashTable is a collection of key and value pairs. The HashTable collection is covered in detail in Chapter 24, "Working with Collections and Strings." To retrieve the TextBox control values in the containing page, you must read the values from the HashTable returned by the Values property. The page in Listing 5.15 retrieves and displays each value from the HashTable returned by the user control. The values of the ctlShippingAddress are retrieved by name . The values of the ctlBillAddress are retrieved within a For...Each loop. Listing 5.15 DisplayAddressHashTable.aspx<%@ Register TagPrefix="SuperCompany" TagName="Address" Src="AddressHashTable.ascx" %> <Script Runat="Server"> Sub Button_Click( s As Object, e As EventArgs ) Dim objItem As Object ' Show Billing Information lblOutput.Text = "<h2>You entered the following values:</h2>" lblOutput.Text &= "<b>Billing Address:</b>" lblOutput.Text &= "<li> Street: " & ctlBillingAddress.Values( "Street" ) lblOutput.Text &= "<li> City: " & ctlBillingAddress.Values( "City" ) lblOutput.Text &= "<li> State: " & ctlBillingAddress.Values( "State" ) lblOutput.Text &= "<li> ZIP: " & ctlBillingAddress.Values( "ZIP" ) lblOutput.Text &= "<p>" ' Show Shipping Information lblOutput.Text &= "<b>Shipping Address:</b>" For Each objItem in ctlShippingAddress.Values lblOutput.Text &= "<li> " & objItem.Key & ": " & objItem.Value Next End Sub </Script> <html> <head><title>DisplayAddressHashTable.aspx</title> <body> <form Runat="Server"> <h2>Billing Address</h2> <SuperCompany:Address ID="ctlBillingAddress" Runat="Server" /> <h2>Shipping Address</h2> <SuperCompany:Address ID="ctlShippingAddress" Runat="Server" /> <p> <asp:Button Text="Submit" OnClick="Button_Click" Runat="Server" /> <p> <asp:Label ID="lblOutput" Runat="Server" /> </form> </body> </html> The C# version of this code can be found on the CD-ROM. |
EAN: 2147483647
Pages: 263