Sending Email from an ASP.NET Page
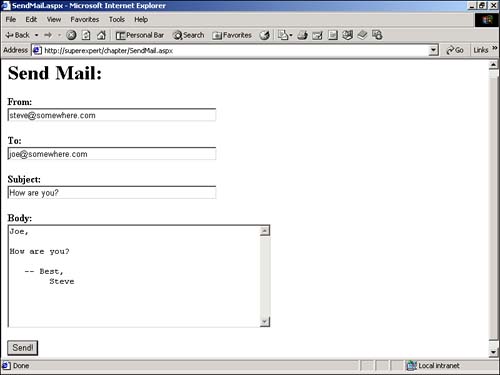
| There are several situations in which you will need to send email messages from your ASP.NET applications. For example, you might want to send a confirmation message to a new user after the user has registered. Or, you might want to automatically send a document to a user as a mail attachment. The ASP.NET Framework includes two classes for sending email: the SmtpMail class and the MailMessage class. These classes were designed to work with the local Microsoft SMTP Service (included as a component of Windows 2000 and Windows XP Professional) or any other email server on your network. In the following sections, you'll be provided with an overview of the Microsoft SMTP Service. Next , you'll learn how to send a simple email message with the SMTP Service. Finally, more advanced topics, such as sending email with attachments and sending HTML email are discussed. The Microsoft SMTP ServiceThe Microsoft SMTP Service does the basic job of sending and retrieving email in accordance with the Simple Mail Transport Protocol (SMTP). In some ways it is very limited. The service does not support the Post Office Protocol (POP). This means that you cannot use the service to create mailbox accounts for multiple users or retrieve email from the service using an email client, such as Outlook or Eudora. If you need to create a full-blown email system that goes beyond support for basic SMTP, you will need to invest in additional software, such as Microsoft Exchange Server or Software.com's Post.Office (see http://www.software.com). On the positive side, the Microsoft SMTP Service is valuable for sending automated messages from your Web site. The service can support sending thousands of email messages a day. For example, you can use it to send automatic notification messages to the users of your Web site. Configuring the Microsoft SMTP ServiceTo check whether the SMTP Service is installed and running on your server, open the Internet Services Manager and see whether an icon labeled Default SMTP Virtual Server is listed beneath the name of your server (see Figure 26.1). If the service is installed but not running, start the service by selecting Action, Start. Figure 26.1. The Default SMTP Virtual Server. A single computer can have multiple SMTP Virtual Servers. Each SMTP Virtual Server is identified by an IP address and domain name. An SMTP Virtual Server can contain one default local domain and zero or more alias domains. When the SMTP Service is installed, a single default local domain is created. The name of the default local domain determines how the service delivers messages. If the service receives an email message that is addressed to the same domain as the default local domain, it is delivered locally; otherwise , the service attempts to send it somewhere else. NOTE The name of the default local domain is determined by the name designated on the DNS tab for the TCP/IP protocol in the Network application in the Control Panel. You can create multiple SMTP Virtual Servers on the same server. This is useful when you need to host completely different Web sites on the same computer. Each SMTP Virtual Server can handle email sent to different IP addresses or domain names . To create a new SMTP Virtual Server, right-click on the icon labeled Default SMTP Virtual Server and choose New, Virtual Server. Finally, you can optionally create alias domains for a single SMTP Virtual Server. Alias domains are useful when your Web site has multiple domain names that point to the same site. When an email message is sent to an alias domain, the message is treated as if it were sent to the default local domain. To create an alias domain, right-click on the icon labeled Domains and choose New, Domain. These additional alias domains must all share the same IP address and Drop directory (see the next section, "How the Microsoft SMTP Service Works") as the default local domain. You can monitor the performance of the SMTP Service by examining its log files. By default, the service keeps a log of its activity in the \WINNT\System32\LogFiles directory. This directory can be changed by clicking the SMTP Virtual Server's property sheet and editing the entry labeled Log File Directory. You can open and examine the SMTP Service's log files in any standard text editor such as Notepad. How the Microsoft SMTP Service WorksFrom a user's perspective, the SMTP Service is a simple component. The service uses two main directories, named Pickup and Drop, to process email. Both of these directories are located, by default, under the InetPub\MailRoot directory. The Pickup directory is used to send email. The service constantly monitors the Pickup directory for new email messages. Whenever it finds an email message, the service attempts to send it. If the service is unable to immediately deliver the message, it is kept in the Queue directory while the service attempts to keep delivering the message. If the email message cannot be delivered and cannot be returned to the sender, the message is moved to the Badmail directory. The Drop directory is used to receive email. When email messages are received by the SMTP Service, the service writes out the messages to the Drop directory. It doesn't do anything else with them; they just stay there. Again, the Microsoft SMTP Service does not support multiple mailboxes. The email messages in these two directories are nothing more than text files. For example, you can send an email message by opening Notepad, entering the following text, and saving the file in the Pickup directory ( Inputpub\mailroot\pickup ): To: Webmaster@Superexpert.com From: someone@somewhere.com Subject: Testing SMTP Service Here is the message! As soon as you save the file, the file should disappear from the Pickup directory because the SMTP Service is attempting to send it. In theory, you could use the classes from the System.IO namespace from within your ASP.NET pages to write messages to the Pickup directory and send email (see Chapter 25, "Working with the File System"). In practice, however, this is not a good strategy. You can send email more reliably and easily by using the SmtpMail and MailMessage classes. Sending a Simple Email MessageYou can use the SmtpMail class to send an email message from within an ASP.NET page with a single line of code. To send an email with the SmtpMail class, use the Send method: SmtpMail.Send( _ "jane@somewhere.com", _ "webmaster@Superexpert.com", _ "Testing Mail!", _ "Just sending a test message!" ) This statement sends an email message from jane@somewhere.com to webmaster@Superexpert.com. The subject of the message is Testing Mail! and the body of the message is Just sending a test message! . NOTE Both the SmtpMail and MailMessage classes are found in the System.Web.Mail namespace. Before you can use these classes, you must import the System.Web.Mail namespace into your page. By default, the SmtpMail class uses the local email server to send email messages. You can use another email server on your network by setting the shared SmtpServer property of the SmtpMail class before sending a message. For example, to use the email server located at MyEmailServer.com, you would use the statement: SmtpMail.SmtpServer = "MyEmailServer.com" The ASP.NET page in Listing 26.1 contains a simple form that enables you to send any email message (see Figure 26.2). Listing 26.1 SendMail.aspx<%@ Import Namespace="System.Web.Mail" %> <Script runat="Server"> Sub Button_Click( s As Object, e As EventArgs ) SmtpMail.Send( _ mailfrom.Text, _ mailto.Text, _ mailsubject.Text, _ mailbody.Text ) End Sub </Script> <html> <head><title>SendMail.aspx</title></head> <body> <h1>Send Mail:</h1> <form runat="Server"> <b>From:</b> <br> <asp:TextBox ID="mailfrom" Columns="50" Runat="Server" /> <p> <b>To:</b> <br> <asp:TextBox ID="mailto" Columns="50" Runat="Server" /> <p> <b>Subject:</b> <br> <asp:TextBox ID="mailsubject" Columns="50" Runat="Server" /> <p> <b>Body:</b> <br> <asp:TextBox ID="mailbody" TextMode="Multiline" Columns="50" Rows="10" Runat="Server" /> <p> <asp:Button Text="Send!" OnClick="Button_Click" Runat="Server" /> </form> </body> </html> The C# version of this code can be found on the CD-ROM. Figure 26.2. Sending email from a form. When you submit the form in Listing 26.1, the Button_Click subroutine executes. This subroutine grabs all the values entered into the form fields and sends an email message with those values. NOTE If you are sending a long message, you will probably need to include line breaks in the message body. By default, an email message does not use HTML, so you cannot use the <BR> or <P> HTML tags to create a line break. To create a line break, use the Visual Basic constant, vbCRLF , which adds a carriage return and line feed. Using the MailMessage ClassAs shown in the previous section, you can use the Send method of the SmtpMail class to send simple email messages. However, if you need to set particular properties of an email message, then you'll need to create an instance of the MailMessage class. The MailMessage class has the following properties:
For example, imagine that you need to send a high-priority email message to Jane@ yourcompany. com and you want to send a blind carbon copy of the message to your supervisor at supervisor@ yourcompany . com . You could send this message with the following statements: Dim objMailMessage As MailMessage objMailMessage = New MailMessage objMailMessage.From = "you@yourcompany.com" objMailMessage.To = "jane@yourcompany.com" objMailMessage.Subject = "Meeting location changed!" objMailMessage.Body = "The meeting will be in the Salmon room" objMailMessage.Priority = MailPriority.High objMailMessage.Bcc = "supervisor@yourcompany.com" SmtpMail.Send( objMailMessage ) First, an instance of the MailMessage class is created and several of its properties are set. Next, the MailMessage is sent with the Send method of the SmtpMail class. Adding Attachments to an Email MessageYou can attach one or more files to an email message by using the MailAttachment class. The MailAttachment class represents a particular email attachment. This class has the following two properties:
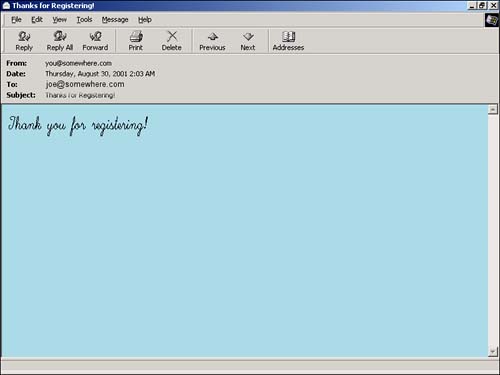
You can set these properties on an instance of the MailAttachment class. Alternatively, and more conveniently, you can specify the Filename and Encoding parameters when initializing the class through its constructor like this: objMailMessage = New MailAttachment( "c:\somefile.zip" ) or objMailMessage = New MailAttachment( "c:\somefile.zip", MailEncoding.UUEncode ) The first statement initializes an instance of the MailAttachment class with the path to a file. The second statement initializes an instance of the MailAttachment class with both a path to a file and an encoding format. For example, the ASP.NET page in Listing 26.2 attaches a Microsoft Word document named BizPlan.doc to an email message. Listing 26.2 SendAttachment.aspx<%@ Import Namespace="System.Web.Mail" %> <% Dim objMailMessage As MailMessage Dim objMailAttachment As MailAttachment ' Create the Mail Attachment objMailAttachment = New MailAttachment( "c:\BizPlan.doc" ) ' Create the Mail Message objMailMessage = New MailMessage objMailMessage.From = "you@somewhere.com" objMailMessage.To = "joe@somewhere.com" objMailMessage.Subject = "Secret Business Plan" objMailMessage.Body = "Here's the plan (don't show it to anyone!)" objMailMessage.Attachments.Add( objMailAttachment ) ' Send the Mail Message SmtpMail.Send( objMailMessage ) %> BizPlan Sent! The C# version of this code can be found on the CD-ROM. When you execute the ASP.NET page in Listing 26.2, the BizPlan.doc file is emailed to joe@somewhere.com. Sending HTML EmailBy default, the SmtpMail class sends email messages as plain text. However, you also have the option to send the body of an email as HTML. If you send an email as an HTML message, then you can include HTML formatting and images in the body of the message. CAUTION Not all email clients support HTML email messages. Even worse , some email clients support some HTML tags and not others. To send an HTML email, set the BodyFormat property of the MailMessage class like this: objMailMessage.BodyFormat = MailFormat.Html The page in Listing 26.3 illustrates how to send an HTML email. Listing 26.3 SendHtml.aspx<%@ Import Namespace="System.Web.Mail" %> <% Dim objMailMessage As MailMessage Dim strHTMLBody As String ' Create the HTML Message Body strHTMLBody = "<html><head>" & _ "<title>Thank You!</title>" & _ "</head><body bgcolor=lightblue>" & _ "<font face=Script size=6>" & _ "Thank you for registering!" & _ "</font></body></html>" ' Create the Mail Message objMailMessage = New MailMessage objMailMessage.From = "you@somewhere.com" objMailMessage.To = "joe@somewhere.com" objMailMessage.Subject = "Thanks for Registering!" objMailMessage.Body = strHTMLBody objMailMessage.BodyFormat = MailFormat.HTML ' Send the Mail Message SmtpMail.Send( objMailMessage ) %> HTML Email Sent! The C# version of this code can be found on the CD-ROM. When you request the ASP.NET page in Listing 26.3, an email message containing a light blue background and a script type face is sent (see Figure 26.3). Figure 26.3. Sending HTML email. Writing text with HTML formatting can be messy. Listing 26.3 created a string variable named strHTMLBody that contained the entire HTML for the body of the message. There is a better way to work with HTML in the ASP.NET Framework. You can manipulate HTML with the HtmlTextWriter . NOTE To learn more about the HtmlTextWriter , see Chapter 28, "Developing Custom Controls." The page in Listing 26.4 illustrates how you can use the HtmlTextWriter to more cleanly build the body of an HTML message. Listing 26.4 HtmlTextWriter.aspx<%@ Import Namespace="System.Web.Mail" %> <%@ Import Namespace="System.IO" %> <% Dim objMailMessage As MailMessage Dim swHtmlBody As StringWriter Dim twTextWriter As HtmlTextWriter swHtmlBody = New StringWriter twTextWriter = New HtmlTextWriter( swHtmlBody ) twTextWriter.RenderBeginTag( "html" ) twTextWriter.RenderBeginTag( "head" ) twTextWriter.RenderBeginTag( "title" ) twTextWriter.Write( "Thank You!" ) twTextWriter.RenderEndTag twTextWriter.RenderEndTag twTextWriter.AddAttribute( "bgcolor", "lightblue" ) twTextWriter.RenderBeginTag( "body" ) twTextWriter.AddAttribute( "face", "Script" ) twTextWriter.AddAttribute( "size", "6" ) twTextWriter.RenderBeginTag( "font" ) twTextWriter.WriteLine( "Thank you for registering!" ) twTextWriter.RenderEndTag twTextWriter.RenderEndTag twTextWriter.RenderEndTag ' Create the Mail Message objMailMessage = New MailMessage objMailMessage.From = "you@somewhere.com" objMailMessage.To = "joe@somewhere.com" objMailMessage.Subject = "Thanks for Registering!" objMailMessage.Body = swHtmlBody.ToString objMailMessage.BodyFormat = MailFormat.HTML ' Send the Mail Message SmtpMail.Send( objMailMessage ) %> HTML Email Sent! The C# version of this code can be found on the CD-ROM. Using Links and Images in HTML EmailWhen including images or links in an HTML email, you must specify the link as an absolute path ”otherwise, the email client won't have enough information to find the proper Web site. In other words, you must use an address like this: http://www.yourdomain.com/somedir/thepage.aspx rather than the shorter relative address: /somedir/thepage.aspx You can get around this limitation by using the UrlContentBase and UrlContentLocation properties of the MailMessage class. If you assign an absolute URL to the UrlContentLocation property, then all URLs in the body of the message are interpreted relative to that URL. For example, if you assign a value to the UrlContentLocation property like this: objMailMessage.UrlContentLocation = "http://www.yourdomain.com/images/" then you can use the following IMG tag in the body of the email message: <img src="aspnet.gif"> The path of the image specified in the IMG tag would be resolved to: http://www.yourdomain.com/images/aspnet.gif If you assign a relative URL to the UrlContentLocation property, then you must also assign a value to the UrlContentBase property. The combined values of the UrlContentLocation and UrlContentBase properties would be used to construct an absolute URL. The page in Listing 26.5 demonstrates how you can send an image and resolve the location of the image with the UrlContentLocation property. Listing 26.5 SendImage.aspx<%@ Import Namespace="System.Web.Mail" %> <%@ Import Namespace="System.IO" %> <% Dim objMailMessage As MailMessage Dim swHTMLBody As StringWriter Dim twTextWriter As HtmlTextWriter swHTMLBody = New StringWriter twTextWriter = New HtmlTextWriter( swHTMLBody ) twTextWriter.RenderBeginTag( "html" ) twTextWriter.RenderBeginTag( "head" ) twTextWriter.RenderBeginTag( "title" ) twTextWriter.Write( "Thank You!" ) twTextWriter.RenderEndTag twTextWriter.RenderEndTag twTextWriter.AddAttribute( "bgcolor", "lightblue" ) twTextWriter.RenderBeginTag( "body" ) twTextWriter.AddAttribute( "src", "aspnet.gif" ) twTextWriter.RenderBeginTag( "img" ) twTextWriter.RenderEndTag twTextWriter.RenderEndTag twTextWriter.RenderEndTag ' Create the Mail Message objMailMessage = New MailMessage objMailMessage.From = "you@somewhere.com" objMailMessage.To = "joe@somewhere.com" objMailMessage.Subject = "Here's the image!" objMailMessage.Body = swHTMLBody.ToString objMailMessage.BodyFormat = MailFormat.HTML objMailMessage.UrlContentLocation = "http://www.yourdomain.com/" ' Send the Mail Message SmtpMail.Send( objMailMessage ) %> Image Sent! The C# version of this code can be found on the CD-ROM. In Listing 26.5, an image named aspnet.gif is included in the body of the email message. Because the UrlContentLocation property is set, the absolute path to the image on the origin Web site can be resolved ( http://www.yourdomain.com/aspnet.gif ). |

EAN: 2147483647
Pages: 263