Hack43.Connect a Phone Line Using an FXO Gateway
Hack 43. Connect a Phone Line Using an FXO Gateway
The easiest way to interface Asterisk to a standard phone linelike the traditional phone line in most homesis by using a telephone media gateway. There are essentially two ways to connect a traditional, non-IP phone devicebe it an analog phone, a digital phone interface, or a telephone lineto the Asterisk system. The first way is via the Zaptel telephony framework, a driver standard that permits telephony interfaces to be used with Asterisk. (Oddly, Zaptel's inventor, Jim Dixon, named his creation after the early 20th century Mexican revolutionary, Emilano Zapata.) Zaptel engineering is a very deep subject that warrants its own hack [Hack #44], and even its own book (such as O'Reilly's Asterisk: The Future of Telephony), so we're going to start with the other way of connecting non-IP phone devices to Asterisk: via media gateways. Once you've got this down, you can move on to the wonderful world of Zaptel. A media gateway is a device that offloads the responsibility of hardware interfacing from the server. It converts non-IP signaling into VoIP signaling and vice versa. Media gateways don't need driver frameworks like Zaptel to support connecting phone lines or other legacy technology. They come ready to install on the network, with no software to compile. Just plug, configure, and go. Connecting legacy phones and phone lines to Asterisk via a media gateway is decidedly easier than using Zaptel, so that's the route we're taking here. The analog telephone adapter (ATA) pictured in Figure 1-1 of "Get Connected" [Hack #1] is a media gateway, since its job is to connect an analog phone to a VoIP service provider's SIP server over the Internet. In this case, though, we want to do the reverse of that. We want to connect a telephone company line to our own server. We'll do it using a Clipcomm CG-200 media gateway, an inexpensive, Korean-made gateway that supports connecting up to two phone lines (the CG-400 supports up to four). When complete, the phone line, connected to the media gateway, will be answered automatically by the Asterisk server, and a greeting message will be played for the caller. 4.4.1. Configure the GatewayThe Clipcomm CG-200 and CG-400 are similar to other phone media gateways: they provide an Ethernet interface (or two) and two or more FXO ports that each allow you to connect a telephone line. But unlike some other gateway hardware, the Clipcomm has a fantastic web-based configuration interface, as shown in Figure 4-2. Figure 4-2. The Clipcomm's web-based configuration interface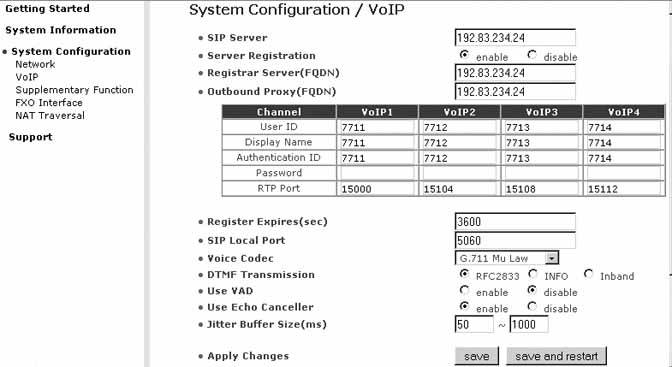 Let's assume you've already set up the TCP/IP basics on your Asterisk server machine and on your media gateway. Make sure you can ping back and forth between them, too. Then, accessing the VoIP configuration page on the Clipcomm, enter the Asterisk server's IP address into the SIP Server field. Enable SIP Registration and enter the Asterisk server's IP address again into the Registrar and Outbound Proxy fields. This will cause the media gateway's SIP client to register with the Asterisk server.
Now, you'll need to tell the media gateway what credentials (username and password) to use for each phone line you're going to be "passing through" to the Asterisk server. If you're just connecting a single line, you need only establish credentials for VoIP1. (VoIP2, VoIP3, and VoIP4 correspond to the second, third, and fourth phone lines you can connect.) The User ID tends to be a phone number. When this User ID is dialed by a caller, it signifies that this SIP endpoint should be called. This differs from the Authentication ID, which is used to register the SIP endpoint with the Asterisk server. Authentication ID and User ID needn't be the same, but they often are. In this case, we've chosen 7711 for both. This is the number we'll use later with Asterisk to handle calls to and from the phone line that's connected to this media gateway. Click the Save and Restart command button to reboot the media gateway. Then click Supplementary Function. This will pull up a page similar to the one in Figure 4-3. Figure 4-3. The Clipcomm's supplementary function configuration page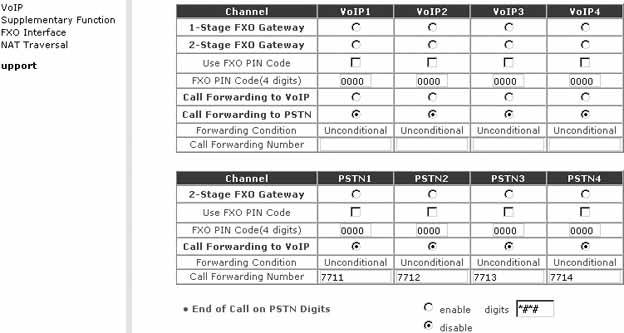 On this page, you can see the FXO channels that correspond to the VoIP channels. They're called PSTN1, PSTN2, etc., and they represent the two or four RJ11 jacks on the gateway's back panel. To get incoming calls from the attached phone line to be forwarded automatically to the SIP server on the Asterisk machine, click the radio button under PSTN1, labeled Call Forwarding to VoIP. Now, when calls come into the Clipcomm from the phone-company line, they'll be answered automatically, and the Clipcomm will attempt to route them through to the Asterisk server. Don't forget to save this configuration.
4.4.2. Configure an Asterisk SIP Peer for the GatewayAsterisk refers to SIP endpoints as SIP peers, and it uses /etc/asterisk/sip.conf to establish settings for them: everything from usernames and passwords to basic audio preferences. Our objective here is to establish a SIP peer configuration for the media gateway we've just configured. So, using your favorite text editor, add the following to your sip.conf file: [7711] caller <200> canreinvite=no context=default dtmfmode=rfc2833 host=dynamic port=5060 type=friend username=7711 Notice how the bracketed heading and the username setting of 7711 match the media gateway's User ID and Authentication ID settings, respectively. 4.4.3. Make Asterisk Answer AutomaticallyNow, save sip.conf and open up /etc/asterisk/extensions.conf. This file tells Asterisk what to do whenever a user dials a phone number. It contains the "dial plan" that guides the system-wide call-handling functionality of the Asterisk server. In the [default] section of the file, comment everything out and add these lines: exten => s,1,Answer exten => s,2,Playback(abandon-all-hope) exten => s,3,Hangup Save the file and launch (or relaunch) Asterisk: # asterisk -rx reload Now, calling the phone number of the line connected to the media gateway will result in the call being answered by the Asterisk server. You'll hear a voice message, and then the call will be hung up. |

EAN: 2147483647
Pages: 156