Customizing Web Site Shapes
|
When you generate a site map, you can select the shapes you want to represent the elements and links that Visio finds as well as the extensions and protocols that will be included. You can specify different shapes for any extension or protocol.
Adding Shapes to a Web Site Map
The quickest way to create a new Web site shape is to drag an existing one from the stencil onto the drawing page and then edit it. The Web site shapes are groups for which subselection behavior has been disabled. If you want to edit one of these shapes, it’s easiest to open the group by selecting the shape and then choosing Edit, Open <Shape Name>. For example, to edit the Graphic shape, select the shape, and then choose Edit, Open Graphic. Visio opens a drawing page for the group, as Figure 15-13 shows, so you can more easily select and edit the shapes that make up the group. When you have made the changes you want, close the window for the group’s drawing page.
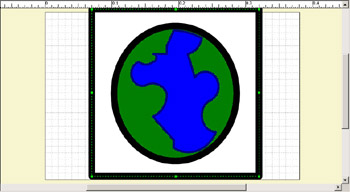
Figure 15-13: When you open a group for editing, Visio displays the group on its own drawing page.
| Tip | Edit text for Web site shapes To change the text in a shape’s label, right-click the shape, choose Configure Hyperlink, type new text in the Description box, and then click OK. |
| Cross-Reference | For details about editing groups, see “Working with Groups,” page 668. |
Adding Web Site Shapes to the Model
You can drag shapes from the Web Site Map Shapes stencil to your site map to prototype new sections of your site or to provide details that Visio did not include. These shapes won’t appear in the List and Filter windows, because they aren’t part of the model that Visio generated. However, you can add shapes to the model simply by specifying an address in the Hyperlinks dialog box, as Figure 15-14 shows.
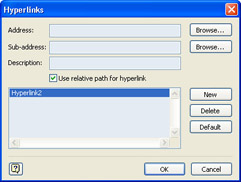
Figure 15-14: To add a new shape to the model of your map, right-click the shape, choose Configure Hyperlinks, and then specify an address.
Follow these steps to add a shape to the Web site model:
-
Right-click a shape, and then choose Configure Hyperlinks.
-
In the Address box, type a URL or file path that includes the name of the link, such as demo.htm. If you want, specify a specific page or anchor in the Sub-Address box. To add a label to the shape other than the address, type in the Description box. Click OK.
-
To connect thae shape to other shapes in your site map, click the Connector tool on the Standard toolbar, and then draw a line from the originating link to the new shape.
Locating a Shape in a Site Map
You can use the List and Filter windows to locate shapes in a diagram. When you right-click an item in either window, you can choose Show On Page to select the shape that represents the item, as Figure 15-15 shows.

Figure 15-15: Right-click an item in the List window to locate the shape in the site map that represents that item. The same right-click technique works in the Filter window, too.
| Tip | Double-click an item in the List or Filter window to select the shape associated with it, and pan the site map to the selected shape. |
|
EAN: 2147483647
Pages: 209