Installing Visio 2003
|
Microsoft recommends that you first uninstall any previous versions of Visio before installing Visio 2003 to prevent potential conflicts between the programs. This step is not entirely necessary—the Setup program can uninstall previous versions, or you can choose to retain a previous version of Visio.
| Caution | Before installing Visio 2003, uninstall any beta versions of Visio. |
Step 1: Start Setup
To install Visio on an individual computer, first exit all other programs, including e-mail and virus detection programs. Insert the Visio 2003 CD-ROM into the computer’s CD-ROM drive and then wait for the Setup program to start and display the first screen, as Figure A-1 shows. If the Setup program does not start automatically, click Start, choose Run, and then in the Run dialog box, type d:\Setup and click OK (or type the drive letter for your CD-ROM drive).
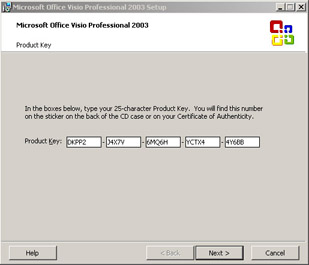
Figure A-1: To proceed with the Setup program, you must type the 25-character product key into the boxes of this screen.
If you provide the correct product key and click Next, the Setup program displays the license agreement, which you must agree to before you can proceed. Select the I Accept The Terms In The License Agreement check box at the bottom of the screen, and then click Next. Fill in your personal data, such as name, on the next screen.
Step 2: Choosing Your Installation Type
On the next screen, as shown in Figure A-2, you choose your type of installation. The Typical Install option is recommended and installs the options most users need. Selecting Complete Install installs all Visio 2003 files and selecting Minimal Install installs the minimum files that you need to run the program. With a minimal install, you can install the files that you need the first time that you run them. A custom install lets you install the files that you choose.
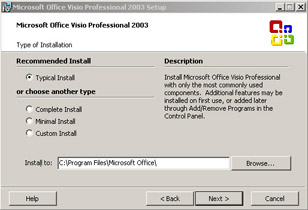
Figure A-2: Choose which type of installation you need on this screen.
If you choose to use a custom install, you can now choose which features you wish to install.
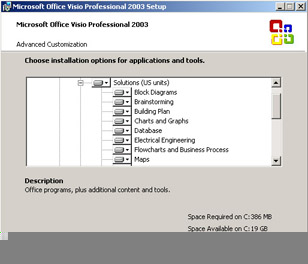
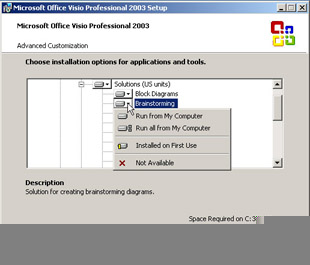
You can choose which templates to install and options for how you would like each template installed. The options are as follows:
-
Run From My Computer The selected feature will be installed on your hard drive and run from your computer.
-
Run All From My Computer The selected feature, and all its options, will be installed and run from your computer.
-
Installed On First Use The template will be installed the first time that you need to use it. This requires the CD to install it.
-
Not Available Don’t install the template. It won’t be available.
Note If you’re installing Visio from a network location rather than from the Setup CD, the Installed On First Use option is a great way to hedge your bets about features you’re not certain you’ll need. It’s quick and easy to install the feature later. However, if you install from the Setup CD, you will be prompted for the CD if that feature ever becomes necessary, which could be inconvenient if your CD doesn’t happen to be near your computer at that moment.
You can also choose where you wish to install Visio on the Type Of Installation screen. Just type in a path in the Install To text box or browse to the location using the Browse button to the right of the Install To text box.
| Note | If the file path you specify in the Install To text box is longer than 120 characters, the Setup program displays an internal error message. If this happens, click OK, and then type a path name that contains fewer characters. For example, the default installation location (C:\Program Files\Microsoft Office\Visio11) contains 41 characters (including the space characters). |
Step 3: Installing with a Previous Version of Visio
What happens next depends on whether or not you have a pre-existing version of Visio on your computer. If the Setup program detects a previous version of Visio, the screen shown in Figure A-3 appears.

Figure A-3: You have several options if Visio discovers an earlier version on your computer.
You can choose to remove the earlier version and install Visio 2003, choose Remove All Previous Versions, or choose to remove a specific version, and then click Next.
If you want to keep other versions of Visio, select Keep All Previous Versions or choose the specific version that you wish to retain. You’ll need to specify a different installation path in the Setup Wizard on the next screen. Visio 2003 is supposed to be compatible with earlier versions of Visio, but problems can occur when you run different versions of Visio on the same computer.
Step 4: Installing Visio
When you click Install, the Setup program proceeds to copy all the program files to the selected location. Before you click Install, you can click Back to go over your choices and make changes if necessary. After you click Install, you can still stop the proceedings by clicking Cancel, but then you’ll have to restart the Setup program when you want to install Visio.
Template versions
Visio includes two versions of each template and add-in: one that uses U.S. (imperial) measurement units and one that uses metric units. The Setup program analyzes your system configuration to determine which set of templates and add-ins to install given your locale and makes that set the default. The templates and add-ins are identical in every way except for the measurement units. If you want to include both versions, you can specify that you want to install all the Solutions (Metric Units), Add-Ons (Metric Units), Solutions (U.S. Units), and Add-Ons (U.S. Units).
One thing you can’t customize is exactly which template or stencil to install. You can choose only sets of templates (and their associated stencils) based on the folder that Visio installs. For example, you can install all of the templates in the Block Diagrams folder or none of them, but you can’t selectively install the Block Diagram template but not the Block Diagram With Perspective template. You do have the choice of installing certain annotation, border, background, callout, pattern, and symbol shapes, most of which are installed in the Visio Extras folders. These options appear under the Add-Ons feature.
| Note | For details about the templates included in each solution folder, see Appendix B, “Template and Stencil Reference.” |
|
EAN: 2147483647
Pages: 209