Using the Import Data Wizard
|
Imported data can bring a space plan to life, but you don’t need it to create a space plan in Visio. However, if you have a floor plan of some type and a spreadsheet or database of facility and employee information, you can bring the two together in Visio Professional. The Space Plan template includes the Import Data command on the Plan menu, which starts a wizard that you can use to import the information you want to include. It’s easiest to import data from a Microsoft Excel spreadsheet, but you can import information from Microsoft Exchange Server, Microsoft Active Directory, or any ODBC-compliant database, which includes most popular database programs.
| Note | ODBC stands for open database connectivity, a standard that Microsoft created to help you import database information into many different kinds of applications. If you aren’t sure whether your database is ODBC-compliant, check its documentation. |
The one piece of information your data source should include is a space identifier, as Figure 26-11 shows. The wizard uses the space identifier to figure out where to put the imported data in your floor plan. If you’re importing information about spaces, the space identifier is the field in your data source that uniquely identifies each space—typically, a room number. If you’re importing information about people or equipment, the space identifier is the field in your data source that matches the identifier already assigned to the space shapes in your drawing. For example, you can import an employee list so that your floor plan shows who sits where. In addition to employee names, your employee list must also include a space identifier that matches the spaces you’ve set up in your floor plan. Then, when the employee names are imported, the wizard can automatically associate people with spaces.
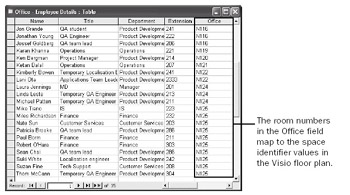
Figure 26-11: When you import employee names from a Microsoft Access table, the wizard automatically places the names in the correct offices.
| Cross-Reference | For details about assigning identifiers to space shapes, see “Defining Spaces in a Floor Plan,” page 768. |
If your data source doesn’t include location information or a space ID, you can still import information from it, but you’ll have to place the imported items in your floor plan manually where you want them. For example, if you have a database of computer equipment owned by different departments in your organization, you can import the data into your floor plan. To show where the equipment is located, you must drag individual computers from the Explorer window into the offices or rooms of your floor plan.
Starting the Import Data Wizard
The Import Data Wizard works like this: you point the wizard to your data source and indicate which columns or fields to import and where to put the data in your floor plan. The wizard imports the information and displays it in the Explorer window, from which you can choose the items you want to add to your floor plan. You might not want to display all of the data you import in the drawing, but you can always view and work with it in the Explorer window. You can use the imported data as criteria for color-coding spaces, and you can change which data is displayed at any time. To begin importing data with the Import Data Wizard, select Plan, Import Data. The sections that follow describe each screen in the wizard.
| Tip | The Import Data Wizard can place people and assets in their correct locations, as long as each space shape in your drawing includes a space identifier (such as an office number) and your external data source includes the same identifier. |
Preparing to Use a Database
Visio is able to link shapes in a floor plan to external data through the shapes’ custom properties. The link is one-directional—that is, from the data source to the Visio shapes. You can refresh your floor plan with the latest information from your data source, but changes you make to facilities information in Visio cannot be written back to your data source. If you plan to work with an external data source, it helps to do the following before you start:
-
Create a data source If you’re using a database other than Exchange Server or Active Directory, make sure that you have a data source for it. A data source is a file with the extension .dsn that allows you to connect to a data provider. You might already have the necessary data source on your computer, or an information systems technician or database expert can create one for you. If you don’t know whether you have a data source, you can start to set up your space plan, and then determine whether a data source for your database is listed when you attempt to import data. You can use the Windows Control Panel to set up ODBC data sources.
-
Ensure that you have access to the data source To import data from a corporate or shared database, you might need specific permissions and network access. If database access requires a password, make sure you have the right one.
Exporting data from other formats
Even if your database isn’t ODBC-compliant, you can probably export data from it into a format that Visio can import, such as tab-delimited or comma-delimited text, which are common output formats supported by most database programs. Then you can set up an ODBC data source for the exported file. The bottom line is that if you need to pull data in from a proprietary or legacy data source, you probably can—but you might need to have a professional prepare your data.
Step 1: Selecting Where You Want Your Data to Be Placed
On the first screen of the Import Data Wizard, you must select where you want your data to go, as Figure 26-12 shows. The options are as follows:
-
Import the data into shapes that you will manually place. Choose this option to either create new shapes and cascade them onto the drawing page or create new shapes and store them in the Explorer Window under Unplaced Data.
-
Import the data into shapes that are already on the drawing. If you choose this option you can choose to either add the data as a custom property or as a new shape on top of an existing shape.
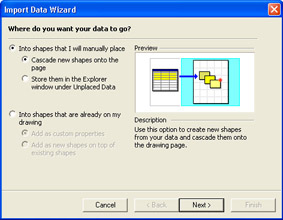
Figure 26-12: The first screen of the Import Data Wizard allows you to select where you want your data to go.
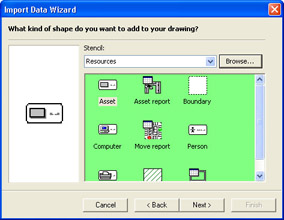
The category choices are Person, Space, Boundary, Computer, Printer, Asset, Equipment, Fixture, and Furniture. The shapes associated with each category are shown on the Resources stencil. Use the Space and Boundary categories to import information about locations and the Person category to import lists of people. Use the Computer, Equipment, Fixture, Furniture, and Printer categories to track these types of assets. The Asset category is useful for anything else not covered by the other categories.
After you have made your choice, click Next to proceed to the next screen in the wizard.
Step 2: Attaching to a Database
On the second screen of the Import Data Wizard, you identify the external data source you want to use. In the Type box, choose the type of database or spreadsheet that contains your space information. Depending on your choice, the options differ as follows:
-
If you choose Excel, click Browse, locate the spreadsheet file, and then click OK, as Figure 26-13 shows. The name of the file will appear in the Name box. You can also use the Name box drop-down list to choose a name.
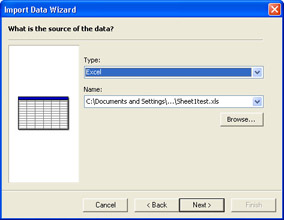
Figure 26-13: When you choose Excel for Source, the Name and Browse options are available. Click Browse to locate the spreadsheet you want to use as your data source. -
If you choose Active Directory or Exchange Server, click Next to log on to the appropriate server.
-
If you’re using any other kind of database or spreadsheet (such as an Access database, a proprietary human resources system, or an Oracle database), choose ODBC, and then click Next. On the screen that appears, select a data source name (DSN) in the Data Source box. A Select Database dialog box opens, where you locate a specific database file and then click OK. In the Import Data Wizard, Visio then lists the database’s catalogs and tables, as Figure 26-14 shows. Select the one you want to use.
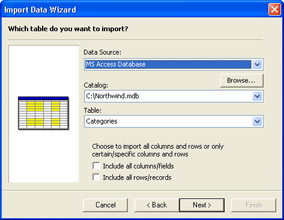
Figure 26-14: After you select a data source, you can choose the catalog and table that contain the information you want. This Access database doesn’t support catalogs, so the wizard displays its file name instead.
When you’ve specified the file from which to import data, click Next to continue with the wizard.
Step 3: Identifying the Name and Location Information
On the next wizard screen (see Figure 26-15), you can choose to import all columns/fields and rows/records or none. If you choose to import all of both, skip to step 4 below. If you leave either or both boxes blank, the next screen allows you to choose specific columns or rows that you wish to import. This is critical, because in these two steps you specify the fields in your database that provide the information that the Import Data Wizard needs to match the data to the right space. The wizard needs to be able to name a record, match it to a space in the floor plan, match it to that space in the correct building, and link the database records to the space plan. If you choose to specify the fields, you can choose from the list of data fields present in your database in the next two screens.

Figure 26-15: The wizard allows you to choose all of the data fields in this dialog box. If you leave either check box unselected, you will be allowed to choose specific fields on the next couple of screens.
Step 4: Finishing Up
The next screens differ depending on whether you chose to import the data into shapes that you would manually place or shapes that are already on your drawing. Let’s look first at the options available if you chose to import data into shapes that you would manually place or import data into shapes on top of existing shapes.
-
After you choose the data fields to import, the Import Data Wizard asks you to select which shape you want to import the data to. If you don’t see a shape that you wish to use, click Browse to locate more shapes.
-
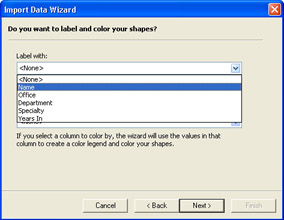
Choose the field that you wish to label and color the shapes. For example, if you choose to label with the Name field, each shape will be labeled with the data string in Name (usually individual names).
-
The next screen asks you to choose which column in your data contains unique identifiers. This is usually Name or ID. The unique identifier is the key that ties a row of data to a specific shape. This identifier must be unique for each row of data (for example, a room number). Click Next and the Import Data Wizard imports the data and presents a drawing update summary, as Figure 26-16 shows. The drawing update also provides an Import Data Report link. Clicking the link displays a Hypertext Markup Language (HTML) file of the imported data.
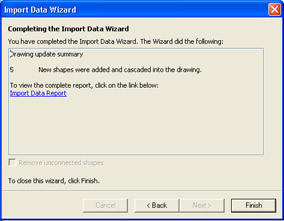
Figure 26-16: The drawing update summary summarizes Visio’s actions and provides a link to view the Import Data Report.
Now let’s look at how to import data as custom properties of existing shapes:
-
After choosing the data fields to import, choose the field that you wish to label and color the shapes. For example, if you choose to label with the Name field, each shape will be labeled with the data string in Name (usually individual names).
-
Next, choose into which shapes’ custom properties you wish to import the data.

-
Next the Import Data Wizard asks you to choose a property that uniquely identifies the shape to which you wish to import the data. Choose from the drop-down menu. The usual identifier is Space ID, but you can choose whichever identifier you like.
-
On the next screen you choose a column in your data that has matching values. For example, if you chose Space ID in the previous step, then perhaps the Office column in your data would have matching data (that is, the name of the office/space ID). Visio will use this information to link your data to the proper shapes. Click Next and the Import Data Wizard imports the data and presents a drawing update summary, as shown in Figure 26-16. The drawing update also provides an Import Data Report link. Clicking the link displays an HTML file of the imported data.
-
Click Finish to complete the wizard.
If your data was imported as Unplaced Data, you can associate it with a location in one of two ways:
-
Drag an item from the Explorer window into an office or room.
-
On the Categories tab, expand the Space list. Drag an unplaced item onto a space in the Space list. This is a little easier if you resize the Explorer window so that Unplaced Data and Space are both visible.
The Refresh Data command does not update
the information in the space plan
The Refresh Data command works only if you imported data from a data source that includes a field that uniquely identifies each record and you mapped this field to a key in the Import Data Wizard.
Refreshing the Data
If you want to update the data in your drawing when your database changes, you can as long as you identified a unique field when you imported the data. Updating, or refreshing, the data is a one-way process: Visio reconnects to the original data source and imports the fields and their current values, which overwrites the information in your current drawing. If you’ve made changes to your space plan—for example, if you’ve moved employees around or reallocated resources—your changes might be lost after you refresh.
Choose Plan, Refresh Data to refresh the data in your drawing. Visio refreshes the data and displays a drawing update summary, as Figure 26-17 shows. Like the Import Data Wizard, this dialog box contains options to remove unconnected shapes and to show a report of the import activity.
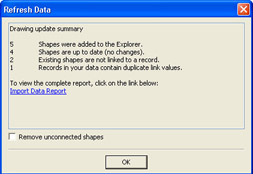
Figure 26-17: To update the information in your floor plan, choose Plan, Refresh Data. Visio reimports the data, overwriting the values in your model, and displays this dialog box.
Refreshing the data in the space plan overwrites
changes that were made to the diagram
If you want to refresh the data in your facility model without losing the changes you’ve made in the drawing, the only way to do this is to make the same changes to the original data source. For example, if you move a person in a floor plan based on an imported spreadsheet of employee names, you must record the new location in the spreadsheet. If you aren’t sure whether you made changes that will be overwritten, make a backup copy of your drawing before you refresh the data. That way you can compare the drawings later.
Another trick for keeping the information in sync between a space plan and your data source is to check the Unplaced Shapes listing. It can serve as a red flag for identifying problems in your data source. You can print a list of unplaced shapes for your database administrator to use in correcting the data.
If Visio can’t locate your data source, it displays a message. If you click OK in the message box, a Login dialog box appears, from which you can reconnect to the data source.
|
EAN: 2147483647
Pages: 209