Merging Shapes to Create New Ones
|
Sometimes the easiest—or only—way to create a shape is to draw several shapes and splice or merge them to get the geometry you want. Using the shape operation commands shown in Figure 22-17, you can build new shapes out of the geometry of existing shapes. Shape operations is a loose term for the commands on the Operations submenu of the Shape menu.
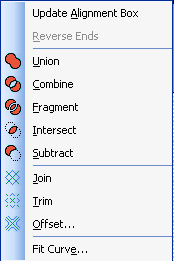
Figure 22-17: With the shape operation commands, you can create merged shapes.
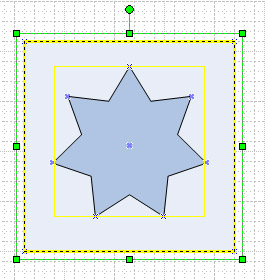
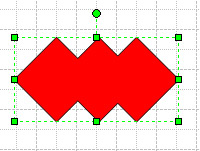
In general, the shape operations work by merging the geometry of several shapes to create one new shape or by splitting out sections in cookie-cutter fashion to create several new shapes, as Figure 22-18 shows. Technically, these commands let you create complex boundary paths—shapes that are represented in the ShapeSheet window by multiple Geometry sections. Some shape operations apply only to 2-D shapes; others apply to lines.

Figure 22-18: You could try to use the Pencil tool or Group command to create shapes with complex geometry like these, but the shape operation commands work faster and produce more compact shapes (in terms of disk space).
| Caution | If you are creating new shapes that include SmartShapes formulas, use the shape operation commands before you write any formulas in the ShapeSheet window. These commands work by creating a new shape and discarding the originals. Any formulas in the original shapes aren’t preserved after you apply a shape operation command. |
All of the commands discussed in the following sections are located on the Shape, Operations menu. These sections group the commands according to the type of shape they apply to. Commands for working with 2-D shapes are discussed first, followed by techniques for joining, trimming, and offsetting 1-D shapes (lines and arcs).
Merging 2-D Shapes with Shape Operations
When you can’t create the exact shape you want using the drawing tools, you can select two or more 2-D shapes with parts of what you want and then merge shapes. The Combine, Fragment, Intersect, Subtract, and Union commands each operate on closed, 2-D shapes in a different way to produce a 2-D shape that can have both closed and open paths. Recall that a closed 2-D shape is a shape that behaves like a box and can have a fill pattern. For each command except Fragment, you select multiple shapes and choose a command to produce a single shape. Fragment produces multiple shapes. In all cases, the original shapes are discarded, so you might want to use the command on copies of your shapes, or just remember to use the Undo command if you don’t get what you expected.
If you studied computer science, you might remember from your advanced graphics class that constructive solid geometry (CSG) is basically Boolean set operations applied to closed primitives. The three CSG operations are union, intersection, and difference. If you missed that class, its application to the Visio program might not be clear unless you realize that the architects of the Visio drawing engine did take the class. That’s why you see the commands Union, Intersect, and Subtract on the Shape, Operations menu, and that’s why the results of these commands are, in fact, logical. Sometimes these commands are referred to as the Boolean operation tools, hearkening back to their technical origins.
If you’ve worked in CAD programs or studied geometry, you might find that the results of the shape operation commands are predictable. For the rest of us, the shape operations provide a research opportunity—by experimenting, you will eventually find the command, or combination of commands, that gives you the result you want. It helps if you always did well on spatial relations tests. Otherwise, there’s always the Undo command (Ctrl+Z).
| Note | Selection order is very important when using these commands. The format of the first command you select will be applied to the resulting shape. For example, if you select a red shape and a green shape, in that order, and then click Intersect, the resulting shape will be red. |
How the Combine Command Works
Use the Combine command when you want to create a shape, such as a picture frame or a window, that has filled and transparent (that is, closed and open) sections. The Combine command creates a new shape from two or more selected shapes. Where the shapes overlap, Visio makes the path transparent, creating holes in the new shape. The original shapes are deleted, and the new shape inherits the text and formatting of the first shape you selected.
To combine shapes, first select the first shape whose format you want to use in the resulting shape, and then press Shift+click to select the other shapes you want to merge.
Next, choose Shape, Operations, Combine.
In ShapeSheet terms, the Combine command creates a new shape represented by a single ShapeSheet spreadsheet, which contains the Geometry rows from each of the original shapes.
| Tip | If you don’t get the results you want from the Combine command, try the Union or Join command. |
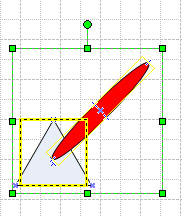
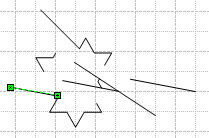
How the Fragment Command Works
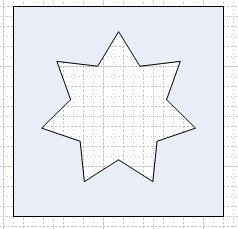
Sometimes the simplest way to create an irregular polygon or unusual shape is to use the Fragment command. When you select two or more shapes and fragment them, any overlapping areas become new 2-D shapes, and any areas enclosed by intersecting lines also become new 2-D shapes, as Figure 22-19 shows. Unlike the other shape operations discussed in this section, the Fragment command operates on 1-D shapes. For example, you can draw lines through a 2-D shape to show where you want to fragment the shape. The result of fragmenting the shapes will be multiple, small 2-D shapes formed from the areas defined by the intersecting lines. Or if you fragment three intersecting lines, you’ll create a 2-D triangle from the enclosed area. None of the original shapes remain after you use the Fragment command.
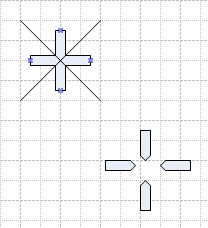
Figure 22-19: With the Fragment command, two lines and a cross shape become four new shapes, which you can pull apart.
To fragment shapes, select the first shape whose format you want to use in the resulting shape, and then press Shift+click to select the other shapes you want to merge. Next, choose Shape, Operations, Fragment.
| Tip | If you don’t get the result you want from the Fragment command, try the Trim command. |
How the Intersect Command Works
To create a shape from the area enclosed by two or more overlapping shapes, use the Intersect command, which creates one new shape and deletes the originals. The resulting shape is defined by the geometry of the overlapping area. This command is often the easiest way to create irregular, curving shapes. If you select two or more shapes that don’t overlap, their intersection is (in mathematical terms) an empty set, so the original shapes just disappear. Another way to think about how intersection works is that the resulting shape is a set of all the points that were common to the original shapes.
To intersect shapes, select the first shape whose format you want to use in the resulting shape, and then press Shift+click to select the other shapes you want to merge.
Next, choose Shape, Operations, Intersect.

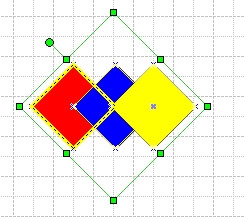
How Subtract Works
To cut a shape out of another shape in cookie-cutter fashion, use the Subtract command, which creates a new shape from the geometry of the first shape you select minus the area where the second shape overlapped the first, as Figure 22-20 shows. Obviously, the order in which you select the shapes matters when you use the Subtract command. If you select more than two shapes when you use the Subtract command, Visio subtracts the shape geometry of the successive shapes from the first in the order in which you select them to create a single, new shape. All the original shapes are deleted.

Figure 22-20: The result of the Subtract command varies depending on selection order.
To subtract shapes, select the first shape whose format you want to use in the resulting shape, and then press Shift+click to select the other shapes you want to merge. Next, choose Shape, Operations, Subtract.
How the Union Command Works
The effect of the Union command is easy to predict: it creates a new shape that encloses the entire area of the original shapes. If you select two or more overlapping shapes, the Union command creates a new shape from the total filled area of the original shapes. The original shapes are deleted.
To unite shapes, select the first shape whose format you want to use in the resulting shape, and then press Shift+click to select the other shapes you want to merge.
Next, choose Shape, Operations, Union.
| Tip | Using the Union command instead of grouping shapes You can select shapes that don’t overlap—the Union command creates a new shape that looks just like the originals, but with a single bounding box. However, you’re probably better off using the Group command in cases such as this. Group behavior is more flexible. |
Creating and Offsetting Lines with Shape Operations
When you want to combine and split apart lines, Visio includes the Join, Offset, and Trim commands, which might look familiar if you’ve ever worked with CAD software. Unlike the shape operations discussed earlier, these commands are designed specifically to operate on 1 D shapes. For example, you can draw a series of overlapping lines, and then use the Join command to create a 2-D grid shape.
How the Join Command Works
The Join command works a lot like the Combine command. Sometimes they’re interchangeable. However, the Join command is specifically intended to merge selected 1-D line and arc segments into paths. The resulting shape is always a 2-D shape, even if it still looks like a line. Because the Join command is intended to operate on lines, it ignores fill color or patterns that are applied to the original shapes; the resulting shape has no fill, but inherits the text and line formats of the first shape you selected. The original shapes are deleted.
To join shapes, select the first shape whose format you want to use in the resulting shape, and then press Shift+click to select the other shapes you want to merge.
Next, choose Shape, Operations, Join.

| Tip | Join and combine shapes Although the Join command is similar to the Combine command, you can see the difference when you use them on filled shapes. The Join command ignores fill color, so you won’t get the cookie-cutter shape that the Combine command can produce. |
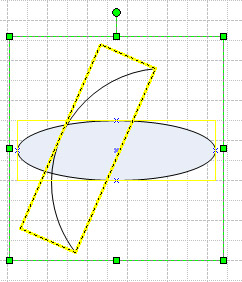
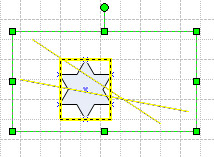
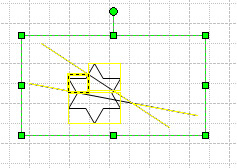
How the Offset Command Works
The Offset command is the best way to quickly produce grids, concentric rings, and repeating patterns that must be exactly spaced. It creates a set of parallel lines and curves at a specified distance from either side of the original shape, as Figure 22-21 shows. You can use the command to offset line segments from an original 2-D shape, but it’s designed to operate on 1-D shapes. Unlike the other shape operations, you can apply the Offset command to a single shape (which results in three offset shapes); the original shape is not deleted.
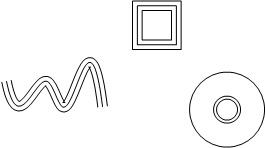
Figure 22-21: With the Offset command, a single line becomes three lines offset by a specified distance.
To offset shapes, select a shape, and then choose Shape, Operations, Offset.
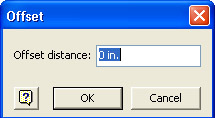
In the Offset Distance box, type the exact distance at which to offset the new lines, and then click OK.
| Note | If you offset a filled shape, the resulting shapes will not be filled, but you can apply a fill color or pattern to them. |
How the Trim Command Works
The Trim command splits two or more shapes where their lines intersect. This command is similar to the Fragment command. However, the Trim command analyzes the intersecting and overlapping lines of selected shapes, whereas Fragment looks at intersecting and overlapping shape areas. As with most other shape operations, the Trim command deletes the original shapes.
Follow these steps to trim shapes:
-
Select the first shape whose format you want to use in the resulting shape, and then press Shift+click to select the other shapes you want to merge.
-
Choose Shape, Operations, Trim.
-
To see the new shapes more easily, drag them apart.
A noteworthy and counterintuitive side effect of the Trim command is that it produces only 2-D shapes. Even if the trimmed bits look like lines, Visio defines them as 2-D objects. You can trim filled shapes, but the resulting shapes won’t be filled, although they do inherit the text and line styles of the first shape you select.
|
EAN: 2147483647
Pages: 209
- Key #1: Delight Your Customers with Speed and Quality
- Beyond the Basics: The Five Laws of Lean Six Sigma
- Making Improvements That Last: An Illustrated Guide to DMAIC and the Lean Six Sigma Toolkit
- The Experience of Making Improvements: What Its Like to Work on Lean Six Sigma Projects
- Six Things Managers Must Do: How to Support Lean Six Sigma