| A public folder tree must be created and added to a public folder store before authorized users can create subfolders within a tree. The default tree is automatically created and managed by Exchange 2003; it cannot be created, deleted, or modified (only other public folder trees can be created, modified, or deleted) and is stored in the default container in the Exchange organization. Additional containers must be created in Exchange, if a container other than the default is desired. Administrators need to create additional containers only if administrative groups are being utilized, and administrators have the option of adding a public folders container to every administrative group created after the first administrative group. Creating Public Folder Containers and Trees Containers are created using the following steps: 1. | In ESM, expand the administrative groups and then expand the administrative group to work with.
| 2. | If a Folders node is displayed, a public folder tree already exists. If a Public Folders node is not displayed, right-click the administrative group, select New, and then select Public Folders Container.
| 3. | You can now create public folder trees in the container.
|
Create a new public folder tree using the following steps: 1. | In ESM, expand administrative groups and select the group to work with. In the left pane, right-click Folders, select New, and then select Public Folder Tree.
| 2. | Type a descriptive name, without spaces, for the public folder tree (this makes it easier to access via web browsers) and then Click OK. Be sure to associate the new tree with a public folder store as discussed in the section "Creating Public Folder Data Stores" of Lesson 4.
| 3. | Exit ESM and re-open to view the new public folder.
|
Creating Public Folders with Exchange System Manager After the public folder tree is created and associated with a public folder store, new subfolders can be created by authorized users in Exchange System Manager, Internet Explorer, or Outlook 2003. Administrators can create public folders in Exchange System Manager using the following steps: 1. | In ESM, expand administrative groups and select the group to work with. Next, expand the folders and then right-click the public folder tree to work with and select New, Public Folder. A properties dialog box will be displayed, as shown in Figure 7.1.
Figure 7.1. Creating public folders in Exchange System Manager. 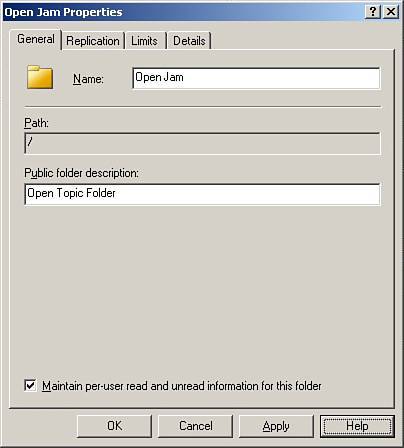
| 2. | Type a descriptive name for the new public folder into the Name field and then add a description in the Public Folder Description field. The name used for the public folder is also used for the email address of the public folder and is used to send messages to the folder.
| 3. | On the Replication tab, check the default option settings. By default, the folder is replicated to the default public store for the public tree. To replicate the folder to another server in the organization, click Add, select an additional public store to use, and then click OK. Repeat this step as necessary to include other servers.
| 4. | Determine how items are prioritized for replication by selecting a delivery priority:
- Not Urgent Messages with this low importance priority are replicated after messages with higher priority.
- Normal This is the default replication setting. Messages with this priority are replicated before Not Urgent priority messages.
- Urgent Messages with this priority are replicated before any other messages. Overuse of this priority can cause performance problems and folder update delays in Exchange, so use this setting wisely.
| 5. | On the Limits tab, set individual message limits or select Use Public Store Defaults.
| 6. | Click OK to complete the configuration.
|
After the basic setup is complete, folder creators may want to configure additional options for replication settings, message limits, client permissions and active directory rights, or designate public folder administrators. Creating Public Folders in Outlook Creating folders in Outlook 2003 is just as easy for both authorized users and administrators. Create folders using these steps: 1. | Open Outlook 2003. Display the Folder List view and then expand the Public Folders in the Folder List. Right-click the top-level folder where you want to create the public folder.
| 2. | Select New Folder. Type a descriptive name for the public folder and select the type of items to be placed in the folder via the Folder Contains drop-down list. Click OK to complete the folder creation.
|
After the folder creation is complete, folder creators may want to configure additional options for replication settings, message limits, client permissions and active directory rights, or designate public folder administrators. Creating Public Folders Using Internet Explorer Authorized users and administrators can also set up public folders using Microsoft Internet Explorer 5.0 and later (as long as the public folder tree is configured for web sharing.) To set up Public Folders using Internet Explorer, follow these steps: 1. | Type the URL of the public folder tree into the address field of Internet Explorer. It will look similar to this: http://{servername}/public. Log in, if prompted to do so.
| 2. | In the browser window, right-click the top-level folder where you want to create a public folder and select New Folder.
| 3. | Type a descriptive name for the public folder and select the type of items to be placed in the folder via the Folder Contains drop-down list. Click OK to complete the folder creation.
|
After the folder creation is complete, folder creators may want to configure additional options for replication settings, message limits, client permissions and active directory rights, or designate public folder administrators. Adding Items to Public Folders Using Exchange System Manager After the folders are created and configured, items can be posted to them using Exchange System Manager, Internet Explorer, or Outlook. Use the following steps to post items in Exchange System Manager: 1. | Open ESM, select and expand Administrative Groups and then the administrative group to work with. Expand Folders, expand the Public Folder tree to work with, and then select the folder to post to.
| 2. | Select the Content tab. A Post dialog box will appear. Click New to open OWA and display a Post dialog box. If prompted to log in, do so.
| 3. | Type in a subject for the message posting and then type in the message text. Attachments can be added if necessary. Click Post to submit the message to the public folder.
|
Adding Items to Public Folders Using Internet Explorer and Outlook Authorized users can post items to public folders using Internet Explorer (5.0 or later) and Outlook. Use the following steps to add a message: 1. | Enter the URL of the public folder tree into the address field of Internet Explorer, such as http://{servername}/public. Log in if prompted to do so. Click OK.
| 2. | Select the folder to work in and click New.
| 3. | Type in a subject for the message posting and then type in the message text. Attachments can be added if necessary. Click Post to submit the message to the public folder.
|
Using Outlook to post a message is just as easy; use the following steps: 1. | In Outlook, click Go and then select Folder List. Expand Public Folders and then All Public Folders. Select the public folder to post a message in.
| 2. | Click New, type in a subject for the message, and then type in the message text. Attachments can be added if necessary. Click Post to submit the message to the public folder.
|
Manipulating Public Folders Because administrators manage Exchange, they have the task of managing and manipulating public folders as well. Using standard administrative procedures outlined in this section, public folders can be deleted, renamed, moved, copied, or recovered. Deleting Public Folders in Exchange System Manager Deleting a public folder removes the contents of the public folder and the contents of any subfolders. Be sure the data is not needed or archived before deleting a public folder. To delete a public folder, use these steps: 1. | In ESM, right-click the folder to remove and then select Delete.
| 2. | Click Yes to confirm the public folder removal.
|
Renaming Public Folders An organization may want to change the naming convention of the public folders or rename a single public folder. Renaming a public folder is simple using the following steps: 1. | In ESM, right-click the folder to rename and then select Rename.
| 2. | Type in a new name and then press Enter.
|
Copying and moving a public folder can be performed only within the same public folder tree; copying or moving a public folder to a different tree is not supported. Moving and Copying Public Folders To move a public folder, follow these steps: 1. | In ESM, right-click the public folder to relocate and select Cut.
| 2. | Right-click the folder to move the public folder into and select Paste.
|
To copy a public folder, follow these steps: 1. | In ESM, right-click the public folder to relocate and select Copy.
| 2. | Right-click the folder to copy the public folder into and select Paste.
|
Recovering Deleted Public Folders Public folders may be accidentally deleted and need to be recovered by administrators. This is possible as long as two conditions are met: a deleted items retention period has been set for the public folder store; and the deleted items retention period for the data store has not expired. If the two conditions are met, deleted folders can be recovered using the following steps: 1. | Log in to the domain with administrator privileges. Open Outlook and access the Public Folders node, and then select the All Public Folders node or the node that contained the public folders.
| 2. | In the Tools menu, select Recover Deleted Items. This action will pop up a Recover Deleted Items dialog box.
| 3. | Select the folders to recover and then click Recover Selected Items.
| 4. | Each top-level folder restored by the recovery process will have "Recovered" added to the end of the name of the folder. The recovery process adds Recovered to all the email addresses you have assigned to the folder.
|
Tip  | After the folder contents have been verified, administrators should restore the folder's original name via the rename process and also restore the original email address via the Email Addresses tab in the folder's Properties dialog box. This makes the public folder appear and operate just as it did before being deleted; public folder users will appreciate the extra effort. |
Delegating Administrative Permissions Although the Public Folder Store properties sheet allows administrators to create a broad set of permissions that applies to all public folders, administrators can also modify permissions on individual folders. Administrators can control whether users are allowed to edit and delete any items in the folder, only items that they have posted, or no items at all. Administrators can also grant users the right to post content to one folder, but not to another. By default, all users have permission to access a folder and read the contents. Users who log on to the network or use OWA have additional privileges that allow them to create subfolders, read, create, edit, and delete items in a folder. To help administrators configure permissions, Microsoft has provided several predefined roles that administrators can select, rather than applying individual permissions. For example, assigning users the Reviewer role would allow them to read items only. The complete list of roles and their associated permissions are as follows: Owner All permissions are granted. Users can create, read, modify, and delete permissions and create subfolders. Owners can change folder permissions as well. Publishing Editor Grants create, read, modify, and delete permissions. Also allows creation of subfolders. Editor Grants create, read, modify, and delete permissions. Publishing Author Grants permission to create and read items and to edit or delete user-created items. Subfolders can also be created. Non-editing Author Grants permission to create and read folder items. Reviewer Grants read-only permission. Contributor Grants permission to create items but not view folder contents. None No permissions are granted in the folder.
Modifying Public Folder Client Permissions Permissions over the folder are set through the properties sheet's Permissions tab. This tab contains two buttons: Client Permissions and Administrative Rights. To modify existing permissions or set new roles for users in an individual public folder, use the following steps: 1. | In ESM, expand administrative groups and then expand the group to work with.
| 2. | Expand the Folders node and then expand the public folder tree that contains the folder to work with. Right-click the public folder and then select Properties.
| 3. | On the Permissions tab, click Client Permissions. The Client Permissions dialog box will appear, showing account names, roles, and permissions.
| 4. | Click Add and select the name of the user who needs access. Then click Add to include the username in the Add Users List. Repeat as necessary. Click OK when you're finished.
| 5. | In the Name and Role list, select one or more users whose permissions need modifying. Then assign the appropriate role or individual permissions.
| 6. | Click OK when you're finished assigning permissions.
|
Modifying Public Folder Administrative Rights The Administrative Rights button is used to configure and control who is an administrator over the folder. Administrators can set a few different advanced permissions for controlling access to the folder or modifying the folder itself. Typically, these settings are left unchanged. To set a folder's administrative rights, use the following steps: 1. | In ESM, expand administrative groups and then expand the group to work with.
| 2. | Expand the Folders node and then expand the public folder tree that contains the folder to work with. Right-click the public folder and then select Properties.
| 3. | On the Permissions tab, click Administrative Rights. The Permissions dialog box will appear.
| 4. | Via the Permissions dialog box, grant or deny administrative privileges as appropriate.
| 5. | Click OK when you're finished assigning administrative rights.
|
|