| Although more complex to use than other connectors, X.400 connectors are used to connect two routing groups because they incur less overhead than other connectors and use bandwidth more efficiently than other connectors when sending large messages. They are also useful for talking to a foreign X.400 messaging server; they can talk to TCP/IP X.400 protocol and the X.25 X.400 protocol. The TCP/IP X.400 connector works with standard TCP/IP protocols and is the most commonly used connector, so we'll look at configuring that option in this section. Creating a TCP/IP X.400 Stack Before installing the X.400 connector, a X.400 stack must be installed and configured. Create a TCP/IP X.400 stack by performing the following steps: 1. | In ESM, expand the administrative group to work with. Expand the Servers node and then expand the server to work with.
| 2. | Expand Protocols and then right-click X.400. Point to New and then select TCP/IP X.400 Service Transport Stack. On the General tab, type a descriptive name for the stack. The default naming convention is TCP (servername). Be sure to change the name now; it can't be changed later.
| 3. | If applications other than Exchange will be using the stack, configure the OSI settings and then click OK. Otherwise, click OK to complete the stack creation.
|
Creating an X.400 Connector After the stack has been created, one or more X.400 connectors can be created to transport messages to remote email hosts. The connector creates a direct link between a server in one routing group and a server in another routing group or organization. After the necessary stacks have been created on both sides of the connection, perform the following steps: 1. | In ESM, expand the administrative group to work with. If available, expand the Routing Groups node and then expand the routing group to use as the connection creator.
| 2. | Right-click Connectors, select New, and then choose TCP X.400 Connector. On the General tab, type a descriptive name for the connector, as shown in Figure 6.2.
Figure 6.2. Using the Properties dialog box to configure the TCP X.400 connector. 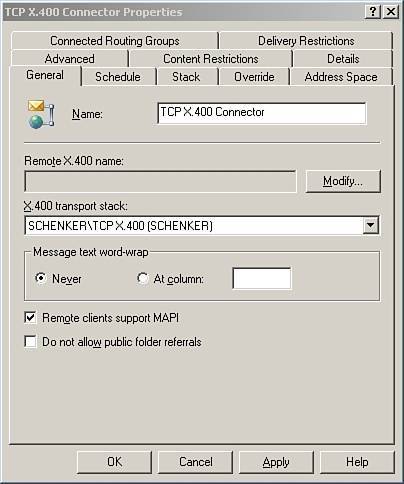
| 3. | On the General tab, under Remote X.400 name, click Modify to open the Remote Connection Credentials dialog box. In the Remote X.400 name field, type the name of the remote X.400 connector on the remote server. Typically, the remote connector name defaults to the remote server name. Type the password for the remote X.400 connector into the password field and again in the Confirm Password field. Click OK.
| 4. | On the General tab, select the appropriate X.400 Transport stack from the drop-down list.
| 5. | Select the Address Space tab in the Properties dialog box. If two Exchange organizations are being connected, set the Connector scope as Entire Organization, click Add, and then set the address space properties and cost values. Lower-cost values mean higher priority for routing. If two routing groups are being connected, set the Connector scope as Routing Group, click Add, and then set the properties and set connector cost values (lower cost has the highest priority).
| 6. | On the Connected Routing Groups tab, click Add. Then select the routing group to which you want to connect.
| 7. | If the remote system is not an Exchange server, click the Advanced tab and clear the Allow Exchange contents check box. If the check box is not cleared, addresses on messages are in domain name form, not in X.400 form, and replies are not possible.
| 8. | On the Stack tab for a TCP X.400 connector, select the Remote hostname and type the fully qualified domain name (FQDN) into the Address box, or select IP Address and type the remote server's IP address into the Address box.
| 9. | Click the Schedule tab and select an appropriate time for the connector to run: Never (disable the connector), Always (continuous transfer over the connector), Selected Times (a custom schedule to run the connector), or Remote Initiated (transfer only when the remote server initiates the transfer).
| 10. | If nondefault X.400 settings are required, click the Override tab and set custom values. Otherwise, click OK to install the connector.
|
After the routing group connector is installed, administrators may want to change additional settings such as delivery restrictions and advanced controls. |