| Exchange administrators use address lists to organize and manage email recipients. An address list is a folder that contains a dynamic listing of the Exchange 2003-enabled objects in an organization. Administrators are able to define address lists based on Active Directory attributes such as business unit, location, or other criteria. When administrators define a particular business unit, location, or department on a user account, the user is automatically made a member of that address list. This makes it easier for people to find the person or the distribution list to which they want to send an email message. Exchange creates several default address lists during the setup process. In addition to the Global Address List (all mail-enabled users, groups, and contacts) and the Offline Address List (an offline address list of all mail-enabled users, groups, and contacts), Exchange creates the following lists: All Contacts Lists all mail-enabled contacts. All Groups Lists all mail-enabled groups. All Users Lists all mail-enabled users. All Public Folders Lists all public folders.
Typically, the offline address list and the global address list are the lists used most frequently in an organization. Tip  | When you create new address lists, use naming conventions that indicate the content of the list. Because most often people send messages to people in their own department, such as Engineering, administrators should create address lists that organize people by department or location and describe the types of recipients in the list. For example, an address list created for the Engineering department called Engineering Department Email would be more effective and easier to use than an address list named Pocket Protector Group. |
Setting Up New Address Lists Administrators can create address lists for organizing email recipients by location, department, or other organizational criteria. For example, an administrator wants to create an address book to find all users who work in the Air Jimi company headquarters in Oakland, California. To configure an address book that can be viewed by users in their Outlook 2003 mail clients, complete the following steps: 1. | Open System Manager and select the Recipients node in the console tree (left pane).
| 2. | Expand the Recipients object by clicking the plus sign; then right-click the All Address Lists node, point to New, and select Address List.
| 3. | Type a name that describes the list that you are creating. For example, type Oakland Email Addresses.
| 4. | Click Filter Rules to select list membership criteria. On the General tab, click the check boxes for the users, groups, public folders, or contacts that should be displayed in the list. Clear the check boxes for unwanted items.
| 5. | Click the Advanced tab, click Field, and then click one of the following attributes that you want to use for your address book filter: User, Contact, Group, or Public Folder. The administrator wants all Oakland email addresses, so click User and then select City.
| 6. | Under the Condition label, select a condition that fits the type of information to search on. Here the administrator will select Condition Is (Exactly) and then type Oakland into the Value field. This will set the criteria to find email addresses at the Air Jimi Headquarters in Oakland. Next, click Add to complete the process.
| 7. | After you have finished adding conditions, click Find Now. As shown in Figure 5.5, double-check that the list contains the correct users in the list and then click OK, Finish.
Figure 5.5. Specifying address list membership criteria and viewing search results using the Advanced tab. 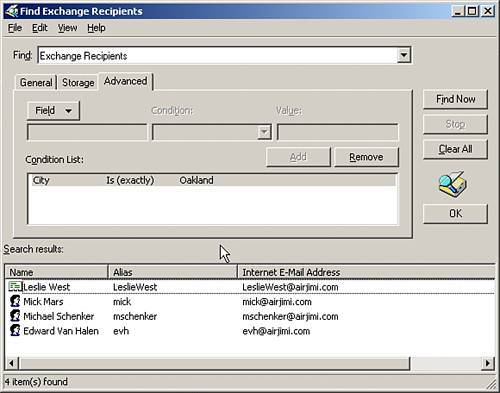
|
The newly created address list is displayed in Exchange System Manager. To confirm that the address lists are configured properly and are available for users the next time they start Outlook, complete the following steps: 1. | Log on to a workstation as a user and start Outlook.
| 2. | Click New, click Mail Message, and then click To.
| 3. | Click the down arrow in the Show Names From box and confirm that the new address book is displayed under All Address Lists.
|
Administrators will often want to edit address lists. The properties of the default address lists cannot be changed, but the properties of lists created by administrators can be. To modify the properties of a list, follow these steps: 1. | Open Exchange System Manager and select the Recipients node in the console tree (left pane). Expand the Recipients node by clicking the plus sign and then clicking the plus sign next to the All Address Lists node.
| 2. | Right-click and then select Properties of the address list to modify. Next, click Modify to create a new filter for the address list.
| 3. | On the General tab, select the appropriate users, groups, or contacts to be displayed in the recipients list. Use the Advanced tab to set address list limiting criteria.
| 4. | After all the filters have been set for the list, click OK and then click Finish, completing the process and making the list available for users the next time they start Outlook.
|
Working with Address Book Templates Address book and Details templates specify how recipient information appears in the Address Book and can be customized by administrators to respond to requests of users or to meet organizational needs for streamlining information. The graphical interface is unique for each type of recipient and has a predefined set of controls that define the interface. The controls can be modified in width, height, location, and so on to change the way information is displayed in the Address Book view. Modifying templates creates a custom view of the standard templates that are available to all users in Exchange. Changes to the template can be previewed as they are made, and if template changes are unsatisfactory, the original templates can always be restored. To change the look and feel of a template, use the following steps: 1. | Open Exchange System Manager and select the Recipients node in the console tree (left pane). Expand the Recipients node by clicking the plus sign and then click the plus sign next to the Details node. Select the appropriate template language, and a list of available templates will be displayed in the right console pane.
| 2. | Double-click the template to modify it. Select the Templates tab and wait while ESM parses the template values and any associated Active Directory information. A list of control sets and control values for the template will appear. Clicking Test will provide a preview of the template and give you a chance to review the template before making changes.
| 3. | To add a new control to the template, click Add and then choose the appropriate control set. Set the correct properties for the control and click OK. Next, click Test to preview the modifications. To remove a control set, highlight the control set and click Remove.
| 4. | Existing control sets can be update within the Templates tab by selecting the control set and clicking Modify. Make any changes and then click OK. Test the appearance of the dialog box configuration by clicking the Test button and inspecting the customized view. If unwanted modifications are accidentally saved, click Original and then click Yes to restore original settings.
| 5. | Repeat steps 2, 3, and 4 to fine-tune the view. If required, use the Move Up and Move Down option to place the control sets in the scrolling list.
| 6. | When you are satisfied with the modifications, click OK. Be sure to rebuild the address lists as described next in this lesson.
|
Note  | Don't forget to use the Administrative Note field on the Details tab to track and document template information. It is a useful troubleshooting tool when you are trying to figure out what changes were made to the template controls days, weeks, or months later and you don't remember! |
Rebuilding the address list membership and configuration is another task administrators must do after making many changes to address lists and templates. The resynchronization process is fairly easy: In Exchange System Manager, select and expand the Recipients node by clicking the plus sign; then select Recipient Update Services (RUS) to display the current RUS services in the right pane. Select the appropriate domain or enterprise configuration by right-clicking and selecting Rebuild. When prompted, read the dialog warning information and then click Yes to begin the rebuilding process. Updates will be available for users the next time Outlook is opened for use.
Managing Offline Address Lists Offline address lists are available only when Outlook users are working offline and not connected to the Exchange Server. Administrators configure offline address lists differently from online address books. First, they must configure the email client machine to use personal folders or to have a local copy of the server mailbox. Then the client system must be configured to use offline address lists. Use the following steps to configure Outlook 2003 on the client: 1. | Open Outlook 2003 and select Tools, Send/Receive, and Download Address Book to display the Address Book dialog box. Next, select Download Changes Since Last Send/Receive to download only items that have changes since the last synchronization. Uncheck this option to perform a full address book download, which requires more download time.
| 2. | Next, specify whether to download Full Details (all address details, but with a longer download time) or No Details (no address details, but selecting this option reduces download time). If multiple address books are available, pick which book to download in the Choose Address Book drop-down list.
| 3. | Click OK to finish the process.
|
Creating New Offline Address Lists The Default Offline Address List contains all the addresses listed in the global address list. For better organization and user productivity, administrators can create additional offline address books if necessary. To create a new offline address list, use the following steps: 1. | In ESM, expand the Recipients node by clicking the plus sign; then right-click the Offline Address Lists node, point to New, and click Offline Address List.
| 2. | Type a name for the offline address list; the name will be displayed in Active Directory and will be used to manage the offline address book in Exchange System Manager. Outlook does not use this name.
| 3. | To select a server for the offline address book, click Browse. Type the name of the preferred server or use the Advanced option to search for a server. Click Next to continue.
| 4. | Use Add and Remove to select address lists for Exchange Server 2003 to use as sources for the offline address book. When you are finished selecting items for the address list, click the Next Button twice and then click Finish to conclude the Offline Address List Wizard.
|
Rebuilding Offline Address Lists Exchange Server 2003 configures the Active Directory object for the offline address book, and the offline address book files are created the next time the Exchange store maintenance processes run. When new offline address books are created, the address lists must be rebuilt so that the updates are available to Outlook users. By default, Offline address books are automatically rebuilt daily at 5:00 a.m., yet they can be rebuilt manually if needed. To change the time when the rebuild occurs, perform the following steps: 1. | In ESM, expand the Recipients node by clicking the plus sign; then select the Offline Address Lists node. Right-click the address list to modify and click Properties.
| 2. | On the General tab, select one of the time intervals in the Update Interval drop-down list. To create a specific update interval setting, click Customize and then define a rebuild schedule.
| 3. | If required, click the check boxes for Exchange 4.0 and 5.0 compatibility and then click OK. Otherwise, just click OK to finish modifying the rebuild schedule.
|
Tip | Enabling offline address list support for Exchange 4.0 and 5.0 will affect the performance of Exchange 2003. If backward compatibility is not required, leave this option disabled to maximize Exchange 2003 performance. |
A manual rebuild of an address list can be performed using the following steps: 1. | In ESM, expand the Recipients node by clicking the plus sign; then select the Offline Address Lists node. Right-click the address list to manually rebuild and click Rebuild.
| 2. | When prompted to confirm the rebuild, click Yes to start the rebuild process. Updates will be available the next time users open Outlook.
|
|