VBA Techniques
The examples in this section illustrate common VBA techniques that you might be able to adapt to your own projects.
Toggling a Boolean property
A Boolean property is one that is either True or False . The easiest way to toggle a Boolean property is to use the Not operator, as shown in the following example, which toggles the WrapText property of a selection.
Sub ToggleWrapText() ' Toggles text wrap alignment for selected cells If TypeName(Selection) = "Range" Then Selection.WrapText = Not ActiveCell.WrapText End If End Sub
Note that the active cell is used as the basis for toggling. When a range is selected and the property values in the cells are inconsistent (for example, some cells are bold, and others are not), it is considered mixed, and Excel uses the active cell to determine how to toggle. If the active cell is bold, for example, all cells in the selection are made not bold when you click the Bold button. This simple procedure mimics the way Excel works, which is usually the best practice.
Note also that this procedure uses the TypeName function to check whether the selection is a range. If the selection isn't a range, nothing happens.
You can use the Not operator to toggle many other properties. For example, to toggle the display of row and column borders in a worksheet, use the following code:
ActiveWindow.DisplayHeadings = Not _ ActiveWindow.DisplayHeadings
To toggle the display of grid lines in the active worksheet, use the following code:
ActiveWindow.DisplayGridlines = Not _ ActiveWindow.DisplayGridlines
Determining the number of printed pages
If you need to determine the number of printed pages for a worksheet printout, you can use Excel's Print Preview feature and view the page count displayed at the bottom of the screen. The VBA procedure that follows calculates the number of printed pages for the active sheet by counting the number of horizontal and vertical page breaks:
Sub PageCount() MsgBox (ActiveSheet.HPageBreaks.Count + 1) * _ (ActiveSheet.VPageBreaks.Count + 1) & " pages" End Sub
The following VBA procedure loops through all worksheets in the active workbook and displays the total number of printed pages, as shown in Figure 11-13:
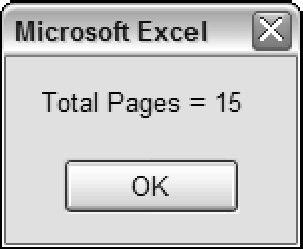
Figure 11-13: Using VBA to count the number of printed pages in a workbook.
Sub ShowPageCount() Dim PageCount As Integer Dim sht As Worksheet PageCount = 0 For Each sht In Worksheets PageCount = PageCount + (sht.HPageBreaks.Count + 1) * _ (sht.VPageBreaks.Count + 1) Next sht MsgBox "Total printed pages = " & PageCount End Sub
| CD-ROM | A workbook that contains this example is on the companion CD-ROM in a file named |
Displaying the date and time
If you understand the serial number system that Excel uses to store dates and times, you won't have any problems using dates and times in your VBA procedures.
The DateAndTime procedure displays a message box with the current date and time, as depicted in Figure 11-14. This example also displays a personalized message in the message box title bar.

Figure 11-14: A message box displaying the date and time.
The procedure uses the Date function as an argument for the Format function. The result is a string with a nicely formatted date. I used the same technique to get a nicely formatted time.
Sub DateAndTime() Dim TheDate As String, TheTime As String Dim Greeting As String Dim FullName As String, FirstName As String Dim SpaceInName As Long TheDate = Format(Date, "Long Date") TheTime = Format(Time, "Medium Time") ' Determine greeting based on time Select Case Time Case Is < TimeValue("12:00"): Greeting = "Good Morning, " Case Is >= TimeValue("17:00"): Greeting = "Good Evening, " Case Else: Greeting = "Good Afternoon, " End Select ' Append user's first name to greeting FullName = Application.UserName SpaceInName = InStr(1, FullName, " ", 1) ' Handle situation when name has no space If SpaceInName = 0 Then SpaceInName = Len(FullName) FirstName = Left(FullName, SpaceInName) Greeting = Greeting & FirstName ' Show the message MsgBox TheDate & vbCrLf & vbCrLf & "It's " & TheTime, vbOKOnly, Greeting End Sub In the preceding example, I used named formats ( Long Date and Medium Time ) to ensure that the macro will work properly regardless of the user's international settings. You can, however, use other formats. For example, to display the date in mm/dd/yy format, you can use a statement like the following:
TheDate = Format(Date, "mm/dd/yy")
I used a Select Case construct to base the greeting displayed in the message box's title bar on the time of day. VBA time values work just as they do in Excel. If the time is less than .5 (noon), it's morning. If it's greater than .7083 (5 p.m.), it's evening. Otherwise, it's afternoon. I took the easy way out and used VBA's TimeValue function, which returns a time value from a string.
The next series of statements determines the user's first name, as recorded in the General tab in Excel's Options dialog box. I used VBA's InStr function to locate the first space in the user's name. When I first wrote this procedure, I didn't consider a username that has no space. So when I ran this procedure on a machine with a username of Nobody, the code failed - which goes to show you that I can't think of everything, and even the simplest procedures can run aground. (By the way, if the user's name is left blank, Excel always substitutes the name User. ) The solution to this problem was to use the length of the full name for the SpaceInName variable so that the Left function extracts the full name.
The MsgBox function concatenates the date and time but uses the built-in vbCrLf constant to insert a line break between them. vbOKOnly is a predefined constant that returns , causing the message box to appear with only an OK button. The final argument is the Greeting , constructed earlier in the procedure.
| CD-ROM | The DateAndTime procedure is available on the companion CD-ROM in a file named |
Getting a list of fonts
If you need to get a list of all installed fonts, you'll find that Excel does not provide a direct way to retrieve that information. In previous editions of this book, I presented a technique that read the font names from the Font control on the Formatting toolbar. Excel 2007 no longer has a Formatting toolbar, and it's impossible to access the controls on the Ribbon using VBA. For compatibility purposes, however, Excel 2007 still supports the old CommandBar properties and methods - it's just that they don't work as you would expect.
In any case, I was able to modify my old procedure so it works reliably in Excel 2007. The ShowInstalledFonts macro displays a list of the installed fonts in column A of the active worksheet. It creates a temporary toolbar (a CommandBar object), adds the Font control, and reads the fonts from that control. The temporary toolbar is then deleted.
Sub ShowInstalledFonts() Dim FontList As CommandBarControl Dim TempBar As CommandBar Dim i As Long ' Create temporary CommandBar Set TempBar = Application.CommandBars.Add Set FontList = TempBar.Controls.Add(ID:=1728) ' Put the fonts into column A Range("A:A").ClearContents For i = 0 To FontList.ListCount - 1 Cells(i + 1, 1) = FontList.List(i + 1) Next i ' Delete temporary CommandBar TempBar.Delete End Sub | Tip | As an option, you can display each font name in the actual font (as shown in Figure 11-15). To do so, add this statement inside of the For-Next loop:  Figure 11-15: Listing font names in the actual fonts. Cells(i+1,1).Font.Name = FontList.List(i+1) Be aware, however, that using many fonts in a workbook can eat up lots of system resources, and it could even crash your system. |
| CD-ROM | This procedure is available on the companion CD-ROM. The file is named list fonts.xlsm . |
Sorting an array
Although Excel has a built-in command to sort worksheet ranges, VBA doesn't offer a method to sort arrays. One viable (but cumbersome) workaround is to transfer your array to a worksheet range, sort it by using Excel's commands, and then return the result to your array. But if speed is essential, it's better to write a sorting routine in VBA.
In this section, I cover four different sorting techniques:
-
Worksheet sort transfers an array to a worksheet range, sorts it, and transfers it back to the array. This procedure accepts an array as its only argument.
-
Bubble sort is a simple sorting technique (also used in the Chapter 9 sheet-sorting example). Although easy to program, the bubble-sorting algorithm tends to be rather slow, especially when the number of elements is large.
-
Quick sort is a much faster sorting routine than bubble sort, but it is also more difficult to understand. This technique works only with Integer and Long data types.
-
Counting sort is lightning fast, but also difficult to understand. Like the quick sort, this technique works only with Integer and Long data types.
| CD-ROM | The companion CD-ROM includes a workbook application (named |
Figure 11-16 shows the dialog box for this project. I tested the sorting procedures with seven different array sizes, ranging from 100 to 100,000 elements. The arrays contained random numbers (of type Long ).

Figure 11-16: Comparing the time required to perform sorts of various array sizes.
Table 11-1 shows the results of my tests. A 0.00 entry means that the sort was virtually instantaneous (less than .01 second).
| Array Elements | Excel Worksheet Sort | VBA Bubble Sort | VBA Quick Sort | VBA Counting Sort |
|---|---|---|---|---|
| 100 | 0.05 | 0.00 | 0.00 | 0.02 |
| 500 | 0.05 | 0.02 | 0.00 | 0.02 |
| 1,000 | 0.06 | 0.08 | 0.01 | 0.02 |
| 5,000 | 0.14 | 1.92 | 0.02 | 0.03 |
| 10,000 | 0.22 | 8.23 | 0.03 | 0.03 |
| 50,000 | 0.97 | 186.56 | 0.27 | 0.08 |
| 100,000 | 1.97 | 713.03 | 0.50 | 0.14 |
The worksheet sort algorithm is amazingly fast, especially when you consider that the array is transferred to the sheet, sorted, and then transferred back to the array.
The bubble sort algorithm is reasonably fast with small arrays, but for larger arrays (more than 5,000 elements), forget it. The quick sort and counting sort algorithm are both very fast, but they are limited to Integer and Long data types.
Processing a series of files
One common use for macros, of course, is to repeat an operation a number of times. The example in this section demonstrates how to execute a macro on several different files stored on disk. This example - which may help you set up your own routine for this type of task - prompts the user for a file specification and then processes all matching files. In this case, processing consists of importing the file and entering a series of summary formulas that describe the data in the file.
| Note | In previous editions of this book, I used the FileSearch object. Excel 2007 no longer supports the FileSearch object, so I resorted to the more cumbersome Dir function. |
Sub BatchProcess() Dim FileSpec As String Dim i As Integer Dim FileName As String Dim FileList() As String Dim FoundFiles As Integer ' Specify path and file spec FileSpec = ThisWorkbook.Path & "\" & "text??.txt" FileName = Dir(FileSpec) ' Was a file found? If FileName <> "" Then FoundFiles = 1 ReDim Preserve FileList(1 To FoundFiles) FileList(FoundFiles) = FileName Else MsgBox "No files were found that match " & FileSpec Exit Sub End If ' Get other filenames Do FileName = Dir If FileName = "" Then Exit Do FoundFiles = FoundFiles + 1 ReDim Preserve FileList(1 To FoundFiles) FileList(FoundFiles) = FileName & "*" Loop ' Loop through the files and process them For i = 1 To FoundFiles Call ProcessFiles(FileList(i)) Next i End Sub
| CD-ROM | This example, named |
The matching filenames are stored in an array named FoundFiles , and the procedure uses a For-Next loop to process the files. Within the loop, the processing is done by calling the ProcessFiles procedure, which follows. This simple procedure uses the OpenText method to import the file and then inserts five formulas. You may, of course, substitute your own routine in place of this one:
Sub ProcessFiles(FileName As String) ' Import the file Workbooks.OpenText FileName:=FileName, _ Origin:=xlWindows, _ StartRow:=1, _ DataType:=xlFixedWidth, _ FieldInfo:= _ Array(Array(0, 1), Array(3, 1), Array(12, 1)) ' Enter summary formulas Range("D1").Value = "A" Range("D2").Value = "B" Range("D3").Value = "C" Range("E1:E3").Formula = "=COUNTIF(B:B,D1)" Range("F1:F3").Formula = "=SUMIF(B:B,D1,C:C)" End Sub | CROSS-REFERENCE | For more information about working with files using VBA, refer to Chapter 27. |
EAN: 2147483647
Pages: 319