Consistent Volume Levels
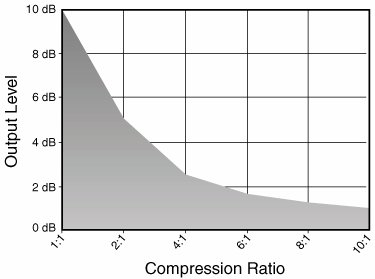
| Podcast consistency isn't just about release schedules and content. If you are going to be adding in clips from other people, such as music, promos, bumpers, tech tips, feedback, or even commercials, you need to keep the volume levels close so as not to cause the listeners any discomfort. If you already have a show produced, we would like you to try this experiment: Put on a good pair of headphones and listen to your latest show. Keep track of how many times you want to adjust the volume up or down. Now think about when you are listening to broadcast radio: How often do you have to change the volume? The reason why you do not need to adjust the volume levels with broadcast radio is that they heavily compress the audio. Audio compression in this case should not be confused with audio data compression, where you are converting the audio to a smaller format file such as MP3 or AAC. The audio compression we are talking about is peak-limiting or peak-reducing of the signal, such that you keep the output levels from getting too loud for one instance compared to the rest of the audio stream. Both Wichita Rutherford from 5 Minutes with Wichita and Derek from Skepticality stated that the number-one thing that podcasters can do to make their shows sound better is to apply audio compression and peak-limiting. For the most part, we are trying not to get overly technical in this book. This is one area, however, where we need to get a little geeky so that you can understand why audio compression is needed and are not intimidated by it (see Figure 11.1). Figure 11.1. Different types of software compressors and limiters.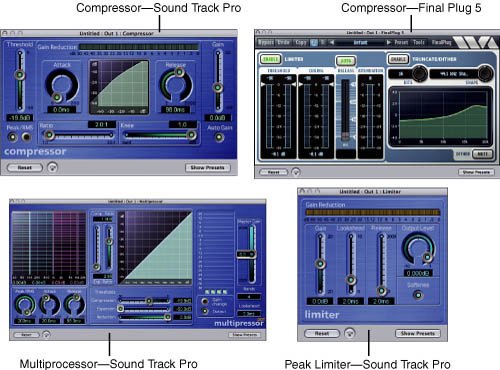 CompressionCompression is the reduction of the audio signal above a set output level, known as the threshold, by a given ratio of reduction. The compression ratio typically varies between 2:1 and 8:1 for most applications. Ratio refers to the amount of reduction in an output signal once it passes the threshold level. With a ratio of 2:1, for each increase in signal level of 2 dB, the actual output level will only increase 1 dB. Note dB (decibel) is a measure of loudness of sound. It is not a linear measurement. Each 3 dB increase in constant noise will double the sound's power; however, the human ear will perceive a doubling of loudness for every 10 dB increase. As an example, Figure 11.2 shows the output levels for an input signal of +10 dB and a threshold of 0 dB for various compression ratios. For a 2:1 ratio, the output would be +5 dB. For a 4:1 ratio, the output level would be +2.5 dB after compression. Figure 11.2. The net effect of various compression ratios on an input signal of 10 dB. When you're dealing with any technical area, some special terms are commonly used, and this is definitely the case with audio compression. Here are some basic terms you will see in the audio compression arena:
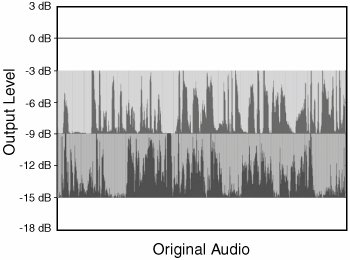
Of all these terms, the concept of gain could use an additional explanation. As an example of why gain is used, let's assume you and your co-host are talking. Typically your voice is peaking between 9 and 3 dB and your co-host, who is a little more timid, is peaking between 15 and 9 dB (see Figure 11.3). Figure 11.3. Original audio tracks for two different people. Now let's look at what happens to this signal when gain and compression are applied (see Figure 11.4). With +6 dB of gain added to the signal, your voice is boosted to 3 dB to +3 dB and your co-host's voice is boosted to 9 dB to 3 dB. With a threshold of 3 dB set and a ratio of 6:1 for compression, your voice after compression is between 3 dB and 2 dB. Therefore, your overall recording went from a range of 12 dB (15 dB to 3 dB) to a range of 7 dB, making the overall difference in your voices much less. And with some additional gain and compression, you can make this even tighter. Compression only lowers those sections of the audio track that are louder than the threshold level. It does not lower those sections below the threshold, nor does it raise any of the lower levels. If you want to raise any of the signal, you need to apply gain. Gain, however, raises all sections on the track, at least until the point when the signal level reaches the threshold level, and then compression kicks in also. Figure 11.4. Audio signals with gain and compression effects applied.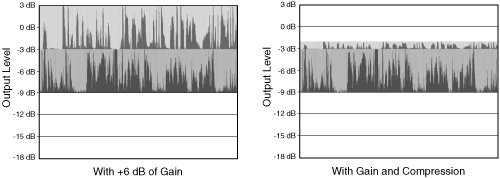 Choosing Your TargetYour job as the podcaster is to pick the threshold point, the compression ratio, the gain, and the attack and release times that result in the best overall sound while keeping the signal from clipping and having digital artifacts. This is something that you will learn only by doing. Compression is one of the most intimidating areas for new podcasters, but there is no real reason for it to be. As with most things, there's an initial learning curve that is quickly overcome. Compression that is done well results in a level output signal that your listeners cannot even tell was compressed to begin with. Compression done poorly results in unwanted digital artifacts that are very annoying and distracting for your listeners. Figuring out the proper settings for compression is done by trial and error, as every podcaster requires slightly different settings for peak results. For most applications, compression is best done in post-production with your editing software. If you do not do any post-production, you may want to look at a hardware solution for compression (for example, dbx 160a or dbx 266XL compressors). Either way, the overall approach to compression will be the same. The goal is to equalize the output levels of the audio so that the overall audio stream stays at a consistent level and makes the listening experience a pleasure for your audience.
People sometimes equate being consistent with being boring. That is not at all the case. There is nothing exciting about allowing your volume levels to vary all over the place. Nor is there anything exciting about making your listeners guess when your next show will come out. Some key goals as a producer of your show are to present a podcast that is physically easy on the ears, mentally easy to follow, and available when your listeners expect it. |
EAN: 2147483647
Pages: 162