| CD will be the simplest of the three tables. You'll use it to record the periodic interest credited to your CDs, entering only two pieces of data per record: the transaction date and the interest amount. The table below shows the fields we'll create for the CD table. Field Name | Type | Auto-Enter | Validation | Storage |
|---|
Identifier | Text | | | Indexed (minimal) | Date | Date | Creation Date | | | Last Modified | Date | Modification Date; Prohibit modification | | | Interest | Number | | Numeric only; Always validate | |
 With Investment Minder open, choose File > Define > Database. The Define Database dialog box appears. With Investment Minder open, choose File > Define > Database. The Define Database dialog box appears.
 Click the Tables tab at the top of the dialog box. Enter CD in the Table Name text box, and then click Create. Click the Tables tab at the top of the dialog box. Enter CD in the Table Name text box, and then click Create.
 Click the Fields tab. Ensure that CD is the current table, define the fields listed in the table above, set the field options, and click OK. Click the Fields tab. Ensure that CD is the current table, define the fields listed in the table above, set the field options, and click OK.
Field list for the CD table 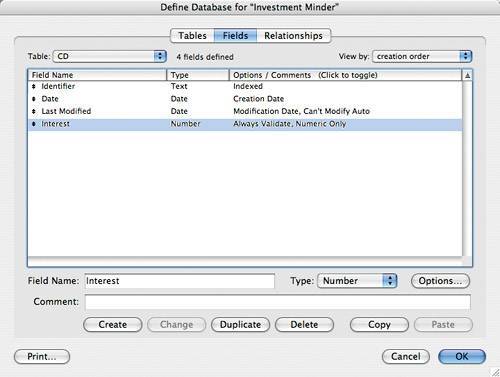  In Layout mode, select the CD layout from the layouts pop-up menu at the top of the status area. We'll modify this default layout to make it look like the other table layouts. In Layout mode, select the CD layout from the layouts pop-up menu at the top of the status area. We'll modify this default layout to make it look like the other table layouts.
 Set the Header, Body, and Footer fill colors to match the colors shown on page 26. Use the Size palette to set the height of the Header to 0.444", the Body to 4.444", and the Footer to 0.444". Set the Header, Body, and Footer fill colors to match the colors shown on page 26. Use the Size palette to set the height of the Header to 0.444", the Body to 4.444", and the Footer to 0.444".
 Select only the fields. Format them as Arial, 10 pt., black text, white fill color, Engraved effect, left aligned. Set the height of each field to 0.236". Make sure that a black border surrounds each field (Format > Field/Control > Borders), as explained on page 27. Select only the fields. Format them as Arial, 10 pt., black text, white fill color, Engraved effect, left aligned. Set the height of each field to 0.236". Make sure that a black border surrounds each field (Format > Field/Control > Borders), as explained on page 27.
 Select only the field labels. Format them as Arial, 12 pt., bold, black text. Set their height to 0.236" to match the height of the fields. Select only the field labels. Format them as Arial, 12 pt., bold, black text. Set their height to 0.236" to match the height of the fields.
 Select the first label/field pair and align them along their top edges by choosing Arrange > Align > Top Edges. Repeat for every additional label/field pair. Select the first label/field pair and align them along their top edges by choosing Arrange > Align > Top Edges. Repeat for every additional label/field pair.
  Drag the Last Modified label and field onto the left side of the Footer. Set the font to Arial, 12 pt., white and remove the boldface. Add a colon to the end of the label, changing it to Last Modified:. Drag the Last Modified label and field onto the left side of the Footer. Set the font to Arial, 12 pt., white and remove the boldface. Add a colon to the end of the label, changing it to Last Modified:.
 Select only the Last Modified field, set its fill pattern to transparent, set its effect to None, and remove the borders. Using the Format > Date command, select Format as: 12/25/03, / separator, and Zero as the leading character for both day and month numbers. Select only the Last Modified field, set its fill pattern to transparent, set its effect to None, and remove the borders. Using the Format > Date command, select Format as: 12/25/03, / separator, and Zero as the leading character for both day and month numbers.
 Use the Size palette to set the positions of the Last Modified field and label to match their positions on the Main layout. When switching between layouts to check the field and label positions, you'll be asked to save changes. Click the Save button. Use the Size palette to set the positions of the Last Modified field and label to match their positions on the Main layout. When switching between layouts to check the field and label positions, you'll be asked to save changes. Click the Save button.
 Drag the Identifier label into the left edge of the Header. Set the font color to white. Use the Text Tool to add a colon (:) to the end of the label. Drag the Identifier label into the left edge of the Header. Set the font color to white. Use the Text Tool to add a colon (:) to the end of the label.
 Format the Identifier field as Arial, 12 pt., bold, white. Set the fill pattern to transparent and the effect to None. Remove the field borders. Change the field's width to 3.264". Drag it into position beside its label in the Header. Use the Size palette to match the positions of the Identifier label and field on the Stocks layout. Format the Identifier field as Arial, 12 pt., bold, white. Set the fill pattern to transparent and the effect to None. Remove the field borders. Change the field's width to 3.264". Drag it into position beside its label in the Header. Use the Size palette to match the positions of the Identifier label and field on the Stocks layout.
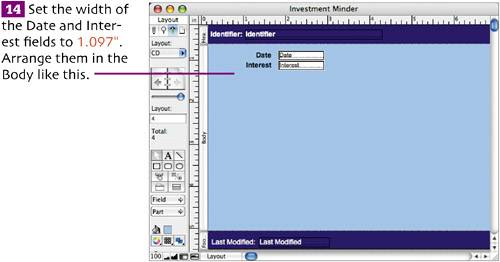  Select the Interest field, and choose Format > Number to apply the currency format. Select the Date field, and choose Format > Date to apply our standard Date format. Select the Interest field, and choose Format > Number to apply the currency format. Select the Date field, and choose Format > Date to apply our standard Date format.
 Save the layout changes by choosing Layouts > Save Layout. Save the layout changes by choosing Layouts > Save Layout.
|