XML and Flash
| Now that you have seen the structure of the XML document, and how to create elements and attributes, it's time to go over what Flash can do with it. Before we start loading XML into Flash, it is important to understand the XML class of object in Flash as well as some of its methods, properties, and events. The XML ObjectIntroduced back in Flash 5, the XML object is Flash's means of loading, parsing, and handling XML data. You create XML objects the same way you create any other object. Here is the generic code for creating XML objects: var myXML_xml:XML = new XML(); Now that you have a new XML object, you will need to know the methods, events, and properties that make it work. And the first thing you will want to know is how to get XML into Flash with the load() method. The load() MethodSimilar to the LoadVars load() method, the XML load() method goes to an assigned URL and brings the entire XML document back into Flash using HTTP. When the method is called, it sets the property loaded in the XML object to false until the document is completely loaded. Any XML data held within the XML object prior to the load() method being called will be disregarded completely. The generic layout of the code for the load() method is as follows: myXML_xml.load(URL); The URL parameter is a string literal path that is either relative or absolute to the XML document you want to load. When the data has completely loaded, the onLoad event will be triggered. The onLoad EventThe onLoad event is triggered when the entire XML document has been loaded. It is best used as a callback for the XML object. Here is the generic layout of the onLoad event: myXML_xml.onLoad = function(success){ //do something } This event has a single parameter that it passes into the function, the success parameter. The success parameter is a Boolean value that represents whether the XML document loaded without errors (true) or with errors (false). When the onLoad event fires, several properties of the XML object data is being loaded into change. The loaded PropertyAlthough it is obvious that when the onLoad event triggers, the loaded property will change, it is still important to know that this property can be monitored. The value of this property will always be a Boolean value. When the load() method is called, the property is set to false; when the content has loaded, it is changed to true. myXML_xml.loaded; The hasChildNodes() MethodWhen called, the hasChildNodes() method will return a Boolean value stating whether or not the loaded XML content has child nodes. A node is another name for element. myXML_xml.hasChildNodes(); This method is good for determining whether you have loaded a blank XML document. The status PropertyThe status property is very important when debugging XML-driven applications in Flash. This property returns a numerical value indicating whether the XML document loaded successfully. If it does not load successfully, it will return a number representing the error that occurred. This is the generic layout of the property: myXML_xml.status; And here is the list of the possible values it will return:
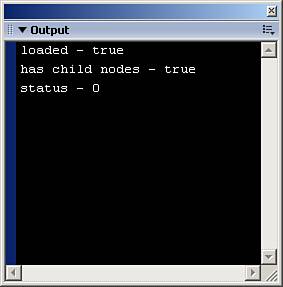
Now you have seen a few of the properties, methods, and events associated with the XML class (we will go over more as we continue through the chapter). Here is an example that will load an XML document that has been previously created into Flash, and then send messages about its loading success (or failure, but we hope not) to the Output panel.
The preceding code does a great deal. First, it creates the XML object that will be doing all the work and holding all the data. Then it creates a callback event for when the data is loaded. In that callback function, it checks to make sure the load went successfully, and if so, it sends the properties of loaded and status as well as the result from the hasChildNodes() method to the Output panel. If there was a major error, it will send an error message to the Output panel. After the callback is complete, it calls the load() method to bring in the content. Test the movie, and as long as you have the XML file and the Flash file in the same directory, you should have an Output panel similar to Figure 24.4. Figure 24.4. Use the onLoad event to alert your code when the XML has loaded.
When you have successfully brought XML data into Flash, you will want to do something with the data. And the first thing you will want to get out of the XML document you are loading is the firstChild. The firstChild PropertyThe firstChild property in the XML object represents the root node (element) in the XML document. This property not only contains the root node, but also all other nodes and their data as well. Basically, the firstChild property is the entire XML document. Let's look back at our preceding example, and this time, we will send the firstChildNode to the Output panel.
This code is nearly identical to the preceding, except that this time, we send the XML object's firstChild property to the Output panel. When this code is run, you will see all the XML data displayed in the Output panel. The next step is to go through the other nodes and get the data you need out of them. This is referred to as "walking the tree." Walking the tree means that we will go through each node and pull out the data or child nodes of that node, and then continue until we have walked the entire XML document. To do this, we use the childNodes property. The childNodes PropertyWe use the childNodes property in the XML object to walk the tree of our XML data. It returns an array of the current node's children nodes. That's a little confusing; what this means is that the property will return an array of every node (element) held within a specific node. Each element in the array is in fact an XML element and can be manipulated as such. Before we start using this property, it is important to look at the XML we are working with again. <team> <player> <name>Paul</name> <number>15</number> <position>Point Guard</position> </player> <player> <name>Matt</name> <number>21</number> <position>Small Forward</position> </player> <player> <name>Doug</name> <number>33</number> <position>Center</position> </player> <player> <name>Todd</name> <number>51</number> <position>Power Forward</position> </player> <player> <name>Eddie</name> <number>11</number> <position>Shooting Guard</position> </player> </team> This is the XML file we created and used in previous examples. And as mentioned, using the childNodes property, it converts this information into arrays of information, so let's take a look at what that might look like if we kept our data in arrays instead of XML. Here is the exact same information (minus the data itself) in array format: team[0] team[0].player[0] team[0].player[0].name[0] team[0].player[0].number[0] team[0].player[0].position[0] team[0].player[1] team[0].player[1].name[0] team[0].player[1].number[0] team[0].player[1].position[0] team[0].player[2] team[0].player[2].name[0] team[0].player[2].number[0] team[0].player[2].position[0] team[0].player[3] team[0].player[3].name[0] team[0].player[3].number[0] team[0].player[3].position[0] team[0].player[4] team[0].player[4].name[0] team[0].player[4].number[0] team[0].player[4].position[0] I'm just glad we can use XML instead of having to create the array structure like that. Although this setup is difficult to read, you can easily see the tree-like structure our XML documents have. So now that you've seen the structure, there is one more thing to cover before we start walking the tree: white space. White SpaceEven though we can tell just by looking at the XML structure where one node ends and the other begins, the computer has more difficulty. It uses white space, the empty space between each node, as its own node value. If we were to attempt to walk the tree without taking white space into consideration, we would receive many hard-to-find bugs. Thankfully, Flash's XML object does have a solution, the ignoreWhite property. By default, this property is set to false, meaning the parser takes the white space into consideration. We will want to ignore that white space by setting this property to TRue like this: myXML_xml.ignoreWhite = true; Put this with the code that creates the XML object, and you do not have to worry about white space any longer. NOTE If you are compiling to the Flash 5 Player, be careful; the ignoreWhite property sometimes does not work properly. Just make sure to test carefully when using it in that version of the player. However, it works fine in the Flash 6 Player and up. That's everything we need to know to begin walking the tree. Let's begin using the childNodes property in the following example.
This code works the same as previous examples, but this time when the XML has finished loading, if there are no errors, the first player node is sent to the Output panel along with the first player's name node. Now when you test the movie, the entire first player's node was traced along with the entire first player's name node. We will extend this example by pulling the data itself out with the nodeValue property of the node. The nodeValue property is a text node containing the actual data of the element. Each individual node has its own set of properties:
So now we will go back into the code in the main timeline and replace what is there with this: //create the XML object var myXML_xml:XML = new XML(); //ignore the white space myXML_xml.ignoreWhite = true; //create the event for when it loads content myXML_xml.onLoad=function(success){ if(success){ //trace the first player's, first elements value, name and type trace(this.firstChild.childNodes[0].childNodes[0].childNodes[0].nodeValue); trace(this.firstChild.childNodes[0].childNodes[0].nodeName); trace(this.firstChild.childNodes[0].childNodes[0].nodeType); }else{ trace("there was a major error"); } } //now load the content myXML_xml.load("team1.xml"); The preceding code should look familiar by now except that we have changed what is being sent to the Output panel. This time we are sending the name of the node we are looking at, its value, and the type. Run this code, and you should see in the Output panel the name "Paul," the node name "name," and the node type "1" meaning that it is an XML node. Now we will go a step further and incorporate a loop statement to walk the entire tree and return all of its values. Still in the same example, replace the code in the main timeline with the following:
This code takes a giant step forward from what we have done so far. Now instead of hard-coding the function to walk through each node, we use two looping statements to go through each node and return not only the node's value, but also the node's name. This has tremendous implications because now we can extend our XML document not only by adding players, but also by adding information about each of those players. For instance, if you were to return to the XML document we are using in this example, give each player a new child node that represents the height of the player, and place a value for the nodes, you could still go back to Flash and run the identical code to get all the information. Run this code and you will see all the players and their information in the Output panel. But using childNodes is not the only way to walk an XML tree, there is also the nextSibling property. The nextSibling PropertyThe nextSibling property allows you to move to the next available node in a certain level of hierarchy. For instance, if the selected node is the first player node, the nextSibling property of that node would be the next player node. If there is no nextSibling available, then null is returned. Here is the same example we just went through, but now using the nextSibling property. Replace the current ActionScript with this: //create the XML object var myXML_xml:XML = new XML(); //ignore the white space myXML_xml.ignoreWhite = true; //create the event for when it loads content myXML_xml.onLoad=function(success){ if(success){ //the first player node var playerNode = this.firstChild.firstChild //this will search through the players while(playerNode){ //the first property node of a player var propNode = playerNode.firstChild; //this will search through the players' nodes while(propNode){ var nodeName:String = propNode.nodeName; var nodeValue:String = propNode.firstChild.nodeValue; trace(nodeName+"="+nodeValue); propNode = propNode.nextSibling; } playerNode = playerNode.nextSibling; } }else{ trace("there was a major error"); } } //now load the content myXML_xml.load("team1.xml"); This code looks very similar to the previous version, except this time instead of using the childNodes property, we use the nextSibling property to go through the actual nodes of the XML object. We first create a variable to hold the first player node. Then we use a while loop to walk through each of the player nodes. Because the nextSibling property will return null when there are no more sibling nodes, the loop will end with the last player node. And at the end of that loop, we set the variable to its own nextSibling. Inside the main loop, we do basically the same thing with the individual player property nodes. Notice that in order to grab the data within the node using nextSibling, we call the firstChild property again. Walking the tree this way may seem odd at first, but the more you work with it, the more you will see it is much faster than using childNodes. So far, all we have done is use information in the nodes. Now let's go over how to get attributes out of the nodes. The attributes PropertyThe attributes property of the XML object is used to get all known attributes of a single node, and return them in the form of an array with named elements. For example, the following node has three different attributes: <player name="Paul" number="15" position="Point Guard"/> The attributes property of this node would return an array with three elements: name, number, and position. Before we continue with the example, we should look at the XML we will be working with. You have already created it and called it team3.xml: <?xml version="1.0"?> <team> <player name="Paul" number="15" position="Point Guard"/> <player name="Matt" number="21" position="Small Forward"/> <player name="Doug" number="33" position="Center"/> <player name="Todd" number="51" position="Power Forward"/> <player name="Eddie" number="11" position="Shooting Guard"/> </team> Notice that this XML has no data in the nodes, only attributes. We will be working with this file in a similar fashion as the previous one. In this example, we will grab the information from a single attribute:
This code creates the XML object as before. And as before, it creates the callback for the onLoad event, but this time, we send the attributes in the nodes to the Output panel. Run this code and you will see the same information we have covered before, but this time it was derived from attributes, not node values. You can also get all the attributes with a specific node using the following example. Go back into the main timeline and replace the code with this: //create the XML object var myXML_xml:XML = new XML(); //ignore the white space myXML_xml.ignoreWhite = true; //create the event for when it loads content myXML_xml.onLoad=function(success){ if(success){ //first player node var playerNode = this.firstChild.firstChild; //create the loop statement to look through the players' attributes for(attribute in playerNode.attributes){ trace(attribute); } }else{ trace("there was a major error"); } } //now load the content myXML_xmlA.load("team3.xml"); What this code does is use a for in loop to look through the array of attributes, and it sends each attribute name to the Output panel. Run this code and you will see all three attributes in the Output panel. Now that we have seen how to create the XML, load the XML, and walk the tree, the next example will use some visual elements on the stage and bring it all together. In this example, we will still be using the team3.xml file we created before:
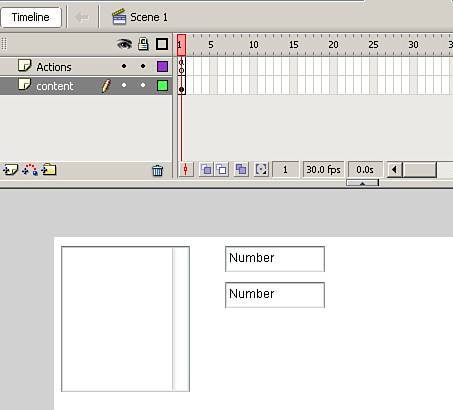
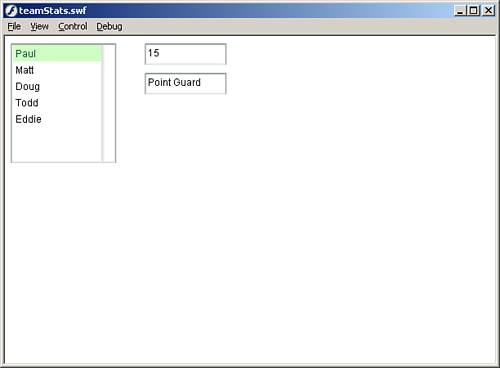
The preceding code creates the XML object to handle the XML data. It creates the callback for when the XML is completely loaded, and within this callback, it creates an array, which we use later in the code. It loops through the XML placing information into a temporary array that is then added to the end of the main array. At the end of the loop, we set the dataProvider property of the myList_list List component. After that, it loads the XML into the XML object. Then it creates a generic object to listen for the event that is triggered when a user selects a player from the List component. When a user makes a selection, the TextArea components receive the information, and the number and position of the selected player is shown. After that, the code sets the event listener to our List component, myList_list. Run this code, and you will see that every time you click a player's name, his information is shown in the TextArea components, as shown in Figure 24.6. You can go out and change the XML file to have more players, and this application will still work. That's the benefit of using XML data and Flash; you can build rich, engaging interfaces that will always run with the newest information. Figure 24.6. Every time a player's name is selected, his information is displayed in the application.
So far we have covered how to work with XML manually. Now with Flash Professional 8, you can use the XMLConnector component to help speed up production. |
EAN: 2147483647
Pages: 319