Updating Groups of Rows
It’s easy enough to use a table or a query in Datasheet view to find a single record in your database and change one value. But what if you want to make the same change to many records? Changing each record one at a time could be very tedious.
Remember that in Chapter 7 you learned how to construct queries to test proposed new validation rules. In the HousingDataCopy.accdb database, there’s a table-level validation rule defined in tblFacilityRooms that doesn’t let you enter a WeeklyRate value that is greater than seven times the DailyRate value. If you want to change this rule to ensure that the WeeklyRate value is no more than six times the DailyRate value (thereby ensuring that the weekly rate is a true discount), you must first update the values in the table to comply with the new rule.
You could open tblFacilityRooms in Datasheet view and go through the individual rows one by one to set all the WeeklyRate values by hand. But why not let Microsoft Office Access 2007 do the work for you with a single query?
Testing with a Select Query
Before you create and run a query to update many records in your database, it’s a good idea to first create a select query using criteria that select the records you want to update. You’ll see in the next section that it’s easy to convert this select query to an update query or other type of action query after you’re sure that Office Access 2007 will process the right records.
You could certainly update all the rows in tblFacilityRooms, but what about rows where the WeeklyRate value is already less than or equal to 6 times the DailyRate value? You don’t want to update rows that already meet the proposed validation rule change-you might actually increase the WeeklyRate value in those rows. For example, a room might exist that has a DailyRate value of $50 and a WeeklyRate value of $275. If you blanket update all rows to set the WeeklyRate field to six times the DailyRate field, you’ll change the WeeklyRate value in this row to $300. So, you should first build a query on tblFacilityRooms to find only those rows that need to be changed.
Open HousingDataCopy.accdb and start a new query on tblFacilityRooms. Include the FacilityID, RoomNumber, DailyRate, and WeeklyRate fields. Enter the criterion >[DailyRate]*6 under the WeeklyRate field. Your query should look like Figure 9–1.
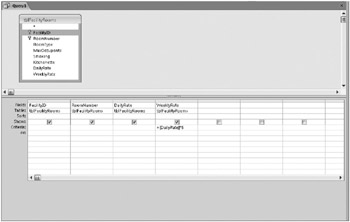
Figure 9–1: This select query finds weekly rates that will fail the new table validation rule.
When you run the query, you’ll see 276 records that you want to change, as shown in Figure 9–2. (There are 306 records in the table.)
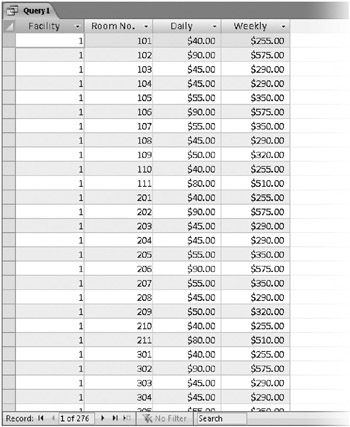
Figure 9–2: This is the recordset of the select query shown in Figure 9–1.
Converting a Select Query to an Update Query
Now you’re ready to change the query so that it will update the table. When you first create a query, Access 2007 builds a select query by default. You can find commands for the four types of action queries-make-table, update, append, and delete-in the Query Type group on the Design contextual tab below Query Tools, as shown in Figure 9–3. (Switch back to Design view if you haven’t already done so.) Click the Update button to convert the select query to an update query.
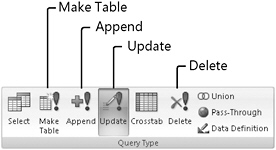
Figure 9–3: The Query Type group on the Design contextual tab below Query Tools contains commands for the four types of action queries.
When you convert a select query to an update query, Access highlights the Update button in the Query Type group when the query is in Design view and adds a row labeled Update To to the design grid, as shown in Figure 9–4. You use this row to specify how you want your data changed for those rows that meet the query’s criteria. In this case, you want to change the WeeklyRate value to [DailyRate]*6 for all rows where the rate is currently too high.
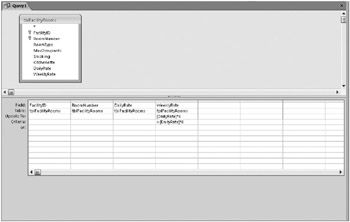
Figure 9–4: An update query shows an Update To row in the design grid.
| Inside Out-What Can I Put in Update To? | You can enter any valid expression in the Update To row. You can include in the expression one or more of the fields from the source tables in the query. For example, if you want to raise the DailyRate value for a certain type of room by 10 percent, rounded to the nearest dollar (zero decimal places), you can include the DailyRate field in the design grid and enter
Round( CCur( [DailyRate] * 1.1), 0) in the Update To row. Note that this formula uses the Round and CCur built-in functions discussed in the previous chapter to round the result to the nearest dollar. |
Running an Update Query
If you want to be completely safe, you should make a backup copy of your table before you run an update query. To do that, go to the Navigation Pane, select the table you’re about to update, and click the Copy command in the Clipboard group on the Home tab on the Ribbon. Then click the Paste command in the same Clipboard group, and give the copy of your table a different name when Access prompts you with a dialog box. (Be sure you select the default Structure And Data option.) Now you’re ready to run the update query.
To run the query, click the Run command in the Results group on the Design tab below Query Tools. Access first scans your table to determine how many rows will change based on your selection criteria. It then displays a confirmation dialog box like the one shown in Figure 9–5.

Figure 9–5: This dialog box reports the number of rows that will be changed by an update query.
You already know that you need to update 276 records, so you can perform the update by clicking Yes in the dialog box. (If the number of rows indicated in the dialog box is not what you expected or if you’re not sure that Access will update the right records or fields, click No to stop the query without updating.) After the update query runs, you can look at the table or create a new select query to confirm that Access made the changes you wanted. Figure 9–6 shows the result-no weekly rate is greater than six times the daily rate.
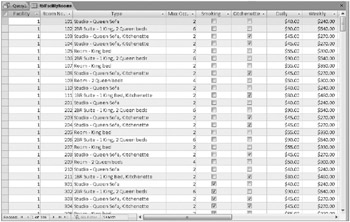
Figure 9–6: You can now see the updated data in the tblFacilityRooms table.
![]()
![]()
![]()
![]() If you think you might want to perform this update again, you can save the query and give it a name. This sample query is saved in the sample database as qxmplUpdateWeekly. In the Navigation Pane, Access distinguishes action queries from select queries if by displaying a special icon, followed by an exclamation point, before action query names. For example, Access displays a pencil and an exclamation point next to the new update query that you just created. You’ll see later that make-table queries have a small datasheet with a starburst in one corner, append queries have a green cross, and delete queries have a red X. Note that if you open an action query from the Navigation Pane, you’ll execute it. If you want to see the datasheet of the action query, open it in Design view first, and then switch to Datasheet view.
If you think you might want to perform this update again, you can save the query and give it a name. This sample query is saved in the sample database as qxmplUpdateWeekly. In the Navigation Pane, Access distinguishes action queries from select queries if by displaying a special icon, followed by an exclamation point, before action query names. For example, Access displays a pencil and an exclamation point next to the new update query that you just created. You’ll see later that make-table queries have a small datasheet with a starburst in one corner, append queries have a green cross, and delete queries have a red X. Note that if you open an action query from the Navigation Pane, you’ll execute it. If you want to see the datasheet of the action query, open it in Design view first, and then switch to Datasheet view.
| Note | It’s a good idea to include identifying fields (such as FacilityID and RoomNumber in the preceding example) when you build a test select query that you plan to convert to an action query. However, Access discards any fields for which you have not specified criteria or that you do not want to update when you save your final action query. This is why you won’t see anything but the WeeklyRate field in qxmplUpdateWeekly. |
To run an action query again, right-click on the query name in the Navigation Pane and click Open on the shortcut menu that appears. When you run an action query from the Navigation Pane, Access 2007 displays a confirmation dialog box similar to the one shown in Figure 9–7. Click Yes to complete the action query. If you want to disable this extra confirmation step (we don’t recommend that you do so), click the Microsoft Office Button, click Access Options, and in the Advanced category of the Access Options dialog box, clear the Action Queries check box under Confirm in the Editing section.

Figure 9–7: This dialog box asks you to confirm an action query.
Updating Multiple Fields
When you create an update query, you aren’t limited to changing a single field at a time. You can ask Access 2007 to update any or all of the fields in the record by including them in the design grid and then specifying an update formula.
Before Access updates a record in the underlying table or query, it makes a copy of the original record. Access applies the formulas you specify using the values in the original record and places the result in the updated copy. It then updates your database by writing the updated copy to your table. Because updates are made to the copy before updating the table, you can, for example, swap the values in a field named A and a field named B, by specifying an Update To setting of [B] for the A field and an Update To setting of [A] for the B, field. If Access were making changes directly to the original record, you’d need to use a third field to swap values because the first assignment of B, to A would destroy the original value of A.
If you remember from Chapter 7, we also discussed the possibility of reducing the highest daily rate charged for a room to $90. If you do that, you must also update the WeeklyRate value to make sure it doesn’t exceed six times the new daily rate. First, build a query to find all rows that have a value in the DailyRate field that exceeds the new maximum. As before, start a query on tblFacilityRooms and include the FacilityID, RoomNumber, DailyRate, and WeeklyRate fields. Place the criterion >90 under the DailyRate field. Your query should look like Figure 9–8. If you run this query, you’ll find 26 rows that meet this criterion in the sample database.
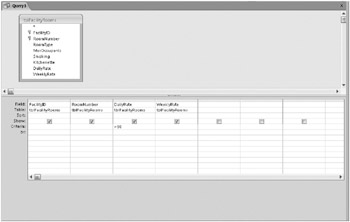
Figure 9–8: This query finds daily rates greater than $90.
Now comes the tricky part. Change your query to an update query and enter 90 on the Update To row under DailyRate. You might be tempted to set Update To under Weekly-Rate to [DailyRate]*6 again, but you would be wrong. The reference to [DailyRate] gets you the original value of that field in each row-before it gets updated to the value 90. You know you’re going to set DailyRate in rows that qualify to 90, so enter the constant 540 or the expression (90 * 6) in the Update To line under WeeklyRate. Your update query should now look like Figure 9–9.
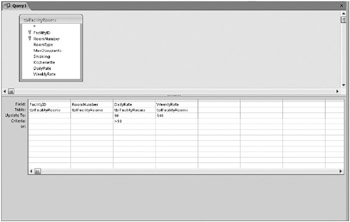
Figure 9–9: This query finds daily rates greater than $90.
| Inside Out-Performing Multiple Updates with Expressions That Reference Table Fields | If you want to increase (or decrease) DailyRate by some percentage, then you should repeat the calculation for the new DailyRate value and multiply by 6, to calculate the new WeeklyRate value. For example, if you want to increase the rate by 10 percent, your expression in Update To for DailyRate is
CCur(Round([DailyRate] * 1.1, 0)) Then your expression under WeeklyRate should be
CCur(Round([DailyRate] * 1.1), 0)) * 6 Remember, DailyRate in any expression references the old value in the row before it is updated. |
You can find this query saved as qxmplUpdateDailyWeekly in the sample database.
Creating an Update Query Using Multiple Tables or Queries
The target of an update query should generally be one table, but you might need to update a table based on criteria you apply to a related query or table. Consider the tblContacts table in the Conrad Systems Contacts sample application. The table contains an Inactive field that you can set to Yes to remove that contact from most displays without removing the row from the database. Although you can edit each contact individually and choose to mark them inactive, you occasionally might want to run an update query that automatically sets this flag when the contact hasn’t had any activity for a long time.
You studied how to solve a complex unmatched problem in Chapter 8. You need to apply a similar concept to this problem-find the contacts who have activity since a certain date of interest and then use an outer join to identify those who have no activity so that you can mark them inactive.
The sample database contains contact events from January 11, 2007, through July 9, 2007. If you were using this data actively, you would be entering new contact events every day, but this sample data is static. Let’s assume that today is January 1, 2008, and you want to flag any contact who hasn’t had any event in the last six months.
First, you need to find out who hasn’t contacted you since July 1, 2007. Start by opening the ContactsDataCopy.accdb sample database. Start a query with tblContactEvents and include the ContactID and ContactDateTime fields in the query grid. Under ContactDateTime, enter a criterion of >=#7/1/2007#. Your query should look like Figure 9–10.
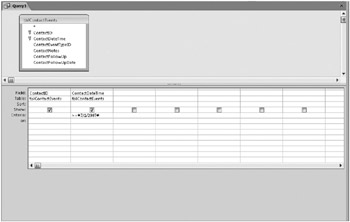
Figure 9–10: This query finds contact events since July 1, 2007.
If you run this query, you’ll find 11 rows for 10 different contacts. Save this query as qryContactsSinceJuly2007. (You can also find the query saved as qxmplContactEventsSince01July2007 in the sample database.)
Next, you want to find who has not contacted you in this time frame. Start a new query with tblContacts and add the query you just built. You should see a join line linking the ContactID field in tblContacts and the ContactID field in your query. Remember from Chapter 8, that you need an outer join from the table to the query to fetch all rows from tblContacts and any matching rows from the query. Double-click the join line to open the Join Properties dialog box and choose the option to include all rows from tblContacts and any matching rows from qryContactsSinceJuly2007. You should now have an arrow pointing from the table to the query.
Include in the query grid the ContactID, FirstName, LastName, and Inactive fields from tblContacts and the ContactID field from the query. You want contacts who aren’t in the list of “recent” contact events, so add the Is Null test on the Criteria line under ContactID from the query. Your query should now look like Figure 9–11.
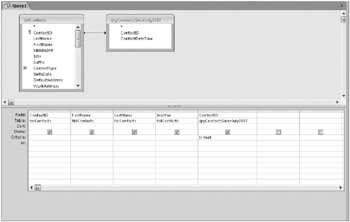
Figure 9–11: This query finds contacts with no contact events since July 1, 2007.
If you run this query, you’ll find out that there are no contact events after the specified date for 22 of the 32 contacts. Remember, this is only an example.
Now you have the contacts you want to set as inactive. In Design view, turn the query into an update query. Under the Inactive field, set Update To to True. You can now run this query to verify that it does mark the 22 contacts as inactive. You can find this query saved as qxmplUpdatelnactive in the sample database.
| Inside Out-Making Update Queries Generic with Parameters | In Chapter 7, you learned how to create a date/time comparison expression using the DateDiff function. In Chapter 8, you learned how to define parameters in your queries. In the example to update inactive status, you entered a specific comparison date in the select query you built If you really want to save and run a query like this periodically, the select query shouldn’t use a static value that you would have to change each time you wanted to perform this update. Using DateDiff, you can define a comparison with an offset relative to the current date. With a parameter, you can create a dynamic prompt for the date you want at the time you run the query. You might also want to write a converse query that clears the Inactive field for contacts who do have recent contact events. |
EAN: 2147483647
Pages: 234