Using XML in Microsoft Access
Access 2007 not only allows you to import and export data from multiple, related tables, it also supports the exporting of forms and reports that look similar to the original object in your Access application. The new table templates feature that you saw in Chapter 4, “Creating Your Database and Tables,” and all the Ribbons you have been working with in Access 2007 also depend on XML technology.
Exporting and Importing XML from the User Interface
From the Navigation Pane of any Access desktop database (.accdb) or project file (.adp), you can export any table, query (view, function, or stored procedure in a project file), form, or report by selecting the object in the Navigation Pane, clicking the More button in the Export group on the External Data tab, and then clicking XML File. (You can also right-click the object in the Navigation Pane, click Export on the shortcut menu, and then click XML File.) You can also import any XML file as a table by clicking the XML File button in the Import group on the External Data tab. The following sections show you how to perform these actions.
Exporting Access Tables and Queries
You can export an entire table and any related tables as well as the data extracted by a query and any related data; or you can open a table or query datasheet, select several rows, and export only the selected data. If you have previously applied a filter to your table or query datasheet, you can also ask the XML export facility to apply that filter to select the data to be exported.
Let’s take a look at exporting the tblFacilities table and one of its related tables in the Housing Reservations database (Housing.accdb). Open the database and select the tblFacilities table in the Navigation Pane. Click the More button in the Export group on the External Data tab and then click XML File. Access shows you the Export-XML File wizard, as shown in Figure 23–2. In the File Name box, enter the location where you want to save the exported files and the name of the file. You can click the Browse button to open the File Save dialog box and browse to the folder in which you want to save the files. (In our example, we are saving to the \WebChapters\XML folder.)
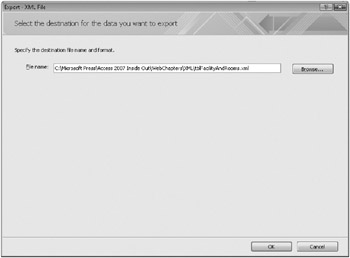
Figure 23–2: Specify a destination folder and name for your exported XML document on the first page of the Export-XML File wizard.
In this exercise, you’ll export both the four records from the tblFacilities table as well as the related records from the tblFacilityRooms table, so change the file name to tblFacilityAndRooms, as shown in Figure 23–2. Click OK, and Access shows you the Export XML dialog box, as shown in Figure 23–3.
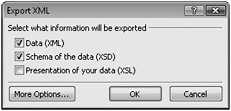
Figure 23–3: Access displays the Export XML dialog box when you export a table to an XML file.
Notice that the Export XML dialog box assumes that you want to export both the data file (.xml) and the schema file (.xsd). If you also want to export the presentation file (.xsl) and create an HTML file that loads the data using the style sheet, select the Presentation Of Your Data (XSL) check box. If you want to quickly export your data with the default options, you can click OK to complete the export process. However, let’s first take a look at some of the options you can choose. Click the More Options button, and Access shows you the expanded Export XML dialog box shown in Figure 23–4.
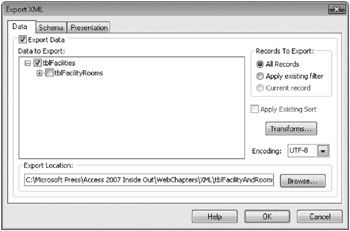
Figure 23–4: Click the More Options button shown in Figure 23–3 to display additional XML export customizing options.
In the expanded dialog box, you can see three tabs corresponding to the three major types of files you can choose to export. (The Presentation tab includes both the presentation file and the companion HTML file.) If you left the Data (XML) check box selected in the original dialog box, you’ll see the Export Data check box selected on the Data tab. Notice that Access shows you the first table that it finds related to the tblFacilities table-tblFacilityRooms. Go ahead and select the check box next to that table to include the related information in your XML files. You can also click the plus sign next to the table name to see other related tables that you might want to include-in this case you could expand the tree of relationships and choose tblReservations, tblReservationRequests, and even tblEmployees and tblDepartments.
In the upper right of the dialog box, you can select which records to export under Records To Export. The default is to export all records in all tables that you select. Because we previously applied a filter to tblFacilities in Datasheet view and then saved the filter, you can also see an Apply Existing Filter option offered. Unfortunately, Access doesn’t give you any clues about the saved filter, so you would need to remember the last filter that you applied and saved with the table to take advantage of this option. There’s also a dimmed option to export the current record, but you’ll see that option available only when you have opened the table in Datasheet view, selected a record, and then started an export to an XML file. (You can try this on your own by opening tblFacilities in Datasheet view, selecting one record, clicking the More button in the Export group on the External Data tab, and then clicking XML File.)
Directly under the Records To Export section, you can see a dimmed check box labeled Apply Existing Sort. As you might surmise, Access would show you this option if you had previously sorted the data in the table in Datasheet view and saved the sort. Directly under the sort option is a Transforms button. If you previously saved a presentation file (.xsl) or created a presentation transform file (.xslt), you can click this button to specify the file. (Creating XSLT transformation files is beyond the scope of this book.) The export facility applies the transformation to your XML file after it completes the export.
In the Encoding box, you can choose options to export the text in UTF-8 (single-byte character set) or UTF-16 (extended character set). You should choose UTF-16 only if your data contains non-Latin characters. (English and most European languages use a Latin character set.) Finally, you can change your mind about where you want to store the resulting file and what name you want to give to the file by typing in the Export Location box or by clicking the Browse button to navigate to a new location. Click the Schema tab to see the options that you can specify for the schema file, as shown in Figure 23–5.
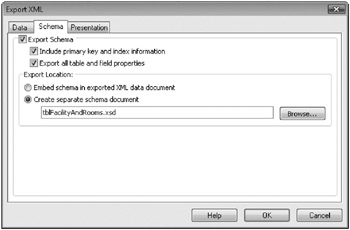
Figure 23–5: You can select options to export the table definition on the Schema tab of the Export XML dialog box.
If you selected the Schema Of The Data (XSD) check box in the initial Export XML dialog box (Figure 23–3), you’ll see the Export Schema check box selected here. As you can see, you have the options to include the primary key and index definitions in your schema file and to export all the table and field properties. You can also choose to embed the schema inside the XML data document file, but choosing Create Separate Schema Document (the default) gives you more flexibility. Finally, you can specify an alternate location for the schema file, but you should normally store it in the same location as the data document. On the last tab, Presentation, you can specify options for your presentation file (.xsl), as shown in Figure 23–6. (We have selected the Export Presentation check box on this tab.)
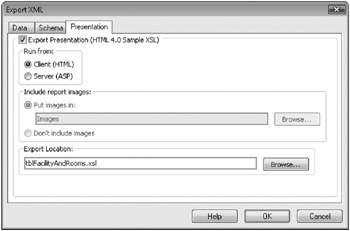
Figure 23–6: Select the Export Presentation check box on the Presentation tab in the Export XML dialog box to create an HTML file.
Notice that you have the option to create a standard HTML file (.htm) by selecting Client (HTML) or an Active Server Page file (.asp) by selecting Server (ASP). You can open an HTML file directly in your browser, but you must publish an Active Server Page to a Web server that supports dynamic pages and then request it from the server to be able to open it. Remember, however, that you’re publishing your data as static XML, so neither the HTML nor the Active Server Page will fetch current data from your database or allow you to update the data in the XML file. Also, even though you have selected multiple tables on the Data tab, the Web pages will display data only from the first table. (This is a limitation of the export XML facility in Access 2007.)
As you’ll see later when you ask to export a form or report to XML, Access makes the Include Report Images options available to allow you to include any graphics that you have used in the design of your form or report in the resulting Web page. (Yes, this option applies to forms, too!)
![]() Click OK to complete the export. The last page of the Export-XML File wizard asks you whether you want to save the export steps for future use. You don’t need to save these steps, so click Close to close the wizard. When you open the resulting tblFacilityAndRooms.htm file in your browser, it should look exactly like Figure 23–1, but if you open the XML file, you’ll see that Access included the data for both tables. You can find the sample files saved on the companion CD as tblFacilityAndRoomsXmpl.htm, .xml, .xsd, and .xsl.
Click OK to complete the export. The last page of the Export-XML File wizard asks you whether you want to save the export steps for future use. You don’t need to save these steps, so click Close to close the wizard. When you open the resulting tblFacilityAndRooms.htm file in your browser, it should look exactly like Figure 23–1, but if you open the XML file, you’ll see that Access included the data for both tables. You can find the sample files saved on the companion CD as tblFacilityAndRoomsXmpl.htm, .xml, .xsd, and .xsl.
| Inside Out-Exporting to ASP | If you’re running Microsoft Windows XP Professional or Windows Vista and have installed and started Internet Information Services, you can export your data as an Active Server Page to your server folders (usually C:\Inetpub\wwwroot) by selecting the Server (ASP) option under Run From on the Presentation tab. Be sure to export the XML, XSD, and XSL files to the same Web folder as the Active Server Page. You can then view the resulting Active Server Page by opening your browser and asking it to display this address: http://localhost/tblFadlityAndRooms.asp |
Exporting Access Forms and Reports
A useful feature in Access is the ability to create Web pages from your Access forms and reports. Unlike when you export the data from a table or query to create a simple formatted Web page, you can export the data behind a form or report and create a special presentation file that emulates the look of the original object in Access. To do this, Access creates a special version of the XSL file using an extension to the language called ReportML. This language extension includes special tags to support form and report formatting, and you can open these files only in a browser that supports the version of VBScript and the Document Object Model (DOM) that understands them (such as Internet Explorer version 6, and later).
You might find this feature useful to produce Web reports that look similar to the design of the original object. To update the data periodically, all you need do is replace the XML file containing the data used by the Web page. The one drawback to this process is you can export only forms and reports that do not include subforms or subreports. Although Access will let you export a form that has one or more subforms, it will export and format only the data shown in the outer form.
Let’s take a look at a simple form in the Housing Reservations application (Housing.accdb) that exports nicely as XML. Open the database, and select the frmDepartments form in the Navigation Pane. Click the More button in the Export group on the External Data tab, and then click XML File to start the process.
On the first page of the Export-XML File wizard (shown previously in Figure 23–2), you can type a location and name for the export file. You can also click the Browse button to browse for a new location. For this example, select the \WebChapters\XML folder as you did in the previous example. You can keep the default name Access provided-frmDepartments.xml-for the file name and then click OK to continue. In the initial Export XML dialog box (shown in Figure 23–3), you’ll see the option to export the data selected. Because you want to see the data formatted similar to the form, also make sure that the Schema Of The Data (XSD) and Presentation Of Your Data (XSL) check boxes are selected, and then click the More Options button to look at the options you can customize. Figure 23–7 shows you the options on the Data tab.
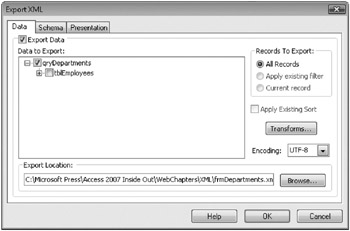
Figure 23–7: The Data tab options when exporting a form as XML are the same as when exporting a table.
Notice that Access gives you the option to include additional related tables, but keep in mind that you’ll see only the first table in the resulting Web page. If you opened the form in Form view first, Access would also offer you the option to export the current record only.
The options on the Schema tab are exactly as you saw earlier when exporting a table (Figure 23–5). Click the Presentation tab to see additional options related to exporting a form, as shown in Figure 23–8.
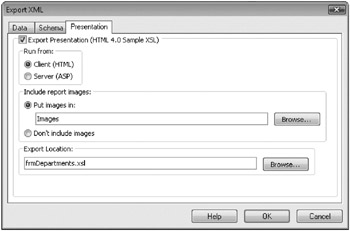
Figure 23–8: The Presentation tab of the Export-XML dialog box lets you set options to include images when you export a form as XML.
Notice that Access now gives you the option to export any images. We created the original form using the Form Wizard and chose the Trek format, which applies a light orange pattern bitmap to the form background. If you want the resulting Web page to include the background, you should leave the Put Images In option selected. Click OK to export the form and its data. Click Close on the last page of the Export-XML File wizard, and don’t save the export steps. When you open the HTM file, it should look like Figure 23–9.
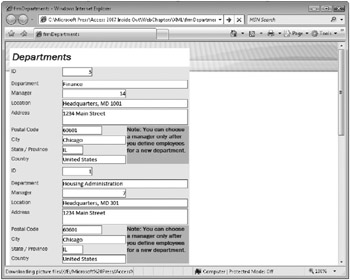
Figure 23–9: The frmDepartments form exported as XML is shown here displayed in a Web page.
![]() Notice that the ReportML style specification does a fairly good job of copying the fonts and styles from the original form. However, it also displays all labels, text boxes, combo boxes, and list boxes that you designed on the form, including a hidden label. When you open the form in the application, that label is revealed only when you’re creating a new department. Also, the form background is the background of the Web page, but it doesn’t display behind the actual form area. (The screen illustration printed in this book might not make that obvious-open the sample file to see the difference.) Finally, the page includes all the records strung back-to-back. You can find this set of files saved in the WebChapters\XML subfolder on the companion CD as frmDepartmentsXmpl.htm, .xml, .xsd, and .xsl.
Notice that the ReportML style specification does a fairly good job of copying the fonts and styles from the original form. However, it also displays all labels, text boxes, combo boxes, and list boxes that you designed on the form, including a hidden label. When you open the form in the application, that label is revealed only when you’re creating a new department. Also, the form background is the background of the Web page, but it doesn’t display behind the actual form area. (The screen illustration printed in this book might not make that obvious-open the sample file to see the difference.) Finally, the page includes all the records strung back-to-back. You can find this set of files saved in the WebChapters\XML subfolder on the companion CD as frmDepartmentsXmpl.htm, .xml, .xsd, and .xsl.
We think Access does a better job of exporting reports than forms (as long as they don’t have subreports) into an HTML/XML result that looks very much like the original. You can try this yourself by selecting the rptDepartments report in the Navigation Pane and following the same export steps that you did for the frmDepartments form. Your end result displayed in a Web page should look like Figure 23–10. You can find this set of files saved in the WebChapters\XML subfolder on the companion CD as rptDepartmentsXmpl.htm, .xml, .xsd, and .xsl.
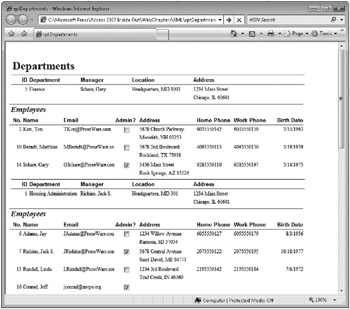
Figure 23–10: The rptDepartments report in the Housing Reservations database is exported as XML and displayed in a Web page.
The result looks remarkably like the original. To make it look perfectly the same, you would need to dig into the presentation file and fix the display specifications for the phone numbers and the birth date.
Importing XML Files
As you learned in Chapter 6, “Importing and Linking Data,” you can import or link many types of database files and text and spreadsheet files into your Access database. In Access 2007, you can also import XML files, but you cannot link to them. Access 2007 also supports XML files that contain multiple tables. When you import XML that includes multiple tables, Access creates one table in your database for each table it finds in the file.
To begin importing an XML file, click the XML File button in the Import group on the External Data tab. Access opens the Get External Data-XML File wizard, as shown in Figure 23–11.
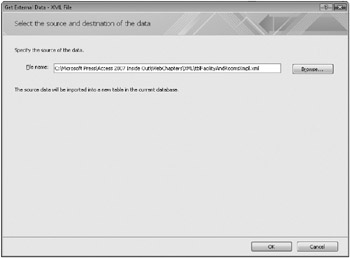
Figure 23–11: Select the location and name of the XML file to import on the first page of the Get External Data-XML File wizard.
On the first page of the wizard you need to type the location and name of the XML file you want to import. You can click the Browse button to choose a different location than the default folder that Access chooses. In this case, let’s choose the sample XML file you previously created that includes data from both the tblFacilities table and the tblRooms table (tblFacilityAndRoomsXmpl.xml). Click OK to start the process, and Access displays the Import XML dialog box, as shown in Figure 23–12.
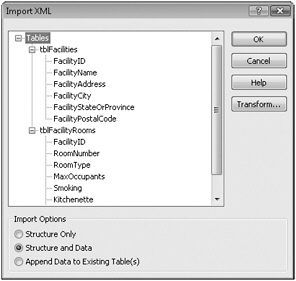
Figure 23–12: The Import XML dialog box displays options for importing XML files.
| Note | If you ask Access to import an XSD file, Access creates a table with the specified data structure but does not import the data. Remember, the data is in the XML file; the XSD file contains only the schema definition. |
When you first see this dialog box, Access shows you the tables it found in the XML file. You can click the plus sign next to any table name to verify the field names. You can click the Transform button to specify any XSLT file that you need in order to convert the data into a format that Access can use. This file originally came from Access, so you don’t need to apply any transformation.
In the Import Options section, you can select options to import only the structure (from the XSD file or embedded schema in the XML file) or the structure and the data (the default) or to append the data to existing tables of the same name. In this case, you know that the Housing Reservations database already contains these tables, so attempting to append the data will result in duplicate primary key value errors. So, leave the default Structure And Data option selected, and click OK. On the last page of the Get External Data-XML File wizard, you can choose to save the export steps you just performed for future use. You don’t need to save these steps, so click Close to close the wizard.
Because the two tables already exist in the database, Access appends a number to the names of the tables it is importing from the XML file to avoid duplicate names. You can see the two new tables (tblFacilities1 and tblFacilityRooms1) in the Navigation Pane and one of them (tblFacilities1) opened in Design view in Figure 23–13. Notice that the new table correctly includes the primary key definition as well as all the other field properties. Remember that when you created this XML file earlier, we had you select the Export All Table And Field Properties option on the Schema tab in the Export XML dialog box. If you had not selected that option, Access would not be able to create any of these field properties.
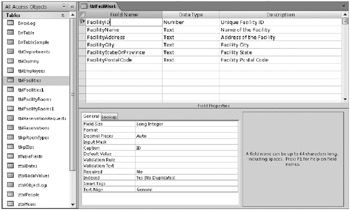
Figure 23–13: The two tables imported into Access from an XML file contain all the correct data and field properties.
Importing and Exporting XML in Visual Basic
Importing and exporting XML from the user interface works well for simple one-time tasks, but what if you need to automate the process to make it easy for users of your application to work with XML data? You took a brief look at the example frmXMLExample form in Chapter 21. Now let’s look behind the form to understand the code that automates importing and exporting XML data.
Access 2007 provides two methods of the Application object-ImportXML and ExportXML-that enable you to deal with XML files in Visual Basic code. The syntax for the ImportXML command is as follows:
[Application.]ImportXML <data source file> [, <import option>]
where <data sourcefile> is the path and file name of the file you want to import and <import option> is acAppendData, acStructureAndData (the default), or acStructureOnly. Notice that the three options match the options you saw in the Import XML dialog box in Figure 23–12. If the table(s) in the file you want to import already exist, Access appends a numeric digit to the table name(s).
The syntax for the ExportXML command is as follows:
[App1ication.]ExportXML <object type>, <object name>, [ <data file>], [ <schema file>], [ <presentation file>], [ <image path>], [ <encoding>], [ <options>], [ <filter>], [ <additional data object>]
<object type> is acExportForm, acExportFunction, acExportQuery, acExportReport, acExportServerView, acExportStoredProcedure, or acExportTable.
<object name> is the name of the object that you want to export.
<data file> is the path and file name of the XML file you want to create. If the file already exists, ExportXML overwrites it.
<schema file> is the path and file name of the XSD file you want to create. If the file already exists, ExportXML overwrites it.
<presentationfile> is the path and file name of the XSL file you want to create. If the file already exists, ExportXML overwrites it.
Note that although all the export file names (data, schema, and presentation) are optional, you must specify at least one of them.
<image path> is the folder path where you want to store any images when exporting a form or report.
<encoding> is acUTF16 or acUTF8 (the default).
<options> are one or more options that you can add together using a plus sign operator (+). The options are as follows:
| Option Intrinsic Constant | Description |
|---|---|
| acEmbedSchema | Embeds the schema within the XML data file. When you include the option, ExportXML ignores any <schema file> specification. |
| acExcludePrimaryKeyAndIndexes | Does not include the primary key or index definitions in the schema data. |
| acExportAIITableAndFieldProperties | Includes the primary key and all field property definitions in the schema data. |
| acLiveReportSource | When <object type> is acExportFunction, acExportServerView, or acExportStoredProcedure, creates a link to your SQL Server database. |
| acPersistReportML | When the <object type> is acExportForm or acExportReport, includes ReportML code in the presentation file. |
| acRunFromServer | Creates an Active Server Page file instead of an HTML file when you ask for a <data file> and <presentation file>. |
<filter> is a criteria string to filter the records to be exported.
<additional data object> is an object of the AdditionalData data type that you can create by executing the CreateAdditionalData method of the Application object. You specify an additional table name by executing the Add method of the object and supplying the table name as a string.
In the Housing Reservations database (Housing.accdb), the frmXMLExample form demonstrates how you might import an XML file and load it into a form for editing and then export the file when you have finished making changes. Figure 23–14 shows you the form opened in Form view.
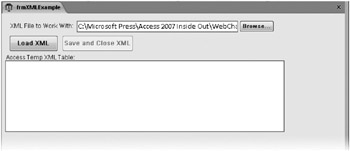
Figure 23–14: The frmXMLExample sample form allows you to import XML data, edit the data, and then export the data when you have finished making your changes.
![]() The form is designed to initially point to a sample XML file that you can find on the companion CD in the WebChapters\XML subfolder-xmlDepartments.xml. You can click the Browse button to point to any XML file, but you should not use any of the other sample XML files that you find in the subfolder because these are all named the same as objects that already exist in the database. Also, the code depends on the name of the file matching the name of the table defined inside the file. Click the Load XML button to import the file and display the data in the Access Temp XML Table window, as shown in Figure 23–15.
The form is designed to initially point to a sample XML file that you can find on the companion CD in the WebChapters\XML subfolder-xmlDepartments.xml. You can click the Browse button to point to any XML file, but you should not use any of the other sample XML files that you find in the subfolder because these are all named the same as objects that already exist in the database. Also, the code depends on the name of the file matching the name of the table defined inside the file. Click the Load XML button to import the file and display the data in the Access Temp XML Table window, as shown in Figure 23–15.
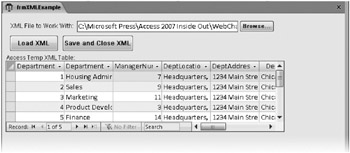
Figure 23–15: After you click the Load XML button, an XML file is loaded into a window in the form so that you can edit the data.
The data is actually a copy of the data you can find in the tblDepartments table. You can type in any field to change the values, just as you can in a subform datasheet that’s bound to a live table in your database. To save your changes, click the Save And Close XML button to export the changed data back to the original XML file. When you load the XML file again, you should see your changes.
To understand how this works, you need to examine the code behind the Load and Save command buttons. Here’s the code from the Load procedure:
Private Sub cmdLoadXML_Click() ' New table name created from imported XML document Dim strTableName As String ' Turn off screen updates Application.Echo False, "Importing XML..." ' Turn on error handling On Error GoTo cmdLoadXML_Err ' Get the table name to be from the XML document name ' Note, this will work only if you name the file ' the same name as the table inside the XML file. strTableName = Mid(Me.txtXMLDocument, InStrRev(Me.txtXMLDocument, "\") + 1) strTableName = Left(strTableName, Len(strTableName) - 4) ' Change error handling to skip if the next gets an error On Error Resume Next ' Delete the old XML table, if it exists DoCmd.DeleteObject acTable, strTableName ' Turn error handling back on On Error GoTo cmdLoadXML_Err ' Import the XML document Application.ImportXML Me.txtXMLDocument, acStructureAndData ' Set the subform Source Object property to the table just imported. Me.subXML.SourceObject = "Table." & strTableName ' Enable the SaveXML button to let them save the XML Me.cmdSaveXML.Enabled = True ' Indicate XML is loaded intXMLLoaded = True ' Turn screen updating back on. Application.Echo True ' Exit the routine Exit Sub ' Error-handling routine cmdLoadXML_Err: ' Turn screen updating back on. Application.Echo True ' Tell the user the problem MsgBox "An error has occurred importing the XML: " & Err.Description ' Exit the routine Exit Sub End Sub
As noted earlier, this code depends on the table name inside the XML file to match the name of the file. (You could also open the XML file or the XSD file as text and scan for the table name tag.) The ImportXML command is very straightforward. The code takes advantage of the fact that you can specify a table in the SourceObject property of a subform control to display the imported table.
The code behind the Save button is as follows:
Private Sub cmdSaveXML_Click() Dim strTableName As String ' Get the table name to be from the XML document name ' Note, this will work only if you name the file ' the same name as the table inside strTableName = Mid(Me.txtXMLDocument, InStrRev(Me.txtXMLDocument, "\") + 1) strTableName = Left(strTableName, Len(strTableName) - 4) ' Export the table back out to the XML document Application.ExportXML acExportTable, strTableName, _ Me.txtXMLDocument, _ Left(Me.txtXMLDocument, Len(Me.txtXMLDocument) - 4) & ".xsd" ' Clean up by resetting the Source Object of the subform to "". Me.subXML.SourceObject = "" ' Delete the XML table DoCmd.DeleteObject acTable, strTableName ' Point the focus off the cmdSaveXML button Me.cmdLoadXML.SetFocus ' Disable the cmdSaveXML button Me.cmdSaveXML.Enabled = False ' Turn off XML Loaded flag intXMLLoaded = False End Sub
Notice that the ExportXML command also rewrites the schema file, but that’s probably not necessary. The code also clears the subform by setting its SourceObject property to an empty string. It must do this so that it can delete the temporary table object-if the object were still open in the subform control, Access wouldn’t allow the DeleteObject command.
As you can see, Access 2007 provides extensive features to work with XML files in your database applications. You not only can import and export XML files and export some forms and reports from the user interface but also can import and export XML from Visual Basic procedures.
EAN: 2147483647
Pages: 234