Working with the Tab Control
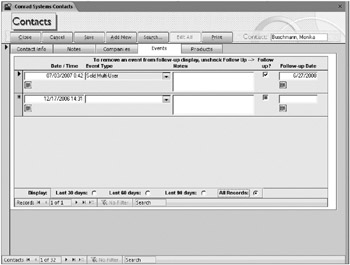
As you have just seen, a subform is an excellent way to create a form that lets you edit information from the one side of a relationship in the main form (contacts) while editing or viewing data from the many side of a relationship (contact events or contact products) in the subform window. Building a subform is very simple for a single one-to-many relationship. But what can you do when you have either multiple relationships or lots of data you need to deal with on a form and including all this information makes your form too large to fit on your screen? Access provides a tab control that lets you place multiple controls on individual tabs within a form. The controls on a tab can be as complex as subforms (in the case of the Conrad Systems Contacts database, to display related companies, events, and products) or as simple as text boxes (which can display the potentially lengthy information in the Notes field). You can see the frmContactsPlain form (the simple copy of the form that doesn’t have all the bells and whistles of the production form) with the tab that shows contact events selected in Figure 13–32. You can select the other available tabs to see the detail information for the contact-the companies associated with the contact (in a subform on that tab) and the products the contact has purchased (in another subform).

Figure 13–32: The tab control allows you to place multiple subforms and controls on a tab page, such as this tab to edit contact events.
Working with the tab control is quite simple. If you like, you can start with a simple columnar form built by the Form Wizard. Use qxmplContactsSorted as the record source, and include the ContactType, Title, LastName, FirstName, MiddleInit, and Suffix fields. Switch to Design view, and create some space at the bottom of the form to add your tab control. You can also start with frmXmplContactsl, which you can find in the ContactsDataCopy.accdb sample database. To build a control that lets you alternately see company, contact event, or liner notes information for the current contact, perform the following steps:
-
On the Design tab, in the Controls group, click the Tab Control button, and drag an area on the form starting on the left side just under the Suffix combo box control and approximately 6.25 inches wide and 2. inches high. Access shows you a basic tab control with two tabs defined. Open the Property Sheet window, and set the Tab Fixed Width property to 1" so that all the tabs will be the same size and wide enough to add captions later.
-
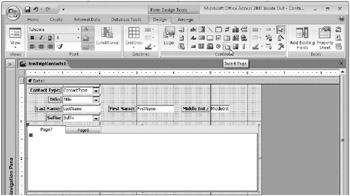
While the tab control has the focus, click the Insert Page button in the Controls group on the Design tab, as shown next. Access will add a third tab to the control

-
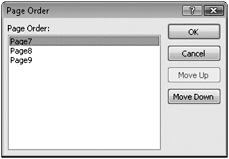
Access always inserts new tabs at the end of the tab sequence. If you want to place the new tab in the middle of the tab order, you can select the tab and set its Page Index property. The Page Index of the first tab is 0, the second is 1, and so on. Another way to set the tab sequence is to right-click the control and then click Page Order to see the dialog box shown next. Select a tab, and move it up or down to get the sequence you want.

-
Click the first tab, open the Property Sheet window (if it’s not already open), and set the Caption property to Companies.
-
Click the second tab, and set the Caption property to Events.
-
Click the third tab, and set the Caption property to Notes.
-
Click the Companies tab to bring it to the front. Click the Subform/Subreport button in the Controls group, and set the Auto Label property in the Property Sheet window to No. Add a subform control to the Companies tab, set its Source Object property to fsubXmplContactCompanies (the sample database contains built-in subforms to make this exercise easy), and set the Link Child Fields and Link Master Fields properties to ContactID. You can also drag the subform from the Navigation Pane and drop it onto the tab if you like.
-
Click the Events tab, and add the fsubXmplContactEvents form to that tab as a subform. Be sure to set the link properties of the subform control to ContactID.
-
Click the Notes tab to bring it to the front. Open the field list, drag the Notes field onto this tab, and remove the attached label. Expand the Notes text box control to almost fill the tab.
-
Adjust the positioning and size of the controls on each tab. Place each control very near the upper-left corner of each tab. The actual Top and Left settings will vary depending on where you placed the tab control. (These settings are relative to the Detail section of the form, not the tab control.) You can place one where you want it and then copy the Top and Left settings to the other two controls so that they exactly line up. It’s important to do this so that the controls don’t appear to jump around on the tab control as you move from tab to tab. Select each control, and then click the Size To Fit button in the Control Alignment group on the Arrange tab.
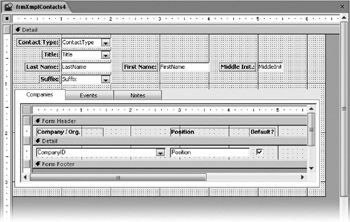
Your result should look something like Figure 13–33. You can find this form saved as frmXmplContacts4 in the sample database.

Figure 13–33: Your completed tab control in Design view shows three tabs with various controls.
Note that clicking each tab in Design view reveals the controls you stored on that tab. Switch to Form view to see the form in action. Table 13–1 lists other useful tab control property settings.
| Property | Settings | Usage |
|---|---|---|
| Multi Row | No (default) | If the control has more tabs than will fit in a single row, the control displays horizontal scroll arrows in the upper-right corner of the tab control to move through all the tabs. |
| Yes | If the control has more tabs than will fit in a single row, the control displays multiple rows of tabs. | |
| Style | Tabs (default) | The control displays tabs to select the various pages. |
| Buttons | The control displays buttons (which look like command buttons but work like the buttons in an option group) to select the various pages. | |
| None | The control displays neither tabs nor buttons. Different pages can be displayed from a Visual Basic procedure or a macro by setting relative tab numbers in the tab control’s Value property. | |
| Tab Fixed Height | 0, (default) | The tab height is based on the font properties of the tab control or the size of the bitmap you define as a picture to be displayed on the tab. |
| [size in inches] | The tab height is fixed at the value entered. | |
| Tab Fixed Width | 0, (default) | The tab width is based on the font properties of the tab control and on the number of characters in the caption or the size of the picture on the tab. |
| [size in inches] | The tab width is fixed at the value entered. |
EAN: 2147483647
Pages: 234