Working with Your Camera
| There are two basic ways to shoot with your camera. One way to shoot is by holding the camera in your hands. This gives you the ability to set up quickly and move with the action if necessary. The other way is to put the camera on a tripod. A tripod is invaluable when you need a stable image but it also restricts how easily you can move the camera. You also have to carry the darn thing around. We prefer the more mobile approach, which allows for things like getting an interview while walking down the street. Holding your camera doesn't cost any money or require extra gear that takes up space in your backpack. There is a drawback to shooting handheld, though. With small DV cameras and tiny digital still cameras, it's easy to end up with shaky footage that looks like it was taken in the middle of an earthquake. But your shots don't have to be shaky. You can experiment with different camera grips to see what works best, but we recommend cradling the camera in your open palms. Try moving the camera fluidly, as though you're doing Tai Chi. This technique can produce pretty smooth shots, with practice. There are other ways to minimize the "shaky cam" effect as well, which we discuss below. Facing ForwardIf you need to walk and shoot video at the same time, face forward. That's our most important piece of advice for avoiding the shakes. People often shoot while walking sideways or backwards. That can cause you to trip, have an accident, or drop your camera. Also, walking sideways or backwards can increase the shakiness of your shooting. So always face forward. Move the camera, not your body, to shoot the action. (Using the flip-out LCD screen, if your camera has one, will make that easier to do.) Facing forward is the best (and safest) way to produce smooth-looking video.
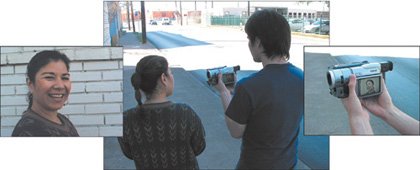
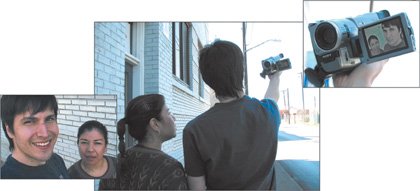
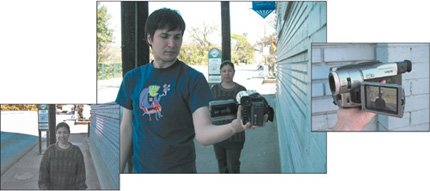
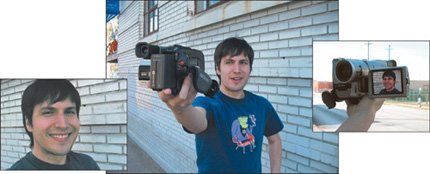
Shooting SidewaysIf you want to videotape a person walking next to you, you'll need to flip your camera's LCD screen around so that it faces outward but is still flush against the side of the camera. Then cradle the camera in your upturned hands and position it parallel to your body so that the lens faces your subject and you can view the LCD screen (Figure 4.3). Figure 4.3. Here's how you can record someone walking by your side. When shooting this way, it's important to find a comfortable position for holding the camera. You'll need to keep your arms loose but fairly close to your body. The further you extend your arms, the heavier your camera will feel. It's helpful to think of your arms as shock absorbers. If the camera has a handle on top of it and feels awkward in your upturned hands, you can try suspending it from one hand by the handle. This position lets the camera "float" as you walk. Taping Yourself with Another PersonGetting yourself into a shot with your subject is a little trickier, but it can be done. Open the camera's LCD screen completely, so it's at a right angle to the camera body, as shown in Figure 4.4. Now hold the camera in front and away from your body, almost at arm's length. Use the LCD screen to line up the shot. Try to "memorize" the position of your arm for the shot so you can watch where you are going instead of keeping your eyes on the camera. The slight angle created by holding the camera out in front should be enough to place you and the person walking next to you in the frame. Figure 4.4. Here's how you can capture yourself and your subject in a walking shot. Note You might notice in the above examples that the LCD screen shows a reversed image, which is typical of many DV cameras when you're shooting in this position. Shooting Behind YouYou can videotape people behind you with nearly the same technique you used for shooting to the side. Start by flipping out the LCD screen and swiveling it to face in the same direction as the camera lens. Now hold the camera in front and slightly to one side of your body. Point the lens behind you, toward the person you want to shoot (Figure 4.5). Now you can shoot while walking forward, which is much easier than trying to shoot and walk backward. And you can monitor the video image from time to time in the LCD screen. Figure 4.5. Videotape people behind you by pointing the camera toward them and off to the side. Shooting YourselfThe previous position can also be adapted for the classic "talking to the camera" videoblogger shot. Once again, the camera should be in front of you, either directly or off to the side. Remember to look at the lens and not at the LCD screen so you are talking directly to your viewer. (Figure 4.6) Figure 4.6. These images show how to capture the classic videoblogger shot: talking directly to the camera. |
EAN: 2147483647
Pages: 81