| In addition to the radio tuning techniques discussed in Chapter 11, "Tuning AP Radio Parameters," another way to ensure complete packets arrive at their destinations is to employ quality of service (QoS). In essence, QoS sends packets before it sends other trafficthey are a higher priority. QoS is especially useful in environments that use the WLAN for voice or video applications. QoS is a popular way to prioritize traffic on a wired network, although you can also implement it in a wireless environment. Note You must also consider range when you diagnose performance problems. Even with QoS, you cannot mitigate problems for a client who is out of range or on the periphery of the AP's cell.
QoS Overview QoS enables you to use congestion management and avoidance tools, which prevent traffic from slowing down your WLAN. In a wired network, routers or switches primarily enforce QoS. In a WLAN, however, the AP manages the QoS duties for traffic to wireless clients. Note You might not notice the effect of QoS on small WLANs with light traffic loads. However, the effect of QoS is more apparent where APs manage heavy loads.
If you already employ a QoS mechanism on your network, your AP assigns QoS policies in the following order: Packets that have already been classified by a switch or router. Existing classification takes priority over all other QoS policies on the AP. QoS Element for Wireless Phones setting. If this setting is enabled, voice traffic takes precedence over other traffic. Policies created on the AP. Default classification for packets.
Configuring QoS Note If you use VLANs on your WLAN, make sure the VLANs are properly configured before you continue.
To configure QoS on your Cisco AP, follow these steps: Step 1. | Open the Cisco AP's web browser interface.
| Step 2. | Click Task > Services on the left side of the browser.
| Step 3. | Click QoS. This calls up the QoS Policies page, shown in Figure 12-10.
Figure 12-10. Cisco AP QoS Screen 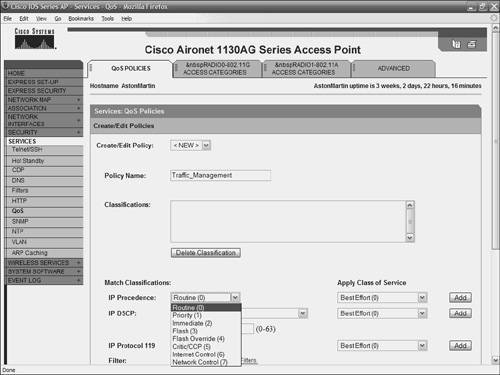
| Step 4. | Select <NEW> in the Create/Edit Policy field, then type in a name for the new policy.
| Step 5. | If the packets you prioritize contain IP precedence information in the IP header Type of Service (ToS) field, select an IP precedence classification from the IP Precedence drop-down menu. This value is between 0 and 7. Table 12-2 lists the ToS values. Figure 12-10 shows the ToS values in a drop-down menu.
Table 12-2. ToS Values When Enabling QoS on a Cisco APToS Value | Description |
|---|
0 | Routine | 1 | Priority | 2 | Immediate | 3 | Flash | 4 | Flash Override | 5 | Critic/CCP | 6 | Internet Control | 7 | Network Control |
| Step 6. | Use the Apply Class of Service drop-down menu to select the CoS that the AP gives to packets you selected from the IP Precedence drop-down. This number is between 0 and 7. Table 12-3 lists the CoS values. The drop-down menu where these values appear is shown in Figure 12-11.
Table 12-3. CoS Values When Enabling QoS on an Cisco APCoS Value | Description |
|---|
0 | Best Effort | 1 | Background | 2 | Spare | 3 | Excellent | 4 | Controlled Load | 5 | Video <100ms Latency | 6 | Voice <100ms Latency | 7 | Network Control |
Figure 12-11. CoS Values on the QoS Tab 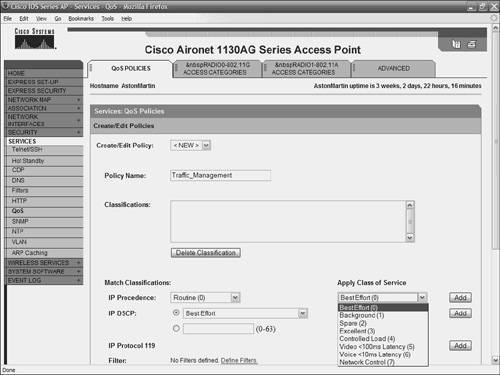
| Step 7. | Click the Add button next to the Class of Service menu for IP Precedence. This adds the classification in the Classifications field. You can delete previously defined classifications if you highlight the classification and click the Delete button.
| Step 8. | If these packets contain IP Differentiated Services Code Point (DSCP) information in the header ToS, select a classification from the IP DSCP drop-down menu. The drop-down menu looks similar to the one in Figure 12-11.
| Step 9. | The Apply Class of Service drop-down menu is used to select a CoS that the AP applies to packets that you select from the IP DSCP menu.
| Step 10. | Click the Add button next to the Class of Service menu. This classification is added to the Classifications field.
| Step 11. | The IP Protocol 119 selections are used to prioritize packets from Spectralink phones. Specify a CoS, and then click the Add button to add this to the Classification field.
| Step 12. | You can establish a default classification for all packets on the VLAN if you select a CoS, then click Add.
| Step 13. | After you add classifications to this policy, click the Apply button under the CoS drop-downs. If you want to delete the entire policy, click Delete.
| Step 14. | The next portion of the browser shows the Apply Policies to Interface/VLANs drop-down menu, as shown in Figure 12-12. This is used to apply policies to the AP Ethernet and radio ports. If VLANs are configured on the AP, drop-downs appear for each VLAN's virtual ports. If VLANs are not configured, drop-downs for each interface disappear.
Figure 12-12. Policies Are Applied Using the Drop-Down Menus at the Bottom of the QoS Tab 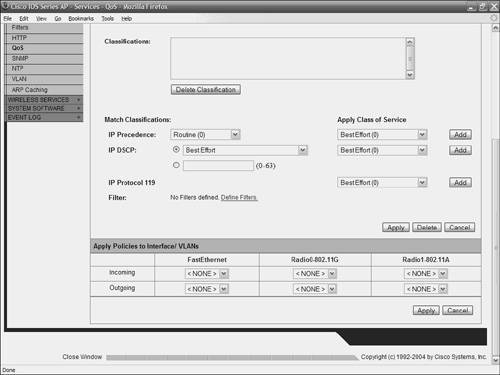
| Step 15. | Click the Apply button at the bottom of the page to finalize your settings and to apply them to your AP.
| Step 16. | To give voice traffic priority over other traffic on your WLAN, click the Advanced tab, and select the radio button to enable this policy.
|
The QoS values you select for your network depend largely on your organization's policies, as well as what traffic you deem to be more important than others. |