Managing and Administering Software Site Licensing
One of the lesser-known, but extremely important, responsibilities of a network administrator is software licensing. It is important to ensure that your company has the correct number of licenses for the software in use in your organization. Not only does this save your company money by purchasing only the number of licenses needed, but more importantly, you avoid lawsuits by software publishers that discover you are using their software illegally. Microsoft requires that every Windows client computer have a client license. This is obtained automatically when you buy a copy of the client operating system over the counter, or when you make a volume purchase via one of Microsoft's volume licensing programs, such as Open or Select Licensing. In a similar manner, a license is required for each copy of Windows Server 2003 that you use. In addition to the client and server licenses, Microsoft also requires that every user or device that connects to a Microsoft server obtain a Client Access License (CAL). There are two methods of licensing for Windows Server 2003 servers:
In the per-server licensing method, the server is licensed for a specific amount of concurrent connections. The connections are allowed on a first-come-first-served basis. For example, if your server is licensed for 100 CALs, the 101st client that attempts to connect to your server would be refused. In the per-seat licensing method, each user or device is required to obtain a CAL. This CAL allows the user or device to connect to multiple servers. The default licensing mode in Windows Server 2003 is per server. Typically, per-server licensing is used in environments where there is only one server. The per-seat licensing mode is more economical for enterprise environments where each client needs to access multiple servers. For example, if you have 100 clients and a single server, you would be required to purchase 100 CALs under the per-server licensing. In this case, you are licensing the number of connections to the server. However, if you have two servers, and your clients need to access both servers, under the per-server licensing mode, you would have to purchase 200 CALs. This is because each server would need to be licensed for 100 connections each. Using the per-seat licensing mode, you would have to purchase only 100 CALs because the licensing is by the number of clients, not by the number of connections to the server. Note: Additional CALs In addition to the CALs required for connecting to a Windows Server 2003 server, you might be required to purchase CALs for applications such as Microsoft Exchange Server or SQL Server. Two tools are used to administer Microsoft licenses, depending on the scope of your enterprise:
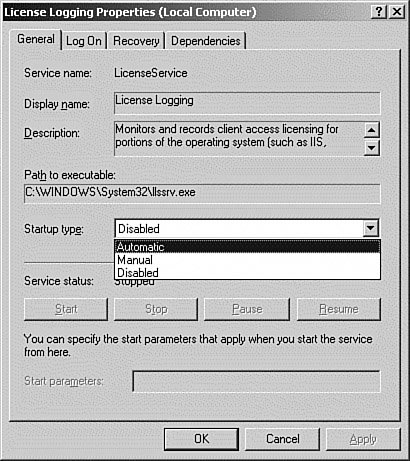
By default, licensing is enforced; however, it is not tracked or monitored. Before you can manage and track licensing, you must enable the License Logging service. The service is disabled by default in Windows Server 2003. To enable the License Logging service, change the Startup type to Automatic using the Services utility in the Administrative Tools folder, as shown in Figure 5.10. After the Startup type is set, click the Start button to start the service. Figure 5.10. The Services tool, showing how to change the Startup type of the License Logging service to Automatic. After the Licensing service is started, you can use either of the two licensing tools to manage your licenses. Licensing AppletThe Licensing applet in Control Panel can be used to do the following:
To add per-server licenses, follow the procedure in Step by Step 5.7.
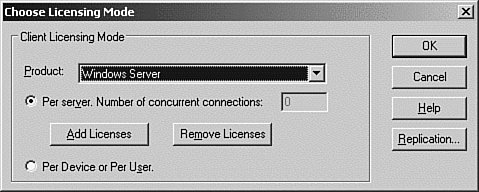
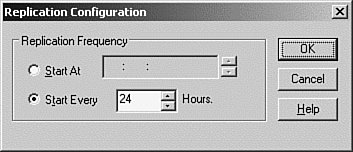
Removing licenses can be accomplished by following the procedure in the previous Step by Step and selecting the Remove Licenses button. Changing Licensing ModesThe licensing mode can be changed from per server to per seat using the Licensing applet. This is a one-time change, so you should always confirm that this is what you really want to do. This can be accomplished by clicking the Per Device or Per User option button on the Choose Licensing Mode dialog box, as shown in Figure 5.11. When the License Violation dialog box appears, read the warning and then click the No button to change the mode. Configuring License ReplicationIn an enterprise environment, you will configure a Site License Server to collect all the licensing data for that site. The Licensing applet allows you to configure the replication time and frequency to send the licensing data to the Site License Server. This can be configured by starting the Licensing applet and clicking the Replication button on the Choose Licensing Mode dialog box, as shown in Figure 5.11. When the Replication Configuration dialog box appears, as shown in Figure 5.12, enter appropriate values for the start time or the replication frequency. Figure 5.12. The Licensing applet, showing how to change the replication frequency of the license information to the Site License Server. Licensing UtilityThe Licensing utility, available in the Administrative Tools folder, allows you to manage licensing at the site or the enterprise level. The Licensing utility can be used to perform the following:
Before you can administer the Site License Server, you must determine what server is currently holding that role. By default, the Site License Server is the first domain controller installed in a site. Although the Site License Server is not required to be a domain controller, it should reside within the site that is being managed. To display or change the server used as the Site License Server, follow the procedure in Step by Step 5.8.
After you determine which server is the Site Licensing Server, you can open the Licensing utility by clicking Start, Administrative Tools, Licensing on that server. The Licensing utility defaults to the Purchase History tab, as shown in Figure 5.14. The Purchase History tab shows you when, how many, and what type of licenses were added or deleted. Figure 5.14. The Licensing utility, showing the Purchase History tab.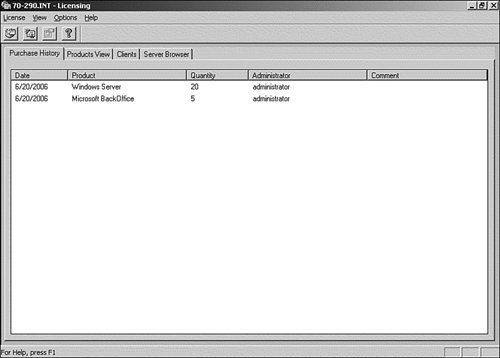 The Products View tab displays the following information for each product on the server:
The Clients tab displays the following information for each client that has accessed the server:
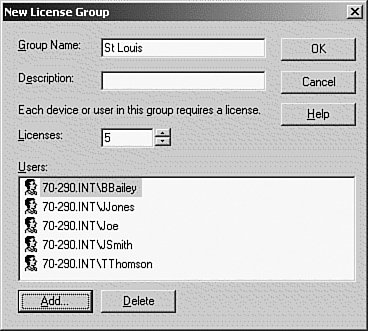
The Server Browser tab, displays the servers, sites, and domains in Active Directory. License GroupsLicense groups are created in special circumstances in which the basic per-seat or per-server licensing may not be the best fit. A good example of this is a situation where several users share a computer. The License Logging service tracks licenses by username. So even though the server is accessed only from a single computer, several licenses are consumed because every user will need a license, even though they will never all be connected to the server concurrently. To create a license group, follow the procedure in Step by Step 5.9.
When you create a license group and add users to it, the Licensing service will treat the members of the group as a single entity, so all the users will consume only one license. |
EAN: 2147483647
Pages: 219