| Backing up data is the simple process of copying the files and folders located on a server to another location. This provides a safety blanket of sorts in the event of a drive or server failure, power outage, virus infection, or user error. With a proper backup, you can rest assured that important files are still available in the event something catastrophic happens. Windows Server 2003 provides a more advanced backup program than what was included with Windows NT. Starting with Windows 2000, Microsoft opted to license backup software from Veritas Software (formerly Seagate Software). Compared to the Windows NT backup utility, this tool is a big step forward. Windows Server 2003 Backup allows you to create backup jobs that you can run manually or schedule to run unattended. Unlike the Windows NT 4.0 Server backup, which could back up only to tape, you can now back up to disk, Zip drives, CD-R/RW, or any other media available via the Windows Server 2003 file system. Windows Backup also allows you to back up files from other computers. However, it cannot back up the Registry or system state data from other computers. The Backup utility allows you to back up a single file, a folder, a drive, or multiple drives. Also, all the backup and restore functions can be performed manually or via wizards. More About Windows Backup Although using the Windows Backup utility to back up the Registry and system state data on remote computers is not supported, there is an unofficial workaround. Just use the Windows Backup program on the remote computer to back up the Registry and system state data to disk. Then the backup file can be backed up remotely. |
Windows Backup allows you to back up files and folders on FAT16, FAT32, or NTFS volumes. However, if you have backed-up data on an NTFS volume restoring to either type of FAT volume, this results in loss of configured file and folder permissions, in addition to the loss of encrypted files and compression attributes. To perform a backup or restore on a Windows Server 2003 server, you must be a member of the local Administrators or Backup Operators group. If you are a member of the local Administrators or Backup Operators group on a domain controller, you can back up and restore files on any computer that is a member of the domain or that has a two-way trust relationship with the domain. If you are not a member of either of these groups, you can back up only the files you are the owner of or that you have at least Read permissions for. To restore a file or folder, you must have Write permission. In addition, administrators and backup operators can back up and restore encrypted files and folders. The files and folders will not be decrypted during the backup and restore process. Note: User Rights You can grant other users and/or groups the ability to back up and restore files using user rights. Assigning user rights is covered later in the chapter in the section "Configuring Security for Backup Operations."
Volume Shadow Copy Using Volume Shadow Copy, you are now able to back up most open files. In previous versions of Windows, including Windows 2000, open-file backup was available only using third-party utilities. For example, most database programs (such as Microsoft SQL Server and Microsoft Access), user files (such as Word documents and Excel spreadsheets), and even common files (such as the WINS and DHCP databases) would not be backed up by the Windows Backup utility. This is because most programs lock access to files that they are updating to prevent data corruption. Therefore, when the backup program attempted to open these files, its request was rejected. Most of the time, the Backup utility would keep trying to open the file until it either received access to the file or the retry timeout period expired. This would slow down the backup procedure, or in the case of some unattended backup procedures, the backup process would terminate without completing a full backup. When Volume Shadow Copy is used during a backup and an open file is encountered, a snapshot is taken of the file. This is an exact copy of the file that is saved to another area on the disk. This copy is then saved via the Backup utility. Volume Shadow Copy has the following advantages: Users cannot be locked out by the backup program. Open files are not skipped. The backup completes faster. Applications can write data to a file during a backup. The need for additional third-party software in most cases is eliminated. Backups can be performed during business hours.
Volume Shadow Copy is enabled by default in the Windows Backup program and is part of the Volume Shadow Copy Service feature covered in depth later in this chapter. Types of Backups Windows Server 2003 has five backup options: Normal, Copy, Daily, Differential, and Incremental. Each type varies as to what is backed up and whether the archive bit is set. The archive bit is a file attribute that is turned on when a file is created or modified, and it can be cleared, depending on the type of backup, whenever a file is successfully backed up. It is used to let the backup software know what files need to be backed up based on whether the file has just been created or whether modifications to a previously backed-up file have happened since the last backup. Normal A normal (sometimes referred to as a full backup) backup is used to back up all the files and folders that you select, regardless of the setting of the archive bit. It then clears the archive bit of the files to show that they were backed up. The disadvantage of a normal backup is that it takes longer than some of the other backup types because it backs up all the files and folders. However, it does have the advantage of requiring only a single media (or set of media) for a full restore. To minimize backup time, the normal backup is typically used in a rotation with incremental or differential backups. Copy A copy backup is typically used to make an archival copy of data and does not interrupt your current backup set. It does not read or change the archive bit. Daily A daily backup is used to back up only the files and folders that have been created or modified on that day. It does not read or change the archive bit. A daily backup is typically used to make a quick snapshot of the daily activity. This is useful when you need to perform a task on the server and want to have a current backup available. Differential A differential backup is used to back up only the files and folders that have been created or modified since the last normal or incremental backup. It does not change the archive bit. However, it reads the archive bit to determine which files need to be backed up. A differential backup is typically used between instances of a normal backup. For example, if you perform a normal backup on Monday, you can perform differential backups the rest of the week. The differential backup takes longer and longer each day because it backs up all the files and folders that have been created and modified since the last normal backup. A differential backup has the advantage that it takes less time than a normal backup, but more than an incremental backup. When you perform a full restore, it requires the media for both the last normal backup and the last differential backup. Incremental An incremental backup is used to back up only the files and folders that have been created or modified since the last normal or incremental backup. It reads the archive bit to determine which files have been changed and need to be backed up. It then changes the archive bit of the files that were backed up so that the next time the backup program is run, these files will not be backed up again unless they were changed. An incremental backup is typically used between instances of a normal backup. Unlike the differential backup, the backup times typically do not get longer each day, because the incremental backup only backs up the files and folders that were modified since the last incremental backup. An incremental backup has the advantage of taking less time than a normal backup, but when you perform a full restore, it requires the media for the normal backup and all the incremental backups performed since the normal backup (which can be time consuming, depending on how many incremental backups you must restore). Although in some situations you might perform a normal backup daily, this is not common except for the smallest of organizations. Typically, most organizations perform a normal backup once a week and then an incremental or differential backup on the other days. Exam Alert: Know Your Backups! You should be familiar with the various types of backups, when each one should be used, and what data is restored during a recovery procedure.
To back up data files using the Backup or Restore Wizard, perform the procedure outlined in Step by Step 17.1. Step by Step 17.1 Backing up data using the Backup or Restore Wizard 1. | From the Start menu, click Start, All Programs, Accessories, System Tools, Backup.
| 2. | The Backup or Restore Wizard appears, as shown in Figure 17.1.
Figure 17.1. The Backup or Restore Wizard's opening screen. You can switch to Advanced mode and deselect the option to start in Wizard mode from this screen. 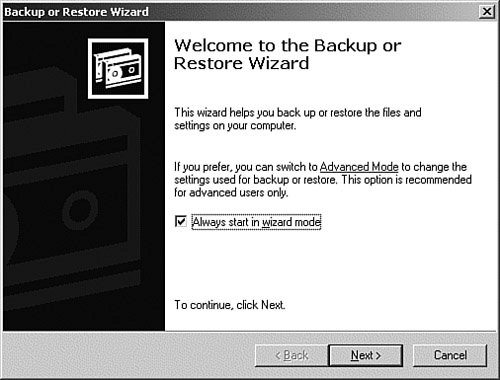
| 3. | From the Backup or Restore screen, you can select to either back up or restore files and settings. Select Backup Files and Settings and then click the Next button to continue.
| 4. | From the What to Back Up screen, shown in Figure 17.2, you can select to back up all the information on the computer, or you can choose what to back up. Select the option to choose what to back up, and then click the Next button to continue.
Figure 17.2. The What to Back Up screen allows you to select the option to back up all information on the computer, which includes a system recovery disk, or you can choose what to back up. 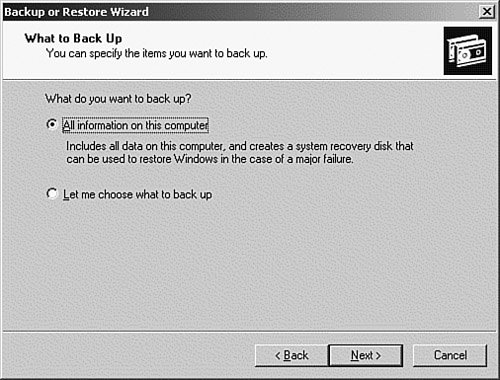
| | | 5. | From the Items to Back Up screen, shown in Figure 17.3, you can select the files and folders to back up. Select the desired files and folders and then click the Next button to continue.
Figure 17.3. You can select files and folders on remote computers if you have a connection to them. 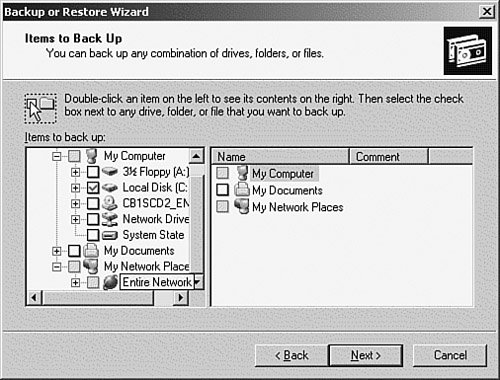
| 6. | From the Backup Type, Destination, and Name screen, you can select to back up to a tape or file, specify where to save the backup, and provide a name for the backup. Select the desired options and then click the Next button to continue.
| 7. | From the Completing the Backup or Restore Wizard screen, examine the selected backup settings. If any settings are not correct, click the Back button to reconfigure them. If everything is correct, click the Finish button.
| 8. | If you clicked the Advanced button, you will see the Type of Backup screen, shown in Figure 17.4. This screen allows you to select from the following types of backups: Normal, Copy, Incremental, Differential, and Daily. Select the desired type of backup and then click the Next button to continue.
Figure 17.4. The Type of Backup screen. The default is a normal backup. 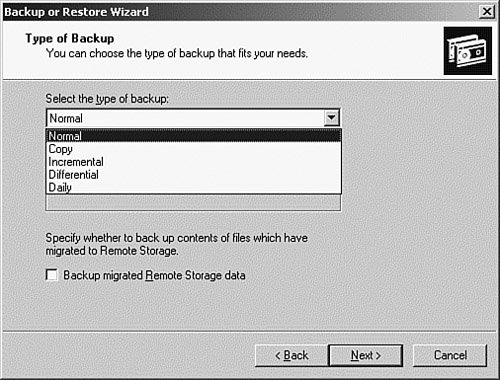
| | | 9. | From the How to Back Up screen, shown in Figure 17.5, you can select verification, hardware compression, and Volume Shadow Copy options. Select the desired options and then click the Next button to continue.
Figure 17.5. The How to Back Up screen. This screen allows you to select whether to use Volume Shadow Copy and hardware compression and whether to verify the data after the backup. 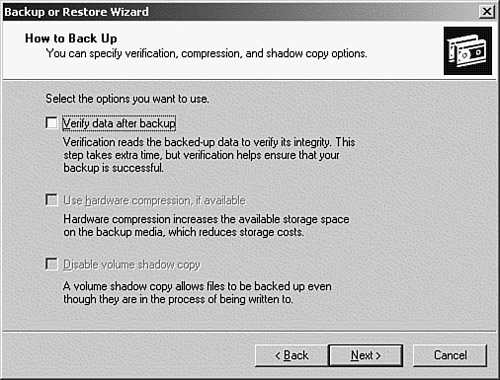
| 10. | From the Backup Options screen, you can select to overwrite or append to an existing backup. From this screen, you have the additional option of setting more security for the backup by selecting the check box to restrict access to the backup set to the administrator and the owner. Select the desired options and then click the Next button to continue.
| 11. | From the When to Back Up screen, you can select to run the backup job immediately or schedule it to run later. Select the desired option and then click the Next button to continue.
| 12. | From the Completing the Backup or Restore Wizard screen, examine the selected backup settings. If any settings are not correct, click the Back button to reconfigure them. If everything is correct, click the Finish button.
| 13. | The backup starts and the Backup Progress window appears. When the backup completes, the Report button will appear.
| | | 14. | Click the Report button to open the backup report, shown in Figure 17.6, which displays the status of the backup.
Figure 17.6. The backup log, showing the backup status. 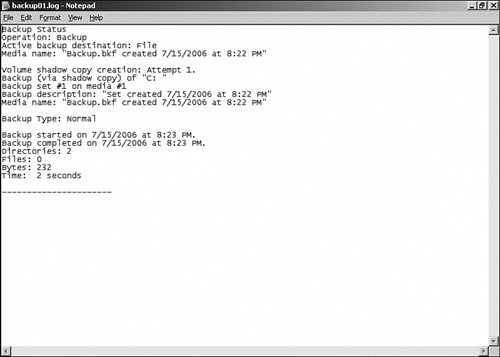
| 15. | Close all windows when finished.
|
|
To shorten the steps required for backups in the future, you can preconfigure most of the settings configured after selecting the Advanced button. These settings are located on the Options tab in the Backup program. To configure the default options for a backup, perform the procedure outlined in Step by Step 17.2. Step by Step 17.2 Configuring the default options for the backup program 1. | From the Start menu, click Start, All Programs, Accessories, System Tools, Backup.
| 2. | The Backup or Restore Wizard appears. Click the Advanced Mode hyperlink.
| | | 3. | From the Backup Utility Advanced Mode screen, shown in Figure 17.7, select Tools, Options.
Figure 17.7. The Backup Utility Advanced Mode screen. 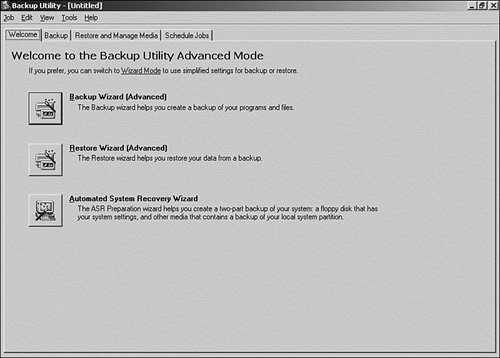
| 4. | The Options dialog box appears. From here, you can set the defaults for your backups and restores (see Figure 17.8).
Figure 17.8. The Options dialog box's Backup Type tab. 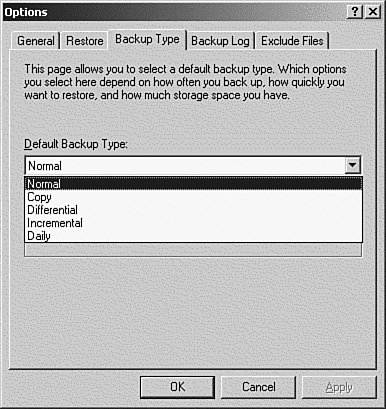
|
|
The five tabs on the Options dialog box allow you to set the defaults for your backup and restore jobs. This way, you can use the wizard to quickly set up a backup or restore job with the preconfigured settings. The Backup Type tab shown in Figure 17.8 allows you to select the default type of backup to perform. The selections are the standard five types of backups: Normal, Copy, Differential, Incremental, and Daily. The General tab, shown in Figure 17.9, allows you to set the default actions for the backup procedure and the alerts presented for various conditions. Figure 17.9. The Options dialog box's General tab. 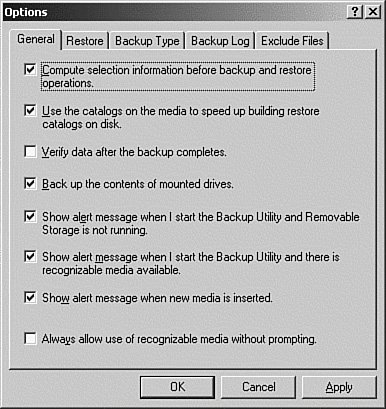
Here's a list of the options and their explanations: Compute Selection Information Before Backup and Restore Operations This option displays the number of files and the total size of the files and folders selected. Use the Catalogs on the Media to Speed Up Building Restore Catalogs on Disk This option forces the restore to use the catalog saved with the media. A catalog is an inventory of the files and folders that were backed up, along with their locations. This file is normally saved on the last volume of the backup media. This option should be deselected only if the catalog is damaged or missing, because rebuilding the catalog can take a long time for a large backup. Verify Data After the Backup Completes This option is not selected by default. If it is selected, after the completion of the backup, Windows Backup compares the information on the backup media to the files on the hard drive to verify that they were backed up properly. This step can double the length of the backup procedure, but it is good insurance for important files. Back Up the Contents of Mounted Drives This option tells Windows Backup to back up the contents of drives that are mounted as folders on an NTFS volume. Show Alert Message When I Start the Backup Utility and Removable Storage Is Not Running This option should be checked only if you are using a tape drive for backup. The Removable Storage service manages the tape drives for you. If it is not running, the backup will fail. Show Alert Message When I Start the Backup Utility and There Is Recognizable Media Available This option should be checked only if you are using a tape drive for backup. This message option generates an alert if a compatible tape is mounted when you start the backup utility. Show Alert Message When New Media Is Inserted This option should be checked only if you are using a tape drive for backup that is managed by Removable Storage. This message option generates an alert if a compatible tape is mounted when you start the backup utility. Always Allow Use of Recognizable Media Without Prompting Does just what it states. If the proper media is in place, the backup starts automatically.
The Restore tab allows you to set the default actions for the restore procedure to take when restoring a file that is already present. Here are the available options: Do Not Replace the File on My Computer. Replace the File on Disk Only if the File on Disk Is Older. Always Replace the File on My Computer.
The Backup Log tab, shown in Figure 17.10, allows you to set the amount of information that is to be recorded in the backup log. The default is to create a summary log that only records the actions taken. The other options available are to keep a detailed log that includes the names of all files and folders that were backed up, and to not create a backup log at all. Figure 17.10. The Options dialog box's Backup Log tab. 
The Exclude Files tab, shown in Figure 17.11, allows you to define the files that should not be backed up, both for all users (top window) and the current user (bottom window). By default, files such as the page and hibernate files are excluded. Figure 17.11. The Options dialog box's Exclude Files tab. 
System State Backups Objective: Back up files and system state data to media
All backups of a Windows Server 2003 server should include the system state data. System state data is a collection of data that contains the operating system configuration of the server. For all Windows Server 2003 operating systems, the system state data includes the following: For Windows Server 2003, the system state data also includes the Certificate Services database Exam Alert: System State You should be familiar with the contents of the system state data and on which type of server it will be present.
(if the server is operating as a certificate server). If the server is a domain controller, the system state data also includes the Active Directory services database and the SYSVOL directory. In addition, the system state data includes the IIS Metabase or the Cluster Service configuration if these features are installed on the server. The system state backup procedure automatically backs up all the system state data relevant to your server configuration. Because of their interdependencies, these components cannot be backed up or restored separately. It's important to back up the system state data for each server and domain controller. The system state backup from one server or domain controller cannot be restored to a different server or domain controller. There are two types of system state backup/restore procedures: local and remote. A local backup/restore is used when the backup media is hosted on the server being restored. A remote restore is performed when the backup media is located on another machine. The Windows Server 2003 Backup program is capable of backing up and restoring the system state data only on the local server. To back up system state data on a Windows Server 2003 server, perform the procedure outlined in Step by Step 17.3. Step by Step 17.3 Backing up system state data 1. | From the Start menu, click Start, All Programs, Accessories, System Tools, Backup.
| 2. | The Backup or Restore Wizard appears.
| 3. | From the Backup or Restore screen, you can select to either back up or restore files and settings. Select Backup Files and Settings and then click the Next button to continue.
| 4. | From the What to Back Up screen, you can select to back up all the information on the computer, or you can choose what to back up. Select the option to choose what to back up and then click the Next button to continue.
| 5. | From the Items to Back Up screen, shown in Figure 17.12, click the My Computer entry to expand the tree. Select the System State entry and then click the Next button to continue.
Figure 17.12. The Backup or Restore Wizard showing the System State check box selected. Note that on the right, the items present indicate that this is a domain controller. 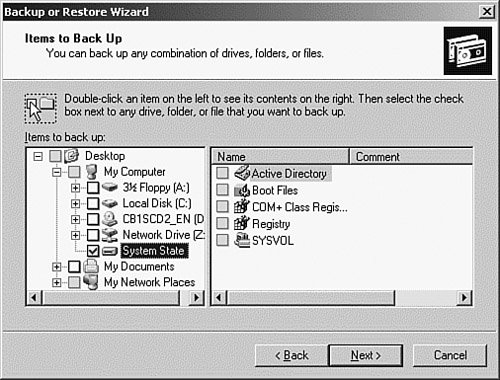
| 6. | From the Backup Type, Destination, and Name screen, you can select to back up to a tape or file, specify where to save the backup, and provide a name for the backup. Select the desired options and then click the Next button to continue.
| 7. | From the Completing the Backup or Restore Wizard dialog box, examine the selected backup settings. If any settings are not correct, click the Back button to reconfigure them. If everything is correct, click the Finish button.
|
|
The system state data can be backed up separately or as part of a complete server backup. Scheduling Backup Jobs Objective: Schedule backup jobs
A backup job runs faster and more efficiently when fewer users are on the server. In addition, even with the Volume Shadow Copy service, it's better to back up a closed file rather than an open one. This ensures that the most current version of the file is backed up. Unfortunately, in most environments the period of least usage is either in the middle of the night or on weekends. Most system administrators would prefer to work more conventional hours. Fortunately, Windows Backup includes a built-in scheduling service. This feature allows the administrator to schedule backups to run unattended anytime in the future. Jobs can be scheduled to run once, or they can be repeated using the following options: Daily Weekly Monthly At System Startup At Logon When Idle
Scheduling backups with the native Backup utility no longer requires the use of the Task Scheduler service. You no longer need to use the AT.EXE utility to schedule the backup (although you still can if you really want to). Instead, you click the Set Schedule button when creating a backup job using the advanced backup options of the Backup or Restore Wizard (see Figure 17.13), or you use the Schedule Jobs tab of the Backup utility (shown later in Figure 17.14). Figure 17.13. The When to Back Up screen. This screen is part of the advanced tasks of the Backup or Restore Wizard. From this screen you can set a backup schedule by clicking the Set Schedule button. 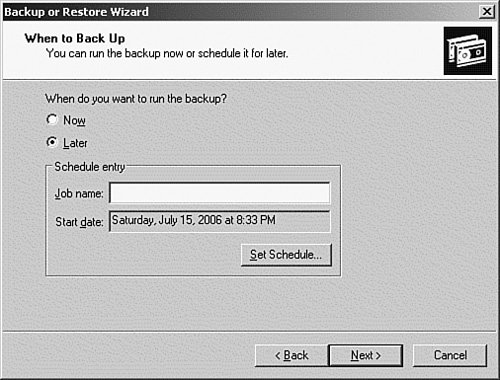
Figure 17.14. The Backup utility's Advanced Mode screen displaying the Schedule Jobs tab. 
To configure an unattended backup, perform the procedure outlined in Step by Step 17.4. Step by Step 17.4 Scheduling an unattended backup job 1. | From the Start menu, click Start, All Programs, Accessories, System Tools, Backup.
| 2. | The Backup or Restore Wizard appears. Click the Advanced Mode hyperlink to open the Backup utility.
| 3. | From the Backup utility's Advanced Mode screen, select the Schedule Jobs tab, shown in Figure 17.14.
| 4. | From the Schedule Jobs tab, double-click the date on which you want to run a backup job. This starts the Backup Wizard. On the Backup Wizard's opening screen, click Next to continue.
| | | 5. | The What to Back Up screen appears, as shown in Figure 17.15. Select one of the options and then click Next to continue.
Figure 17.15. Select what you want to back up. You can choose to back up everything, selected files and folders, or system state data. 
| 6. | The Items to Back Up screen appears. Select the files and folders to be backed up and then click Next to continue.
| 7. | The Backup Type, Destination, and Name screen appears. Select the backup type and where to save it and then give it a job name. Click Next to continue.
| 8. | The Type of Backup screen appears. This screen allows you to select from the following types of backups: Normal, Copy, Differential, Incremental, and Daily. Select the desired type of backup and then click the Next button to continue.
| | | 9. | The How to Back Up screen appears. You can select verification, hardware compression, and Volume Shadow Copy options. Select the desired options and then click the Next button to continue.
| 10. | From the Backup Options screen, you can select to overwrite or append to an existing backup. From this screen, you have the additional option of setting more security for the backup. Select the desired options and then click the Next button to continue.
| 11. | From the When to Back Up screen, you can select to run the backup job immediately or schedule it to run later. Click the Set Schedule button.
| 12. | The When to Back Up dialog box appears with the date that you selected from the calendar, as shown in Figure 17.16. Enter an appropriate name for the job. To change the time, click the Set Schedule button.
Figure 17.16. Select when you want the backup to run. Notice that the date you clicked on the calendar is filled in for you. 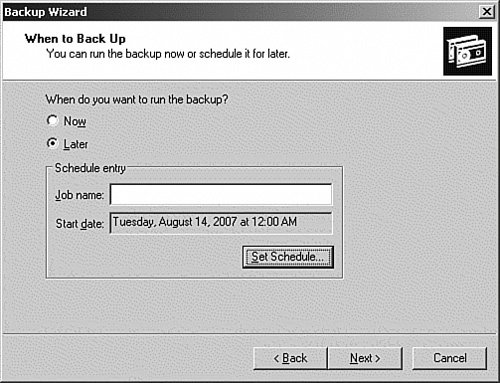
| | | 13. | The Schedule Job dialog box appears, as shown in Figure 17.17. Select the desired options and then click the Settings button.
Figure 17.17. The Schedule Job dialog box presents you with more granular scheduling parameters. 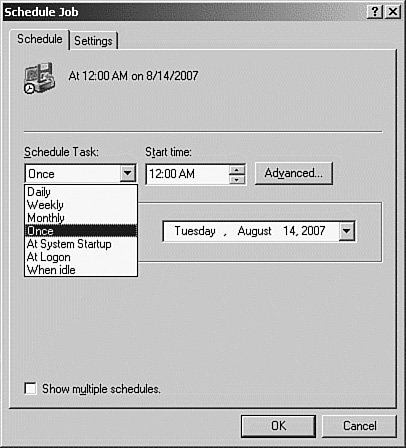
| 14. | On the Settings tab, as shown in Figure 17.18, you can specify additional options, such as what to do if the task runs longer than a certain time, and start the task only if the computer is idle. Select the desired options and then click the OK button.
Figure 17.18. Select additional parameters for your scheduled task. 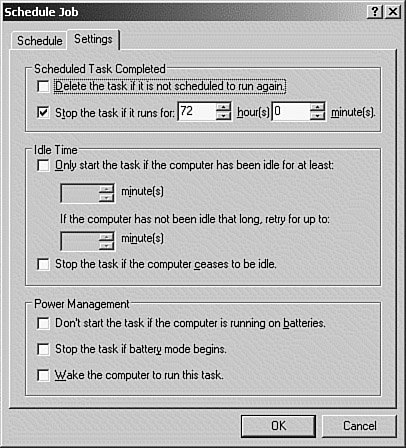
| | | 15. | Back on the When to Back Up dialog box, click Next. The Set Account Information dialog box appears. Enter the user account and password that you want the backup job to run as. Then click the OK button.
| 16. | Back at the When to Back Up screen, click Next to continue.
| 17. | From the Completing the Wizard screen, examine the selected backup settings. If any settings are not correct, click the Back button to reconfigure them. If everything is correct, click the Finish button.
|
|
Back Up from the Command Line In addition to the GUI we have been working with, Windows Server 2003 has a command-line version of the Backup program called ntbackup.exe. The command-line version allows you to schedule a backup either from the command line or in a batch file or script. Prior to Windows 2000, this method was very popular because at that time Windows Backup did not have the built-in scheduler service it has now. There will always be a use for command-line utilities. For example, if you need to run a backup as part of another process, and this process requires automation, it is simple to include the command-line Backup utility in a batch file or script. Here is the syntax for the ntbackup command: [View full width] ntbackup backup [systemstate] "@FileName.bks" /J {"JobName"} [/P {"PoolName"}] [/G  {"GUIDName"}] [/T {"TapeName"}] [/N {"MediaName"}] [/F {"FileName"}] [/D {"SetDescription"}] [/DS {"ServerName"}] [/IS {"ServerName"}] [/A] [/V:{yes | no}] [/R:{yes | no}] [/L:{f | s | n}] [/M {BackupType}] [/RS:{yes | no}] [/HC:{on | off}][/SNAP:{on | off}] {"GUIDName"}] [/T {"TapeName"}] [/N {"MediaName"}] [/F {"FileName"}] [/D {"SetDescription"}] [/DS {"ServerName"}] [/IS {"ServerName"}] [/A] [/V:{yes | no}] [/R:{yes | no}] [/L:{f | s | n}] [/M {BackupType}] [/RS:{yes | no}] [/HC:{on | off}][/SNAP:{on | off}]
Table 17.1 defines the command-line parameters available for a command-line backup. Table 17.1. Command-Line Parameters for ntbackup.exeParameter | Description |
|---|
systemstate | Backs up the system state data. This option forces the backup to be either a normal or a copy type. | @FileName.bks | Specifies the name of the backup selection file. The selection file contains the names of the files and folders you want to be backed up. The selection file must be created using the GUI version of Windows Backup. | /J {"JobName"} | The name of the job to be recorded in the log file. | /P {"PoolName"} | The media pool from which to use media. | /G {"GUIDName"} | The tape, referred to by its Globally Unique Identifier (GUID). Do not use this switch with /P. | /T {"TapeName"} | The tape, referred to by its name. Do not use this switch with /P. | /N {"MediaName"} | Specifies a new name for the tape. Do not use with /A. | /F {"FileName"} | The logical path and filename. Do not use with /P, /G, or /T. | /D {"SetDescription"} | Specifies a label for each backup set. | /DS {"ServerName"} | Backs up the Directory Service database for the specified Exchange Server. | /IS {"ServerName"} | Backs up the Information Service database for the specified Exchange Server. | /A | Appends to an existing backup. Must be used with either /G or /T. Cannot be used with /P. | /V:{yes | no} | Verifies the backup. | /R:{yes | no} | Restricts access to the tape to members of the Administrators group or the owner. | /L:{f | s | n} | Specifies the type of log file, either f (full), s (summary), or n (none). | /M {BackupType} | Specifies the type of backup: Normal, Copy, Differential, Incremental, or Daily. | /RS:{yes | no} | Backs up the Remote Storage database. | /HC:{on | off} | Turns on/off hardware compression, if supported. | /SNAP:{on | off} | Enables or disables Volume Shadow Copy. | /? | Displays help. |
The command-line options automatically default to whatever is configured via the GUI version of Backup. Any options specified override the GUI settings for that instance only. The following is a sample ntbackup command with the parameters explained: Ntbackup backup "@c:\full.bks" /J "Full Backup" /t "Week1Full" /V:yes /L:f /HC:on
This command line specifies that ntbackup will back up the file and folders specified in the backup selection file c:\full.bks. The job name will be Full Backup, and the tape used is Week1Full. The data will be verified after the backup is complete, the log type is full, and hardware compression is turned on for the tape drive. To create a backup selection file to be used with the command-line version of Backup, perform the procedure outlined in Step by Step 17.5. Step by Step 17.5 Creating a backup selection file 1. | From the Start menu, click Start, All Programs, Accessories, System Tools, Backup.
| 2. | The Backup or Restore Wizard appears. Click the highlighted Advanced Mode link to open the Backup utility.
| 3. | From the Backup utility's Advanced Mode window, shown in Figure 17.19, select the Backup tab.
Figure 17.19. The Backup utility's Advanced Mode window, displaying the Backup tab. From here, select the files and folders you want to back up. 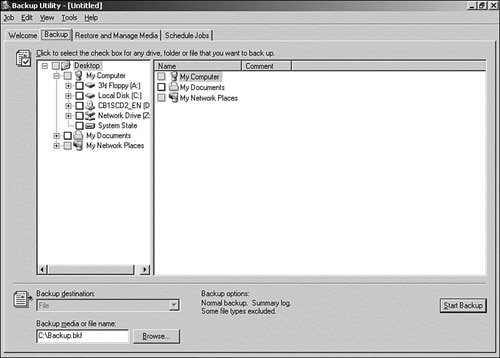
| 4. | From the Backup tab, select the files and folders you want to include in the backup job. This starts the Backup Wizard. On the Backup Wizard's opening screen, click Next to continue.
| 5. | From the system menu, select Job, Save Selections. From the Save As dialog box, enter a file and path for the selection file. It must have an extension of *.bks.
| 6. | Click Save.
|
|
Exam Alert: Know the Capabilities You probably do not need to memorize the various command-line parameters for the test. However, you should have a general idea of the capabilities of ntbackup from the command line and how to create the backup selection file.
Configuring Security for Backup Operations Objective: Configure security for backup operations
Earlier in this chapter, we discussed that to back up and restore a Windows Server 2003 server, you must be a member of the Administrators or the Backup Operators group. If you are not a member of one of these groups, you can back up only the files that you own or that you have at least Read permissions for. To restore a file or folder, you must have Write permission. These permissions are assigned via the Backup Files and Directories and the Restore Files and Directories user rights. These rights can be assigned via Group Policy. To assign other users the Backup Files and Directories right, follow the procedure outlined in Step by Step 17.6. Step by Step 17.6 Assigning other users the Backup right 1. | From the Start menu, click Start, All Programs, Administrative Tools, Domain Security Policy.
| 2. | From the Default Domain Security Settings MMC, shown in Figure 17.20, click Local Policies and then User Rights Assignment.
Figure 17.20. Double-click the desired user right to configure it. 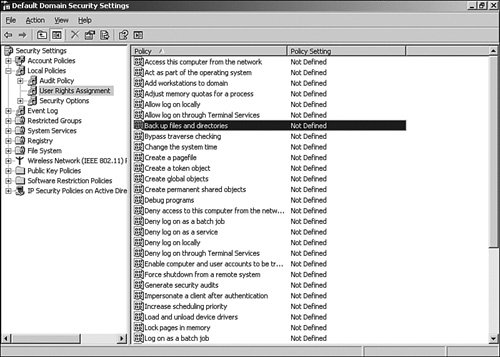
| | | 3. | The users and groups that possess Backup rights, if any, are displayed in Figure 17.21. If not already selected, click the Define These Policy Settings check box. Note that the groups that have these rights by default will not be displayed.
Figure 17.21. The users and groups with Backup rights are displayed. 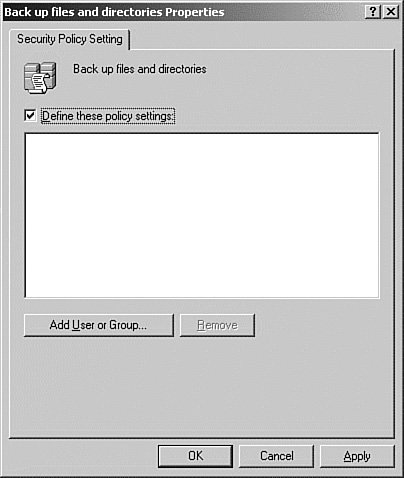
| 4. | Click the Add User or Group button. This opens the Select Users or Groups dialog box. Add users or groups from the local or domain accounts database. Click OK to save.
| 5. | Click OK to save.
| 6. | Close the Default Domain Security Settings MMC.
|
|
Note: Local Policy In the preceding Step by Step, we demonstrated changing Group Policy for the domain. If you want to grant these rights only on a single server, you can change the same settings via the Local Security Policy MMC on that server.
The Restore Files and Directories right can be configured using the same procedure. In addition to restricting backup and restore access to files and folders via Group Policy, you can also control who has the ability to restore backed-up files during the backup process. This is accomplished by selecting the Allow Only the Owner and the Administrator Access to the Backup Data option from the Backup Options dialog box, shown in Figure 17.22, during the backup configuration. This option prevents anyone other than an administrator or the person performing the backup from restoring the information that is being backed up. Figure 17.22. The option to restrict restore rights is displayed. 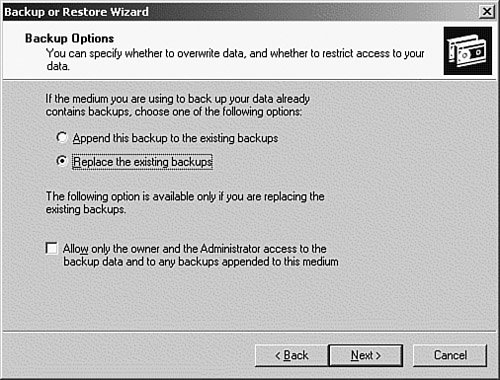
Verifying the Successful Completion of Backup Jobs Objective: Verify the successful completion of backup jobs
After a backup or restore job completes, you can verify its completion by clicking the Report button that appears on the Backup Progress dialog box at the completion of a backup or restore. Clicking the Report button opens the backup log, as shown in Figure 17.23. This is a sample log from the backup of system state data. Full logging was turned on so that all the files and folders that were backed up are listed, along with their paths and attributes. Figure 17.23. The backup log showing full reporting. 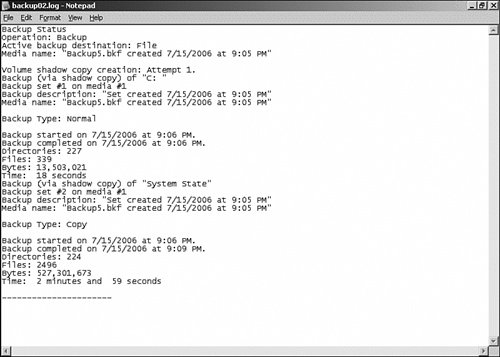
Notice that the summary at the bottom of the file lists the number of files and directories that were backed up, along with the total bytes and total elapsed time. If there had been any errors, they would be listed here. If you want to see the results of a backup job after it has completed and you forgot to click the Reports button or you ran an unattended job from the command line, you can access the report from the Backup utility. Click Tools, Reports from the system menu. This opens the Backup Reports dialog box, shown in Figure 17.24. From this dialog box you can view or print any of the saved reports for previously run backup jobs. Figure 17.24. The Backup Reports dialog box allows you to select from previously saved backup logs. 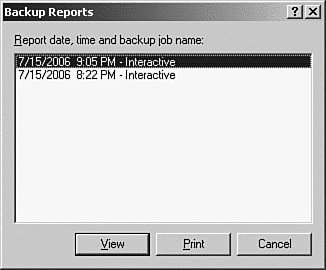
Restoring Backup Data Objective: Restore backup data
It doesn't do you any good to back up all this data if it can't be restored. Fortunately, the Windows Server 2003 Backup program is also capable of restoring the data that you backed up. The restore procedures work similar to the backup proceduresas a matter of fact, most use the same wizards, and it's just a matter of selecting different options. The two major differences are that there is no command-line equivalent to the GUI version of the program, and a restore can't be scheduled to run unattended. To restore data files using the Restore Wizard, perform the procedure outlined in Step by Step 17.7. Step by Step 17.7 Restoring data using the Restore Wizard 1. | From the Start menu, click Start, All Programs, Accessories, System Tools, Backup.
| 2. | The Backup or Restore Wizard appears. From the Backup or Restore screen, you can select to either back up or restore files and settings. Select Restore Files and Settings and then click the Next button to continue.
| | | 3. | From the What to Restore screen, shown in Figure 17.25, select the files and backup set to restore and then click the Next button to continue.
Figure 17.25. The What to Restore screen allows you to select the files, folders, and backup set to use to restore your data. You can click the Browse button to catalog the backup media. 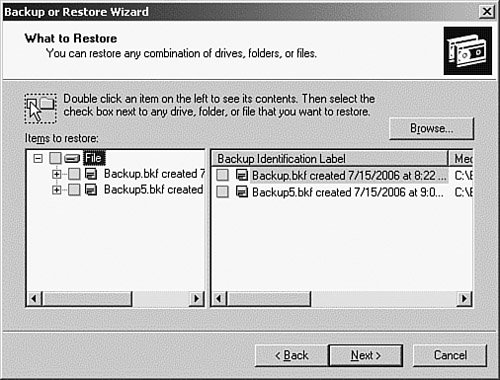
| 4. | From the Completing the Backup or Restore Wizard screen, examine the selected restore settings. If any settings are not correct, click the Back button to reconfigure them. If everything is correct, click the Finish button.
| 5. | If you click the Advanced button, the Where to Restore screen, shown in Figure 17.26, opens. This screen allows you to select from the following options: Original Location, Alternate Location, and Single Folder. Select the location for the restore and then click the Next button to continue.
Figure 17.26. The Where to Restore screen. These options allow you to restore the files to an alternate location so that the original files will not be overwritten. You can also select to restore all selected files to a single folder. 
| | | 6. | From the How to Restore screen, shown in Figure 17.27, you can select how the restore process handles existing files. The default is not to overwrite them. Select the desired option and then click the Next button to continue.
Figure 17.27. The How to Restore screen. The options here allow you to leave the existing files, replace them, or replace them only if they are older than the files on the backup media. 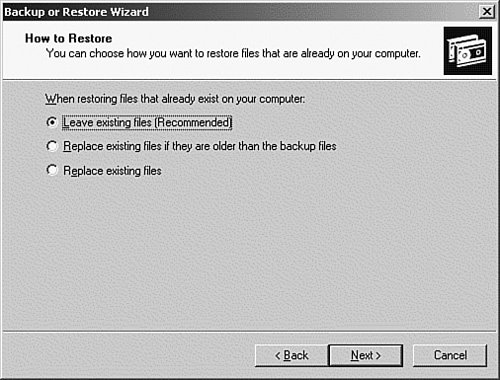
| 7. | From the Advanced Restore Options screen, shown in Figure 17.28, you can select other restore options. You can restore the files using the security settings they were saved with (this is only for NTFS volumes). You can also select to restore junction points, which are logical pointers to files and folders on other drives, or you can select whether to preserve the volume mount points. Select the desired options and then click the Next button to continue.
Figure 17.28. The Advanced Restore Options screen. These are the miscellaneous options that don't fit anywhere else. 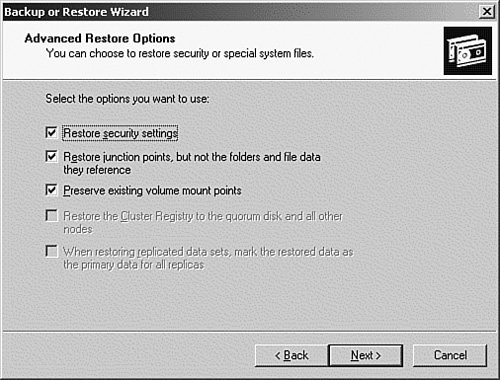
| | | 8. | From the Completing the Backup or Restore Wizard screen, examine the selected restore settings. If any settings are not correct, click the Back button to reconfigure them. If everything is correct, click the Finish button.
| 9. | The Restore Progress dialog box appears, displaying the progress of the restore.
|
|
Restoring System State Data As discussed earlier, the Backup program in Windows Server 2003 allows you to restore the system state data only on a local computer. You are not allowed to back up and restore the system state on a remote computer. Although you can't selectively back up components of the system state, you can restore the following system state components to an alternate location: The Active Directory, IIS Metabase, COM+ Class Registration, Certificate services databases, and the Windows File Protection folder cannot be restored to an alternate location. To restore the system state data on a Windows Server 2003 server (not a domain controller), perform the procedure outlined in Step by Step 17.8. Step by Step 17.8 Restoring system state data using the Restore Wizard 1. | From the Start menu, click Start, All Programs, Accessories, System Tools, Backup.
| 2. | The Backup or Restore Wizard appears. From the Backup or Restore screen, you can select to either back up or restore files and settings. Select Restore Files and Settings and then click the Next button to continue.
| 3. | From the What to Restore screen, select System State from the backup set to restore. Then click the Next button to continue.
| 4. | From the Completing the Backup or Restore Wizard screen, examine the selected restore settings. If any settings are not correct, click the Back button to reconfigure them. If everything is correct, click the Finish button.
| 5. | If you click the Advanced button, the Where to Restore screen opens. This screen allows you to select from the following options: Original Location, Alternate Location, and Single Folder. Select the location for the restore and then click the Next button to continue.
| | | 6. | If you've selected to restore to the original location, you receive a warning that system state data will be overwritten. Click OK to acknowledge the warning.
| 7. | From the How to Restore screen, you can select how the restore process handles existing files. The default is not to overwrite them. Note that these options do not apply to the system state restore; they are shown by default. Click the Next button to continue.
| 8. | From the Advanced Restore Options screen, you can select other restore options. You can restore the files using the security settings they were saved with (this is only for NTFS volumes). You can also select to restore junction points, which are logical pointers to files and folders on other drives, or you can select whether to preserve the volume mount points. Note that these options apply only if you are restoring other files with your system state data. Ignore them. Then click the Next button to continue.
| 9. | From the Completing the Backup or Restore Wizard screen, examine the selected restore settings. If any settings are not correct, click the Back button to reconfigure them. If everything is correct, click the Finish button.
| 10. | The Restore Progress dialog box appears, displaying the progress of the restore.
| 11. | After the restore completes, restart the server.
|
|
Note: For More Information For information on how to restore system state data on a domain controller, see the section titled "Using Directory Services Restore Mode to Recover System State Data," later in this chapter.
Challenge It is very important to always have a current backup of system state data, especially for domain controllers. The Windows Server 2003 Backup utility includes a built-in scheduler that allows you to schedule the backup to occur on a recurring basis. For this exercise, your job is to automate the backup of system state data on your server. The data should be backed up every weekday evening at 11:00 p.m. What is the best way to accomplish this in Windows Server 2003? On your own, try to develop a solution that involves the least amount of downtime. If you would like to see a possible solution, follow these steps: 1. | From the Start menu, click Start, All Programs, Accessories, System Tools, Backup.
| 2. | The Backup or Restore Wizard appears.
| 3. | From the Backup or Restore screen, select Backup Files and Settings and then click the Next button to continue.
| | | 4. | From the What to Back Up screen, select the option to choose what to back up. Then click the Next button to continue.
| 5. | From the Items to Back Up screen, click the My Computer entry to expand the tree. Select the System State entry and then click the Next button to continue.
| 6. | From the Backup Type, Destination, and Name screen, you can select to back up to a tape or file, specify where to save the backup, and provide a name for the backup. Select the desired options and then click the Next button to continue.
| 7. | From the Completing the Backup or Restore Wizard screen, examine the selected backup settings. If any settings are not correct, click the Back button to reconfigure them. If everything is correct, click the Advanced button.
| 8. | From the Type of Backup screen, click the Next button to continue.
| 9. | From the How to Back Up screen, click the Next button to continue.
| 10. | From the Backup Options screen, click the Next button to continue.
| 11. | From the When to Back Up screen, click the Set Schedule button.
| 12. | The Schedule Job dialog box appears. Select the option to run the task daily at 11:00 p.m. Select the desired days to run the backup. When you're finished, click OK to save.
| 13. | Back on the Schedule Job dialog box, click the OK button.
| 14. | The Set Account Information dialog box appears. Enter the user account and password that you want the backup job to run as. Then click the OK button.
| 15. | Back at the When to Back Up screen, click Next to continue.
| 16. | From the Completing the Backup or Restore Wizard screen, examine the selected backup settings. If any settings are not correct, click the Back button to reconfigure them. If everything is correct, click the Finish button.
|
|
|