Lesson 1: SMTP Configurations and Virtual Servers
By default, every Exchange 2000 server relies on one SMTP virtual server for its communication with other servers in the local routing group. This virtual server can also support users of Internet mail clients for sending messages. The communication is not secured. Users and remote SMTP hosts don't need to authenticate themselves before they can communicate. Anonymous access to the local SMTP service is generally allowed. Nevertheless, you can restrict access through authentication and encrypt the communication, as explained in Chapter 11, "Internet-Based Client Access."
This lesson covers the configuration of SMTP virtual servers in more detail. After that, several topics about Internet connectivity and message transfer are discussed.
At the end of this lesson, you will be able to:
- Configure multiple SMTP virtual servers on a single machine.
- Configure basic connection and delivery settings.
- Describe advanced configurations for Internet connectivity.
Estimated time to complete this lesson: 60 minutes
Configuring Additional SMTP Virtual Servers
One SMTP virtual server is usually sufficient for Exchange 2000 Server, but there are situations in which multiple virtual servers can be helpful. For instance, one virtual server may handle Internet e-mail traffic and another could be responsible for users directly transferring messages to the server with their Internet clients (see Figure 15.1). Separate virtual server entities give you the ability to manage message sizes and other settings separately. Each virtual server must use a unique TCP socket (that is, IP address + TCP port). You can read more about the creation of protocol virtual servers in Chapter 11, "Internet-Based Client Access."
NOTE
Adding additional virtual servers does not increase the server's scalability or performance. Each SMTP virtual server operates with multiple threads being able to handle multiple tasks concurrently.
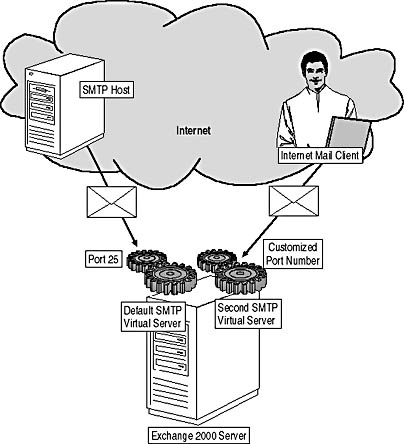
Figure 15.1 Separate virtual servers for public and client communication
Working with Additional Virtual Servers
You can control virtual servers and start, stop, or pause them independently of each other. Pausing a server prevents the establishment of new connections, and existing connections are not terminated. For instance, if you check the number of current connections for a particular virtual server (select the Current Sessions object under the SMTP Virtual Server object in Exchange System Manager) and find an unusually high number of sessions, which could indicate that your host is under a denial-of-service attack from the Internet, you could stop the virtual server without affecting others on the same machine.
NOTE
Stopping virtual servers in Exchange System Manager leaves the SMTP service running on the computer. Stopping the SMTP service itself, on the other hand, stops all virtual servers. When you restart the SMTP service, only those virtual servers that originally were active when the service was shut down will be activated.
Mailroot Directories of Virtual Servers
Every SMTP virtual server has a separate Mailroot directory. All Mailroot directories are located under \Program Files\Exchsrvr\Mailroot and are named sequentially, for example, Vsi 1, Vsi 2, and so forth. Each of these subdirectories contains three or four folders named Badmail, Pickup, Queue, and possibly Filter. As indicated by its name, Badmail is used to save undeliverable messages. Pickup is the folder where outgoing messages are placed for delivery in the form of text files. A text file must be formatted according to RFC 822. As soon as such a file is present, the SMTP server will pick it up, transfer it into the Queue directory, and attempt its delivery. The Queue directory holds all messages that are currently awaiting delivery. The fourth folder, called Filter, on the other hand, is not present by default. It is created automatically when the first message is filtered after you have enabled message filtering for a particular virtual server, as explained later in this lesson.
If you want to change the location of the Mailroot directory for a particular virtual server, you need to use the MetaEdit utility and change the settings directly in the Internet Information Services (IIS) metabase. MetaEdit was introduced in Exercise 2 of Chapter 3, "Microsoft Exchange 2000 Server Architecture." Exchange System Manager only allows you to change the Badmail directory.
NOTE
The Exchange 2000 Setup program moves the Mailroot directory of the SMTP service from \Inetpub\Mailroot to Program Files\Exchsrvr\Mailroot. The old folder structure will not be deleted, but any messages in the former Pickup and Queue directories are not delivered. To send them, move them to the Pickup directory under the new location.
Managing Incoming Message Traffic
Let's assume the Exchange 2000 server shown in Figure 15.1 is supposed to accept messages from any host on the Internet. How does a remote Internet host find the SMTP virtual server to transfer messages to it? You will need to make sure that the Internet hosts are able to resolve your domain name to your host's public IP address. Typically, DNS provides the required name resolution functionality, as explained in Chapter 11, "Internet-Based Client Access."
IMPORTANT
For other SMTP servers to find your SMTP server on the network, your SMTP domain name must be registered in the Internet DNS (mail exchanger, or MX records).
Controlling Incoming Connections
As soon as your host is connected to the Internet and publicly registered in DNS, all Internet hosts are able to find it, connect to it, and transfer messages. Every connection consumes server resources, so numerous simultaneous connections can decrease system performance. By default, Exchange 2000 Server does not enforce any limits. If your server has to cope with a large number of connections, you should decrease the connection timeout in the SMTP virtual server's General tab to disconnect idle links and free server resources quicker. The default timeout is 10 minutes. You can also specify a limit for the number of inbound connections.
Inbound E-Mail Domains
In addition to routing inbound messages to your SMTP virtual server, the domain names for which your organization is responsible must be identified in Exchange 2000 Server. Otherwise, the messages may reach your server but will be refused.
By default, only the main SMTP domain name of your Exchange 2000 organization is configured as an inbound SMTP domain. If you need to support additional domains, for instance, because some of your users prefer to use a different Internet address, such as User@Bluesky-inc-10.co.uk, you need to configure additional inbound domains. Launch the Exchange System Manager, open the Recipients container, select Recipient Policies, and then, in the details pane, right-click the desired policy, such as Default Policy. From the shortcut menu, select the Properties command. Click on the E-Mail Addresses tab, click New, select SMTP Address, and then click OK. In the SMTP Address Properties dialog box, under Address, enter the Internet domain name, such as @Bluesky-inc-10.co.uk, and make sure the check box called This Exchange Organization Is Responsible For All Mail Delivery To This Address is selected. Click OK.
NOTE
Configure separate recipient policies and specify filter rules to assign the desired SMTP domain name(s) to the intended recipients. You can read more about recipient policies in Chapter 13, "Creating and Managing Recipients."
Controlling Message Relay
Relaying is the process of accepting a message from a remote SMTP host and forwarding this message to another SMTP host for delivery to the final destination (see Figure 15.2). You can specify the hosts that are allowed to relay in the virtual server's Access tab. Click the Relay button, and then click Add to specify the desired hosts or domains via IP address or domain name. By default, Exchange 2000 Server allows only authenticated computers to relay SMTP messages.
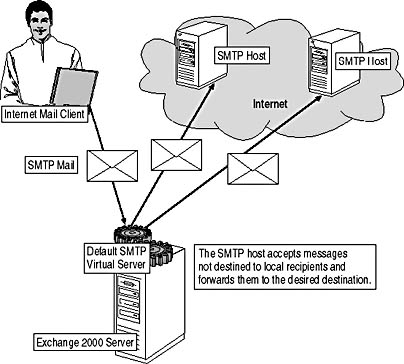
Figure 15.2 Relaying SMTP mail
It is not advisable to loosen relay restrictions for anonymous connections. Doing so may make you a target for those on the Internet that waste precious resources with unsolicited commercial messages. An advertiser might configure his or her Internet mail client to send messages to your SMTP host if it accepts message relaying for anybody. Now, all the advertiser has to do is compose one new message, specify thousands of recipients conveniently from a database, and then send this one message to the relaying host. The client's job is quickly done. It is the host that has to do all the work of sending the unsolicited message to the thousands of users in the Internet. Don't let Internet advertisers abuse your SMTP system.
Configuring Message Filters
Sooner or later, your users will receive unsolicited commercial messages, which can quickly get out of hand. Delivering unnecessary Internet messages is a drain on your system resources; it decreases the productivity of the knowledge worker; and there is always a risk of receiving viruses contained in message attachments.
To prevent the delivery of messages from specific sources, display the properties of the Message Delivery object, which can be found in Exchange System Manager under Global Settings. Click on the Filtering tab, and then use the Add button to specify senders that you want to sort out. As soon as a filter is defined, you can activate the filtering feature on your virtual server. Display its properties, then, in the General tab, click the Advanced button, edit the IP Address - TCP Port mapping, and select the Apply Filter check box. If a message is received with a sender e-mail address that matches a filter entry, the message will be discarded.
To circumvent message filters, senders of unsolicited commercial messages often change their e-mail addresses by inserting altering series of numbers (such as Walt123Lucky456@makeabillioneveryday-times-100.com). Consequently, it is not advisable to specify filter information precisely. You should use wildcards (*) where possible. To filter for entire Internet domains, for instance, use a wildcard as follows: *@makeabillioneveryday-times-100.com. It is also a good idea to filter messages with blank sender information and suppress notifications about the filtering. If you activate the Archive Filtered Messages option in addition, filtered messages are placed in the Filter directory of the SMTP virtual server, where you can check them out to verify that no important messages have been purged.
Reverse DNS Lookups
You can verify the IP address and domain information submitted by a remote SMTP host in the EHLO/HELO command through a reverse domain name lookup. In the Delivery tab, click the Advanced button, then click the Perform Reverse DNS Lookup On Incoming Messages check box. If the verification is unsuccessful, "unverified" appears after the IP address in the SMTP header of messages. However, reverse DNS lookups decrease the server performance, message delivery is not prevented for unverified IP addresses, and most recipients don't check the SMTP header information of Internet messages. Consequently, it is a good idea to activate this feature only for specific security checks.
Configuring Message Delivery Options
Exchange 2000 Server allows you to set message size limits for outbound and inbound messages and to restrict the number of recipients per message (Message Delivery object under Global Settings in the Defaults tab). By default, Exchange 2000 Server accepts messages for delivery to up to 5,000 recipients. Messages with more recipients are returned as undeliverable. However, the settings specified at this location apply only to users with mailboxes in the organization. Limits can be overwritten per user in Active Directory Users and Computers in the user account's Exchange General tab.
NOTE
To forward a copy of nondelivery reports generated by an SMTP virtual server to the Postmaster account, display the SMTP virtual server's property sheets, switch to the Messages tab, and then type Postmaster@<Your Domain Name> (for example, Postmaster@BlueSky-inc-10.com) in the Send Copy Of Non-Delivery Report To text box.
If you allow anonymous users and SMTP hosts to relay through your Exchange 2000 server, up to 64,000 recipients are accepted per message, because the settings of the SMTP virtual server apply instead of global delivery settings. The number of recipients can be restricted in the virtual server's properties in the Messages tab. You can decrease the value in the Limit Number Of Recipients Per Message To field. Values between 100 and 2000000000 are supported.
Forwarding Messages with Unresolved Recipients
If you examine the Messages tab further, you will discover the Forward All Mail With Unresolved Recipients To Host text box, which allows you to specify the fully qualified domain name (FQDN) of another host for delivery of messages that contain unresolved recipients. Instead of generating nondelivery reports, your SMTP server will forward all nondeliverable messages to the specified host. It is up to this host to deliver the messages or generate nondelivery reports. This is a very useful configuration, especially in migration scenarios (see Figure 15.3).
In the configuration of Figure 15.3, all recipients can keep their existing Internet e-mail addresses. Migrated users with mailboxes on the Exchange 2000 server will receive Internet messages because the SMTP virtual server is able to resolve the recipient information. Messages addressed to nonmigrated users will be forwarded to the legacy system, where they are delivered to their mailboxes as well.
NOTE
To avoid message loops, do not forward messages for unresolved recipients to another virtual server if this server is also configured for forwarding of unresolved messages.
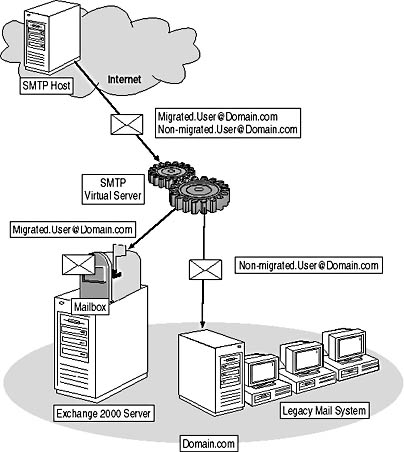
Figure 15.3 Forwarding unresolved recipients to another host
NOTE
The forwarding of nondeliverable messages to another SMTP host affects messages from Internet and MAPI-based clients. If you use this feature to support non-migrated users, keep in mind that nondeliverable messages of MAPI-based clients, such as Outlook 2000, will only contain a WINMAIL.DAT attachment and may not be readable by non-MAPI clients. It is not advisable to use the forwarding of nondeliverable messages for long-term coexistence.
Managing Outgoing Message Traffic
The configuration of outgoing message transfer primarily concerns the notification of local users about the delivery process. In the Delivery tab that every SMTP virtual server provides, you can set retry intervals and determine when to send delay notifications to users and when to cancel delivery. By default, an SMTP virtual server attempts to deliver a message as soon as it arrives. If the remote host is unavailable at that time or if a communication failure occurs, the virtual server queues the message for delivery at later time (or reroutes the message, as explained in Chapter 16, "Message Routing Administration"). The first three retries follow in 10-minute intervals. After that, the virtual server attempts delivery every 15 minutes. If a message cannot be sent for 12 hours, the sender is informed that the message is still awaiting delivery. After two days, the message expires and a nondelivery report is generated and sent back to the originator.
Optimizing Outbound Connections
When you click the Outbound Connections button in the Delivery tab, you can define various connection limits that affect the performance of the SMTP virtual server. Per domain, 100 concurrent connections are allowed by default. If you have a large number of messages to transfer between SMTP hosts, you might increase the number of connections, but the remote host must be able to accept them. In a default configuration, Exchange 2000 Server is able to open up to 1000 concurrent connections to multiple Internet domains and deliver messages to them at the same time.
If messages to multiple domains are awaiting delivery, the SMTP service groups them in memory by their destination domain to send them in a batch over a single connection. To avoid overwhelming a remote SMTP host with numerous messages, the Limit Number Of Messages Per Connection To setting is set to 20 messages by default (Messages tab). This determines that the local SMTP virtual server must establish a new connection when 20 messages have been transferred. The remote host may free allocated resources when the first connection is closed and continue the message transfer in a subsequent connection.
However, the overhead of connection establishment may slow down the mail transfer, especially if your servers have no problems transferring hundreds of messages in a batch. If your server is operating as a central bridgehead in your organization, it may be the case that your SMTP virtual server has to handle a constant stream of messages to downstream servers in other routing groups. In this situation, it could be advantageous to avoid additional handshakes for further connection establishments by not limiting the number of messages per connection. This increases performance because it allows the virtual server to traffic all e-mail over the established link.
Smart Host Message Transfer
In the Outbound Connections dialog box (which you can display via the Delivery tab's Outbound Connections button), you can also find a TCP Port text box, which allows you to change the port number for outbound connections. In most cases, you should not change this setting because it affects all connections. Internet hosts, for instance, generally expect incoming connections on port 25.
However, if you are communicating with a smart host that uses a customized port number, you need to enter the correct value in this box. Don't forget to specify the smart host in the Advanced Delivery dialog box (which you can display via the Delivery tab's Advanced button). A smart host is a server that is able to receive messages from relaying systems and send them to the proper destinations on behalf of the relayers (see Figure 15.4). Internet service providers (ISPs) often provide their customers with access to a central smart host that handles the message transfer.
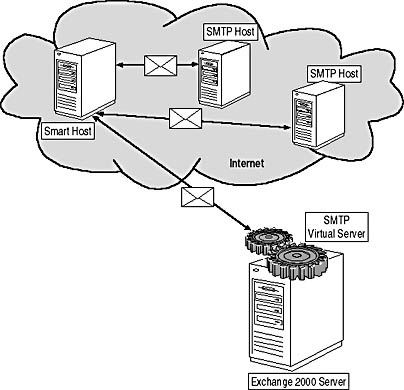
Figure 15.4 Relaying SMTP mail through a smart host
Direct Message Transfer
If you don't use a smart host for message delivery, your SMTP virtual server must be able to resolve e-mail domain names into corresponding IP addresses itself. As mentioned earlier, this is typically accomplished through DNS. However, your internal DNS servers might not be integrated with the public DNS system of the Internet. In this case, querying the internal DNS servers would not bring the desired results and messages would be returned to their originators with nondelivery reports stating that domain or host names could not be resolved.
To add references to external DNS servers to your SMTP virtual server configuration, in the Delivery tab, click the Advanced button. In the Advanced Delivery dialog box that appears, under Configure External DNS Servers, click the Configure button. You can specify one or many DNS servers by their IP address.
NOTE
By default, Exchange 2000 Server uses DNS to locate remote SMTP hosts.
Automatic Replies to the Internet
Automatic message replies are system messages, such as delivery and nondelivery reports, out-of-office responses, read and nonread receipts, and messages automatically forwarded by means of Inbox rules. By default, these message types can be sent to Internet recipients. This may expose a security breach if your organization requires a very high security standard. Out-of-office notifications, for instance, can inform intruders about how long a user will be out of the office. Delivery and nondelivery reports might inform foes whether specific e-mail addresses are indeed correct. They might use existing addresses in falsified e-mail messages to distribute defamatory or otherwise malicious documents or viruses to damage your organization's reputation. Without advanced security measures it's hard to prove that a message was spoofed. (Advanced security is covered in Chapter 19, "Implementing Advanced Security.")
Therefore, it might be advisable to disable certain automatic replies to the Internet, which can be done through Internet message formats definitions. By default, one definition object, called Default, exists in the Internet Message Formats container under Global Settings. Display the properties of this object, click on the Advanced tab, and deselect the check boxes for those message types that you don't want to allow.
IMPORTANT
If you deselect the Allow Automatic Forward check box, users cannot forward incoming messages to Internet addresses by means of an Inbox rule. Messages will be generated and sent; however, the SMTP virtual server will discard them silently without generating a nondelivery report. Users might be wondering where their messages got stuck.
Communicating with Other Exchange Organizations over the Internet
Your users will communicate with many Internet domains that actually correspond to other Exchange organizations. After all, Exchange 2000 Server is one of the world's most popular messaging systems. In Exchange organizations, users typically work with MAPI-based clients, such as Outlook 2000, that support advanced rich text information in e-mail messages. The Default message format definition object allows the user to decide whether to send Exchange rich text information in Internet messages.
Sending Exchange Rich Text Information in Outlook 2000
Most users are not aware of the feature that allows them to send Exchange rich text information to recipients in other domains over the Internet, because this feature is rather hidden, especially when manually entering the address information. To try it, compose a new message, type Recipient@Domain.com in the To line, click the Check Names button, double-click the underlined address, and, in the E-mail Properties dialog box, select the Always Send To This Recipient In Microsoft Outlook Rich-Text Format check box. Click OK. It is that simple.
If you maintain address information for recipients in other organizations in the Active Directory directory service, you can specify whether to send the Exchange rich text information in the corresponding contact objects. In Active Directory Users and Computers, activate Advanced Features (under View), display the properties of the desired contact, click on the Exchange Advanced tab, and select the Use MAPI Rich Text Format check box. Exchange rich text information is automatically sent to those recipients if your users select them from a server-based address list. You can read more about the maintenance of recipient objects in Chapter 13, "Creating and Managing Recipients."
Activating Exchange Rich-Text Information for an Internet Domain
If your users are communicating with other domains and know that these rely on Exchange and Outlook for messaging, you can configure Exchange to send rich-text messages. This preserves all message formatting, and recipients are able to view their messages in exactly the form in which they were composed. Even advanced formatting structures and special message types, such as meeting and task requests, are preserved. Furthermore, delivery and read-receipt requests can be requested from recipients in the other organizations (see Figure 15.5).
NOTE
When sending Exchange rich-text information, the entire message is encapsulated using the transport-neutral encapsulation format (TNEF) and sent as an attachment called WINMAIL.DAT in an SMTP message that contains the message body in plain text.
To ensure Exchange rich-text information is preserved for specific domains, create a new message format definition for each domain separately. In Exchange System Manager, right-click Internet Message Formats, point to New, and click Domain. In the General tab, provide a name, and specify the SMTP domain information. After that, click on the Advanced tab, and, under Exchange Rich-Text Format, select Always Use. Click on the Message Format tab, and, under MIME, select the Provide Message Body As Plain Text option. The body doesn't need to contain any rich text structures itself because this is in the Exchange rich-text information.
In addition, you may want to activate the Apply Content Settings To Non-MAPI Clients check box. This causes Exchange 2000 Server to convert messages from Internet mail clients into MAPI format, which ensures that the remote domain receives consistently formatted e-mail messages from your users regardless of their client applications.
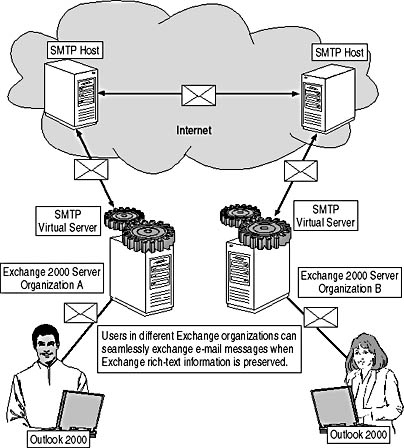
Figure 15.5 Communicating with other Exchange organizations over the Internet
Users of Internet mail clients not working with Exchange mailboxes are unable to interpret the Exchange rich-text information. They will receive a plain text message with a useless WINMAIL.DAT attachment. Any attachments originally included in the message may be encapsulated within the WINMAIL.DAT file and may not be readable. To avoid confusion, don't enforce Exchange rich-text information if you are not sure that the target domain represents an Exchange organization.
Configuring Protocol Logging
SMTP protocol logging is a powerful feature that is useful in many situations. You may keep a history of all SMTP activity in a database, for instance. In this way, you can always prove whether a particular message has left your server. You can also use protocol log information to verify whether the virtual server is performing its work as expected or is experiencing communication problems. Last but not least, SMTP protocol logging can help to identify attacks from the Internet. For troubleshooting purposes, you might find it sufficient to log protocol activities in an ASCII text file instead of an Open Database Connectivity (ODBC)-compliant database.
Display the property sheets of your SMTP virtual server in Exchange System Manager, and activate the Enable Logging check box in the General tab to activate the protocol logging feature. From the Active Log Format list box, select the desired logging format. For maintaining history information in a database, select ODBC Logging, and click the Properties button to specify the required database information. For the most detailed logging in text files, select Microsoft IIS Log File Format. Click the Properties button to specify the desired logging settings and the Log File Directory.

Exercise 1: Relay Restrictions and Junk Mail
In this exercise you will examine the default relay behavior of Exchange 2000 Server. After that, you will configure an SMTP virtual server for filtering of unsolicited commercial e-mail or junk mail.

To view a multimedia demonstration that displays how to perform this procedure, run the EX1CH15.AVI files from the \Exercise_Information\Chapter15 folder on the Supplemental Course Materials CD.
Prerequisites
- Configure BLUESKY-SRV1 as a dedicated public folder server and BLUESKY-SRV2 as a dedicated mailbox server according to the exercises in Chapter 14, "Managing Server Configuration." Make sure both servers are running, as well as BLUESKY-WKSTA.
- Log on as Administrator to BLUESKY-SRV1.
To examine relay restrictions for anonymous SMTP connections and filter unsolicited e-mail messages
- Click Start and then click Run. In the Run dialog box, type telnet, and then click OK.
- At the Microsoft Telnet command prompt, type set LOCAL_ECHO and press ENTER.
- Type open bluesky-srv1 25 and press ENTER.
- Verify that you are successfully connected to the ESMTP Mail Service of bluesky-srv1.bluesky-inc-10.com. Type helo domain.com, and press ENTER.
- Type mail from:<advertiser123@domain.com> and press ENTER.
- Type rcpt to:<recipient@another-domain.com> and press ENTER. Notice the Unable To Relay For Recipient@Another-Domain.com error message (see Figure 15.6).
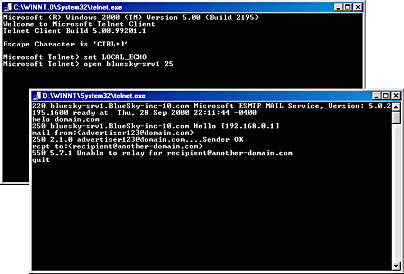
Figure 15.6 Unable to relay anonymously to foreign domains
- Type quit and press ENTER twice to close the connection to BLUESKY-SRV1 and leave Telnet running.
- Launch Exchange System Manager, right-click Message Delivery under Global Settings, select Properties, click on the Filtering tab, and then click Add.
- In the Add Sender dialog box, type *@domain.com, and then click OK.
- Activate the Archive Filtered Messages and Filter Messages With Blank Sender check boxes, and then click OK (see Figure 15.7).
- Right-click the Default SMTP Virtual Server, which you can find under the Protocols container of BLUESKY-SRV1, and select Properties.
- In the General tab, click the Advanced button, select the existing IP Address - TCP Port mapping, and click Edit.
- In the Identification dialog box, activate the Apply Filter check box.
- Click OK three times, and then give the Metabase Update service some time to transfer the configuration changes into the IIS metabase.
- Switch back to the Microsoft Telnet command prompt, type open bluesky-srv1 25, and press ENTER.
- Type helo domain.com and press ENTER.
- Type mail from:<sender@unfiltered-domain.com> and press ENTER.
- Type rcpt to:<administrator@bluesky-inc-10.com> and press ENTER.
- Type data and press ENTER.
- Type From: sender@unfiltered-domain.com and press ENTER.
- Type To: administrator@bluesky-inc-10.com and press ENTER.
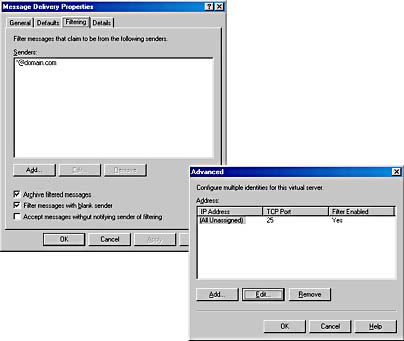
Figure 15.7 Activating a message filter
- Type Subject: This is an unfiltered Message and press ENTER.
- Press ENTER again, and then type We are testing message filtering. Press ENTER.
- Press ENTER again, type a single period (.), and press ENTER again to signal the end of message transfer. Notice the response from the server that the message is queued for delivery.
- Type mail from:<advertiser123@domain.com> and press ENTER. Notice that the server returns the Sender Denied error message and terminates the connection immediately.
- Press ENTER, type open bluesky-srv1 25, and press ENTER again.
- Type helo domain.com and press ENTER.
- Type mail from:<sender@unfiltered-domain.com> and press ENTER.
- Type rcpt to:<administrator@bluesky-inc-10.com> and press ENTER.
- Type data and press ENTER.
- Type From: advertiser123@domain.com and press ENTER.
- Type To: administrator@bluesky-inc-10.com and press ENTER.
- Type Subject: This is a filtered Message and press ENTER.
- Press ENTER again, and then type We are testing message filtering. Press ENTER.
- Press ENTER again, type a single period (.), and press ENTER again to signal the end of message transfer. Notice the response from the server that the sender is denied (see Figure 15.8). You can find this filtered message in form of a .tmp file in the directory \Exchsrvr\Mailroot\Vsi 1\Filter.
- Close the Telnet client program.
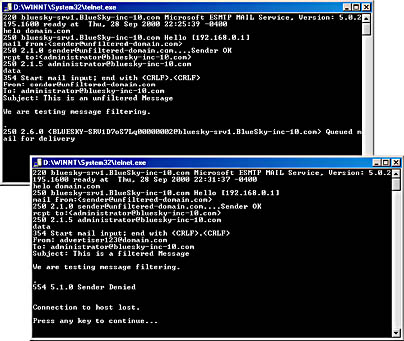
Figure 15.8 Testing a message filter in Telnet
Exercise Summary
Exchange 2000 Server protects your server resources and does not permit anonymous users to relay messages. Only messages to recipients in the local organization are accepted. In addition, you can configure message filters to reject unsolicited messages from the Internet. As soon as the SMTP service detects a match for a filtered sender address, it denies the sender the ability to transfer messages. Unsolicited messages received from users who claim to be nonfiltered senders can still be detected based on the sender information in the message.
NOTE
SMTP has no mechanism to verify the correctness of e-mail address information. Advertisers and intruders distributing mail viruses can find a way around message filters if they try hard enough.
EAN: N/A
Pages: 186