Lesson 2: Configuring Virtual Protocol Servers
Exchange 2000 Server facilitates the introduction into messaging and collaboration across the Internet. However, a few questions remain concerning authentication and session security. Especially when connecting to the Internet, it is advisable to restrict access to only those services that are absolutely necessary for authorized users. To give an example, if you plan only to provide access to Exchange resources via HTTP, stop the Microsoft Exchange POP3, Microsoft Exchange IMAP4, and NNTP services in the Services management tool. Then, set their startup type to either manual or disabled.
This lesson broaches important aspects of Internet-based messaging and collaboration, such as the creation of additional virtual protocol servers for better scalability, the tightening of authentication, and the encryption of data channels for higher security. After that, the configuration of newsgroups and newsfeeds will be discussed. The implementation of advanced security features is the topic of Chapter 19, "Implementing Advanced Security," the adjustment of SMTP settings is broached in Chapter 15, "SMTP Transport Configuration," and HTTP-based features are illustrated again in Chapter 22, "Microsoft Outlook Web Access."
At the end of this lesson, you will be able to:
- Create virtual protocol servers for specific purposes.
- Control connections to virtual protocol servers.
- Configure newsgroups and newsfeeds.
Estimated time to complete this lesson: 60 minutes
Protocol Virtual Server Configurations
IIS supports the concept of virtual servers. Through virtual servers, you can enable a single server to appear as several servers. This is particularly interesting for Internet services providers (ISPs) that are hosting numerous independent Web sites for their customers on a small number of servers. You can have multiple virtual servers running on a single computer.
Default Virtual Servers
The Exchange System Manager utility allows you to create additional protocol virtual servers on your Exchange 2000 computer by means of a few mouse clicks. When you expand the nodes in the console tree, you will find a Protocols container underneath each server object. Each Internet protocol is represented as a different container and within each, corresponding virtual protocol servers are grouped together. By default, only one virtual server exists per protocol.
NOTE
With the exception of the default HTTP virtual server, named Exchange Virtual Server, you should manage all IP settings from within the Exchange System Manager utility. To adjust the settings of the Exchange Virtual Server, use the Internet Services Manager.
Adding Virtual Servers
When you right-click on a protocol container (HTTP, IMAP4, NNTP, POP3, or SMTP) and point to New, you can select the <Protocol Type> Virtual Server command, which allows you to add virtual protocol servers to the configuration. You need to define a name for the new virtual server and assign it an IP address. In Windows 2000 Server you can assign a single network card multiple IP addresses or install multiple network adapters and configure each with a separate IP address. If your virtual server is supposed to use all available IP addresses, make sure you specify (All Unassigned) under IP Address.
IP Address and Port Number
During the creation of additional protocol servers, a dialog box might appear informing you that the new virtual server will not start because IP address and port numbers are already in use. It is important to assign each virtual server either a separate IP address or customized TCP port numbers for nonencrypted and SSL-encrypted communication, or both. For instance, the Default IMAP4 Virtual Server awaits incoming connections for all IP addresses on port 143 (non-encrypted) and port 993 (SSL-encrypted). A second virtual server cannot use the same port numbers because only one process can access a particular socket (IP address + port number) at a time. The default port numbers for each protocol type are listed in Table 11.1.
Table 11.1 Well-Known Ports for Internet Access Protocols
| Protocol | TCP Port | SSL Port |
|---|---|---|
| HTTP | 80 | 433 |
| IMAP4 | 143 | 993 |
| NNTP | 119 | 563 |
| POP3 | 110 | 995 |
| SMTP | 25 | Uses Transport Layer Security (TLS) instead of SSL |
Adjusting Virtual Server Settings
To adjust the settings of a virtual server, open the corresponding protocol container (such as IMAP4), right-click on the desired virtual server (such as Default IMAP4 Virtual Server), and from the shortcut menu, select Properties. In the General tab, click Advanced, for instance, to display the Advanced dialog box, where you can carry out the required changes to IP address and port mappings.
Table 11.2 summarizes the general configuration settings for protocol virtual servers.
Table 11.2 General Configuration Settings for Protocol Virtual Servers
| Property Page | Protocol Type | Configuration Option |
|---|---|---|
| General | All types | IP Address and Advanced button; to specify the IP address and port numbers for the virtual server (and a host name if the protocol is HTTP). Limit Number Of Connections; to restrict how many users can access the virtual server concurrently. Connection Time-Out; to specify a period of time after which idle connections are disconnected from the virtual server. |
| HTTP | Exchange Path; to specify whether the HTTP virtual server is used to connect to mailbox (and public folder) resources or public folders only. You can click the Modify button to select a particular sublevel public folder tree. | |
| IMAP4 | Include All Public Folders When A Folder List Is Requested; to allow IMAP4 clients access to public folders. Enable Fast Message Retrieval; causes the virtual server to return an estimate of message size to requesting clients, rather than the exact size. Although this option can improve system performance, because an exact calculation of the message size can be avoided, certain IMAP4 clients might display truncated messages when this option is on. | |
| SMTP | Enable Logging; to maintain a log file about access and message transfer for the virtual server. | |
| Access | All types | Authentication; to enable Anonymous Access, Basic Authentication, and Integrated Windows Authentication, and specify a Default Domain if Basic Authentication is activated for resource access. |
| All types except HTTP | Secure Communication; to enable the SSL- based encryption of the communication channel between server and client by installing a server certificate. You can use the Certificate button to request a certificate from a certification authority on the Internet or your private certificate server. Connection Control; to specify IP addresses or ranges of IP addresses that should be granted or denied access to the virtual server. | |
| HTTP | Access Control; to restrict the access level for incoming client connections (Read access, Write access, Script Source access, and Directory Browsing). Execute Permissions; to specify whether scripts and executable files may be executed from this virtual server. | |
| SMTP | Relay Restrictions; to specify specific IP addresses or ranges of IP addresses that are allowed or denied the relay of messages through this server. | |
| Message format | IMAP4 and POP3 only | MIME Encoding; to specify whether to format the body of messages in plain text or HTML (the latter supports font formats, and so on). Character Set; to specify the character set for the formatting of the message body. By default the Western European (ISO-8859-1) character set is used. Use Exchange Rich-Text Format; to send messages to the connecting client in the native Exchange format. This can be useful if your users connect to the virtual server using a client that is capable of handling the Exchange format, such as Outlook 2000 with the POP3 transport service. |
Metabase and Active Directory Directory Services
As explained in Chapter 3, "Microsoft Exchange 2000 Server Architecture," IIS maintains its information primarily in its metabase, whereas Exchange 2000 Server stores and retrieves configuration information mainly from Active Directory. When you configure Internet protocols within the Exchange System Manager utility, you manage settings in Active Directory. It is the task of the metabase update service to transfer the changes into the metabase. Because the metabase update may take a few minutes, changes may not take effect immediately.
Authentication Methods
The Access tab provides access to the Authentication button and gives you the ability to enable or disable client authentication methods, such as Anonymous Access, Basic Authentication, and Integrated Windows Authentication). The settings differ slightly between the protocols because some may not apply to a specific protocol type. POP3 and IMAP, for instance, don't support Anonymous Access because this form of access is inappropriate when working with mailbox resources.
Anonymous Access
Exchange 2000 Server supports Anonymous Access to public folders based on HTTP and NNTP. If Anonymous Access has been enabled, users don't need to supply valid user information to connect to the server. Several configuration steps are required to enable this form of access. First, you need to enable Anonymous Access for the corresponding protocol or HTTP virtual directory within the Exchange System Manager. Second, you need to specify an anonymous account at the same location. By default, this is the Internet guest account called IUSR_<SERVERNAME>. Third, within the Exchange System Manager or Outlook 2000, you need to define anonymous access permissions for particular public folders. The configuration of public folders is covered in Chapter 17, "Public Folder Management."
NOTE
The Internet guest account used to validate anonymous NNTP and HTTP users does not correspond to the Anonymous account displayed in the Client Permissions dialog box. Because it is a valid Windows 2000 account, default permissions apply. To assign anonymous permissions directly, you need to mail-enable IUSR_<SERVERNAME>; otherwise, you are unable to select this account from the Global Address List.
Basic Authentication
If Basic Authentication is enabled (the default), clients are not forced to encrypt the user name or password. Instead, they can directly transmit this information to the server in encoded (and easily decodable) text. To put it plainly, if an intruder can watch the communication between a client and the server, this person can get access to users' account information. Consequently, it is advisable to disable the Basic Authentication method when providing access to Exchange 2000 resources over the Internet. Alternatively, you may enforce the encryption of the communication channel, which also helps to protect users.
For Basic Authentication, it is usually sufficient to supply your user name and password. Your user name will be assumed to be the same as the mailbox alias. However, if you want to access a mailbox other than your own—for instance, if you have configured an additional mailbox where you have been granted Full Mailbox Access permissions—you need to specify the user name in this format: Domain name/Windows 2000 Account/Mailbox Alias.
Digest Authentication
Digest authentication may be an important authentication mechanism if you want to support Instant Messaging users that connect to their home server via an HTTP proxy. Digest authentication is an Internet Standard that transmits password information in the form of encrypted hash values to the server. Exchange 2000 Server supports this form of authentication without further configuration requirements; however, you need to enable reversible password encryption under Windows 2000 Server to support it. Activate the Store Password Using Reversible Encryption For All Users In The Domain setting in a Group Policy, such as the Default Domain Policy. You can find this setting under Computer Configuration/Windows Settings/Security Settings/Account Policy/Password Policy. You can read more about Group Policies in the Windows 2000 Server product documentation.
NOTE
To verify whether Digest authentication is enabled, launch the Internet Information Services utility. Open the Web site container where the InstMsg virtual directory is located, right-click InstMsg, select Properties, click on the Directory Security tab, and then, under Anonymous Access And Authentication Control, click the Edit button. In the Authentication Methods dialog box, make sure Digest Authentication For Windows Domain Servers is selected.
Integrated Windows Authentication
Integrated Windows Authentication, formerly known as Microsoft Windows NT Challenge/Response authentication, is more complex and secure than the Basic Authentication or the Digest Authentication method because it uses the Windows network security mechanisms. To initiate the authentication, the client sends the AUTH NTLM command to the host. The server returns a positive response code. At this point, the client sends a negotiation message to the server, which contains random information. This random information is important because the server will use it to create a unique string also known as the challenge. The server transmits the challenge to the client. The client must encrypt the challenge using the password of your Windows 2000 account before it sends the encrypted information back to the server. The server, of course, knows the user's password and can decrypt the response to compare the result against the original challenge. If the response and the challenge match one another, the server sends a notification to the client that the user logged on successfully. Otherwise, the client will receive an "access denied" message. If your client happens to be Internet Explorer, the browser will continue to prompt you for a Windows account name and password until a valid user name and password is provided or you cancel the dialog box.
In addition to the Challenge/Response authentication mechanism, Integrated Windows Authentication also supports the Kerberos version 5 authentication protocol. However, your browser, such as Internet Explorer 5.0 running on Windows 2000, also needs to support Kerberos version 5 protocol; otherwise, only the Challenge/Response protocol can be used. Both the client and the server must have a connection to a key distribution center (KDC). The KDC is an integrated part of the security services of Windows 2000 domain controllers. Kerberos uses Active Directory to retrieve security account information.
Setting Security Options
Integrated Windows Authentication works well in environments where users are working with clients that support this authentication method (Internet Explorer and related programs only) and where the network supports the Challenge/Response and Kerberos protocol. This is usually the case in an intranet. Over the Internet, however, especially over HTTP proxy connections, Windows authentication cannot be used. On a holiday trip, for example, when accessing your mailbox via a Web browser installed on a computer in an Internet café, you are most likely unable to log on to your Windows 2000 domain.
NOTE
Integrated Windows Authentication is best suited for environments where both client and server are members of the same domain and you can ensure that every user is using Microsoft Internet clients and browsers.
Basic Authentication over Encrypted Communication Channels
If you cannot rely on Integrated Windows Authentication, you need to enable the Basic Authentication mechanism to allow your users to log on to the server. As mentioned, this is a critical issue because, without taking further measures, passwords will be transferred over the network in clear text. Hence, it is a good idea to encrypt the communication channel between the Internet clients and the server. An encrypted channel allows you to protect your credentials plus all of the subsequent data. To secure the communication channel, you need to enable and enforce available security features based on SSL.
Secure Sockets Layer
SSL relies on public key cryptography discussed in more detail in Chapter 19, "Implementing Advanced Security." In the Open Systems Interconnection (OSI) reference model, SSL resides between the transport layer and the application layer where the Internet access protocols are located (see Figure 11.13). To encrypt the client data at the SSL, client and server need to agree on the level of security they will use during the session. This information is automatically exchanged in the form of an X.509 certificate during the security handshake, which is carried out as part of the initialization of the TCP/IP connection.
The client receives the server's X.509 certificate, which contains, among other things, the server's public key. Using this public key, the client can encrypt a randomly generated session key (40-bit or 128-bit) and transfer it securely to the server. The server uses its private key to decrypt the data, obtains the session key, and, from this point forward, client and server can use the session key to encrypt the entire communication, including user credentials and messaging data.
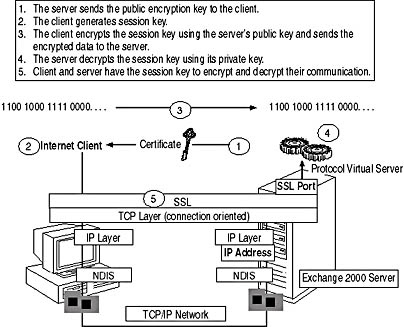
Figure 11.13 The SSL security handshake
Installing a Security Certificate on the Server
To provide IMAP4-based access to mailbox resources in encrypted form over the Internet, you need to install a security certificate on the server via the Access tab of your IMAP4 virtual server. In this tab, click the Certificate button to launch the Web Server Certificate Wizard. After you've clicked Next in the welcome screen, on the Server Certificate wizard screen, you have the option to Create A New Certificate, Assign An Existing Certificate, or Import A Certificate From A Key Manager Backup File. Make sure the first option is selected, and then click Next. On the Delayed Or Immediate Request wizard screen, you can create the request now and later send it via e-mail to a certification authority on the Internet, or, if you have Windows 2000 Certificate Services installed in your environment, you should choose Send The Request Immediately To An Online Certification Authority. Click Next, and, on the Name And Security Settings wizard screen, you need to specify a name and the bit length of the encryption key. In most cases you can accept the default suggestion (virtual server name and 512 bit) and click Next. On the next three wizard screens, you need to specify organizational information that will be written to the security certificate to identify your host. Make sure you specify correct information for the Organization, Organization Unit, Common Name, Country, State, and City. If you chose to use a certification authority earlier, then you will see the Chose A Certification Authority wizard screen; select your Windows 2000 Certificate Server. Existing certification authorities are retrieved from Active Directory, so you only need to make sure the correct reference is displayed in the Certification Authorities list box, then click Next. Choose a place to store the file on the Certificate Request File Name wizard screen, and click Next. In the Certificate Request Submission dialog box, verify the configuration settings again, then click Next, and subsequently Finish.
Enforcing a Secure Communication
If you have a certification authority already, then the required security certificate is installed after the previous process. You may now enforce the encryption of the client/server communication by clicking the Communication button in the Access tab and selecting the Require Secure Channel check box. If your environment supports strong 128-bit encryption, you may enable the Require 128-Bit Encryption check box as well. This 128-bit session cannot be exported outside the United States and Canada.
NOTE
You will not be able to enforce the encryption without a valid certificate from a certificate authority.
When you click OK, clients will not be able to establish a connection to this server via nonencrypted communication channels. Try this by opening Telnet and connecting to your virtual server's unencrypted port (such as port 143 for the Default IMAP4 Virtual Server). Your welcome message will look like this: *BYE Connection Refused.
NOTE
When enforcing encrypted communication channels, Internet clients need to connect to the SSL port configured for the virtual server instead of the standard TCP port. The default SSL ports are listed in Table 11.1.
Authentication Through Client Certificate Mapping
When you configure the authentication methods for an HTTP virtual server (via the corresponding Web site's Directory Security property sheet in the Internet Services Manager) or an NNTP virtual server (via the Access tab Authentication button), you will notice that you can enable client certificate mappings to Windows user accounts. Client certificates work similar to server certificates in that they represent a digital identification of a user (instead of a host). Each time a user logs on with a client certificate, your protocol virtual server automatically associates that user with the appropriate user account. Hence, your users are authenticated automatically and don't need to rely on any other authentication method. However, the manual mapping of numerous client certificates to Windows 2000 user accounts can be a substantial management task.
Configuring NNTP Virtual Servers
Exchange 2000 Server utilizes event sinks to combine the NNTP functionality of Windows 2000 with public folder resources. After you have installed Exchange 2000 Server on your server, you'll need to use the Exchange System Manager to manage NNTP virtual server settings.
Newsgroup Hierarchies
The implementation of newsgroups based on public folders provides several advantages. The good news is that you don't need to roll out or support newsreader software on your individual client computers. Your users can use Outlook 2000 to fully participate in discussions through newsgroups that you replicate with USENET. You may also implement newsgroup-based discussion forums in your department or organization and let your users share ideas no matter what platform they are working on because newsreaders are available for literally any PC-based operating system.
Making Internet Newsgroups Available to NNTP Clients
The public folder called Internet Newsgroups is the default location for inbound newsgroups replicated to a server running Exchange 2000 Server. This folder represents a hierarchy parent folder. All inbound newsfeeds will maintain their newsgroup folders under this parent folder, and you can create public folders under this parent folder manually as well within Exchange System Manager.
Manually Creating Newsgroups
If you want to create additional discussion forums, you need to manually create the associated public folders under a newsgroup hierarchy also known as a virtual directory. However, you don't create these resources in Outlook 2000. Use Exchange System Manager instead. Expand your NNTP virtual server in the contents pane, right-click Newsgroups, point to New, and select Newsgroup. This will launch the New Newsgroup Wizard. Enter the complete name of the newsgroup (such as discussion.outlook) in the Name box, and click Next. On the second wizard screen, enter a Description and Pretty Name. Some newsreaders are able to display the Description and Pretty Name instead of the newsgroup name and hierarchy. To complete the configuration, click Finish.
Exchange System Manager will automatically create a new public folder structure according to your newsgroup hierarchy under a virtual directory, which defaults to Internet Newsgroups. To complete the preceding example, Outlook 2000 users can participate in discussions about Outlook when opening the public folder All Public Folders\Internet Newsgroups\Discussion\Outlook. Newsreader users can access the same forum when subscribing to the newsgroup discussion.outlook.
Creating Newsgroup Hierarchies
If you want to host your newsgroups in several public folder structures other than Internet Newsgroups, you need to create additional newsgroup hierarchies. Under your NNTP virtual server, right-click Virtual Directories, point to New, and then select Virtual Directory. You will be prompted for a name for your Newsgroup subtree. It is a good idea to specify a name that refers to the overall topic of the hierarchy, such as Flying. Click Next, and, on the second wizard screen, select Exchange Public Folder Database, and then click Next. On the third wizard screen, click the Browse button, and, in the Public Folder Selection, expand the All Public Folder tree, and select the desired public folder. Click OK, and then click Finish.
So far, no newsgroups have been created. You can do so following the procedure just outlined. Avoid the creation of the corresponding public folder under Internet Newsgroups, and instead place it under your custom hierarchy (such as Flying) by including the hierarchical information (such as flying.) in the newsgroup name (such as flying.hydroplanes).
Changing Newsgroup Properties
When you right-click a newsgroup folder in Outlook 2000 that was created by means of the Exchange System Manager, let's say under Internet Newsgroups, and you select Properties, you will notice that you cannot manage the newsgroup's properties because of missing client permissions. When you display the properties in Exchange System Manager, only a very limited set of properties, that is, Description, Pretty Name, Read Only, and Moderator, can be set. To manage size limits and other settings, use the property sheets of the NTTP virtual server, particularly the Settings tab. If you want to provide different settings for separate sets of newsgroups, create multiple virtual servers.
In some cases, however, it is desirable to adjust the settings of a particular newsgroup, such as client permissions, without configuring additional protocol virtual servers. The management of public folders can be accomplished in Exchange System Manager. Expand the corresponding public folder store, and select the Public Folder Instances container underneath it. In the contents pane, all public folder instances are listed. Right-click the desired one, and select Folder Properties. To adjust the client permissions, switch to the Permissions tab. If you click the Client Permissions button and add yourself with Owner permissions to the list of accounts, you can fully configure the public folder resource from this point forward in Outlook 2000. The configuration of public folder resources is covered in more detail in Chapter 17, "Public Folder Management."
Moderated Newsgroups
A moderated public folder or moderated newsgroup folder allows a user to forward posted messages to a moderator. The moderator reviews the posted information and allows accepted articles to appear in the newsgroup folder. You have two options to set up a moderated newsgroup—either you set up the newsgroup as a moderated forum in Exchange System Manager or you configure the public folder as a moderated folder in Outlook 2000. With the latter, your users may specify moderators themselves when they configure newsgroups.
IMPORTANT
You need to have the Owner permissions for a newsgroup's public folder to configure the moderator settings in Outlook 2000.
If you want an NNTP virtual server to forward posted articles to a moderator, you need to specify an SMTP server on the NNTP virtual server's Settings property sheet first (SMTP Server For Moderated Groups). You also need to specify a Default Moderator Domain. After that, you can configure the properties of the desired newsgroups. In the General tab, activate the Moderated settings, and then specify a newsgroup moderator. If you select the Set Default option, new articles are sent to an address that has the format of newsgroup alias@Default Moderator Domain.
Newsgroup Expiration Policies
When you examine the nodes underneath an NNTP virtual server, you will notice a container called Expiration Policies. As its name suggests, you can use it to configure policies that determine how long articles are stored in newsgroups. However, if your newsgroups are referring to public folders, it is advisable to configure the expiration settings in the Information Store, which will be explained in Chapter 17, "Public Folder Management."
IMPORTANT
Age limits set in the Information Store supersede expiration policies set at the newsgroup level for the NNTP virtual server. If age limits have been configured in the Information Store, NNTP expiration policies are deactivated.
Concurrent Sessions
Every NNTP virtual server provides you with status information regarding current client sessions in the Current Sessions container. All existing sessions are listed as individual objects. In case a connection appears to hang, or you want to terminate it for any other reason, right-click on it, and then select Terminate. Alternatively, you may select Terminate All. However, disconnecting a user this way is only a temporary measure because most newsreader clients reconnect immediately when the user is reading articles.
Creating Newsfeeds
The remaining node under each NNTP virtual server is called Feeds and, as its name implies, it serves to create and maintain newsfeeds. To create a new newsfeed, right-click on it, point to New, and select Feed. On the first New NNTP Feed wizard screen, enter the remote host's name or IP address, and then click Next. On the second wizard screen, make sure Peer is selected for the remote server role. You may also configure Master and Slave feeds, which correspond to a configuration where clients connect to a slave server to download and upload articles, while new articles are first forwarded to the master server, which assigns an ID to them. The typical selection for the USENET is Peer, then click Next. On the third wizard screen, you need to specify whether your newsfeed is inbound (pull or accept from push feed) or outbound (push). If you are only interested in reading articles, then an inbound pull feed is sufficient; otherwise, you should select the Outbound Feed check box in addition. Click Next, and, on the fourth wizard screen, specify the age of the articles you want to pull into your newsgroups (inbound only) upon feed creation, then click Next again. On the last wizard screen you may specify particular newsgroups to be included or excluded from the list of groups handled by this feed. If you want to include all available newsgroups, accept the default (*) for all newsgroups, and click Finish.
Newsfeed Configuration Tasks
You can accomplish newsfeed configuration tasks through the property sheets that every newsfeed object provides. For instance, you might be required to enable Basic Authentication to access the remote host. Right-click the desired newsfeed, and as usual click Properties in the <Newsfeed> Properties dialog box, switch to the Security tab, and enable Basic (No Encryption). Under User Name and Password, type the required information, and click OK. The drawbacks of Basic Authentication were discussed earlier in this lesson.
Controlling Inbound Newsgroups
When you click on the General tab, you can find the Enable Feed check box, which allows you to temporarily disable a particular newsfeed. This may be especially useful if you discover that a newsfeed replicates too many articles to your server. Disable the newsfeed, add more hardware, or move other Exchange 2000 resources (such as mailboxes) to another server, compact the affected databases (see Chapter 20, "Microsoft Exchange Server 2000 Server Maintenance and Troubleshooting"), and then enable the feed again. Mailbox management is the topic of Chapter 13, "Creating and Managing Recipients."

Exercise 6: Supporting Internet Messaging Clients
In this exercise you will use Outlook Express as a POP3, IMAP4, NNTP, and LDAP client to access your mailbox, public folders, newsgroups, and the Global Address List. First, however, you need to create some newsgroups in Exchange 2000.

To view a multimedia demonstration that displays how to perform this procedure, run the EX6CH11*.AVI files from the \Exercise_Information\Chapter11 folder on the Supplemental Course Materials CD.
Prerequisites
- Ensure Exchange 2000 Server is operational and running on BLUESKY-SRV1.
- Log on as Administrator to BLUESKY-SRV1 and BLUESKY-WKSTA.
- If you have completed the exercises of Chapter 9, "MAPI-Based Clients," you need to delete the manually created profile. (Right-click Microsoft Outlook on the desktop, select Properties, click Show Profile, select Manually Configured Profile, click Remove, and then confirm the action by clicking Yes. Make sure that Outlook starts with the CIW Generated Profile.)
To configure Microsoft Outlook Express as an Internet client for Exchange 2000 Server
- On BLUESKY-SRV1, launch Exchange System Manager from the Microsoft Exchange program group.
- In the console pane, expand Servers, expand BLUESKY-SRV1, expand Protocols, expand NNTP, expand Default NNTP Site, and then select Virtual Directories. Notice that the Default virtual directory points to Public Folders/Internet Newsgroups.
- Select Newsgroups, right-click it, point to New, and select Newsgroup.
- On the first New Newsgroup wizard screen, under Name, type discussion, and then click Next.
- On the second wizard screen, click Finish.
- Repeat Steps 4 and 5 for the newsgroups discussion.outlook and discussion.exchange.
At this point, you have created three additional newsgroups (see Figure 11.14), which you can access from Outlook Express later in this exercise.
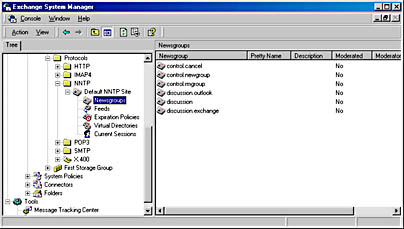
Figure 11.14 Creating newsgroups in Exchange System Manager
- Close Exchange System Manager, and log off.
- On BLUESKY-WKSTA, launch Outlook 2000.
- Open the View menu, and make sure Folder List is selected.
- Expand Public Folders, then All Public Folders, then Internet Newsgroups, and then verify that the discussion hierarchy was created successfully.
- Post some items into the Discussion, Exchange, and Outlook folders.
- Click Start button, point to Programs, and then select Outlook Express.
- If an Outlook Express dialog box appears informing you that Outlook Express is currently not your default e-mail client, deselect the Always Perform This Check When Starting Outlook Express check box, and then click No.
- If the Internet Connection Wizard appears, type Administrator under Display Name, and then click Next.
- On the second wizard screen, under I Already Have An E-Mail Address That I'd Like To Use, in the E-Mail Address text box, type Administrator@Bluesky-inc-10.com, and then click Next.
- On the E-Mail Server Names wizard screen, make sure that POP3 is displayed in the list box, and then, under Incoming Mail (POP3, IMAP4 Or HTTP) Server and Outgoing Mail (POP3, IMAP4 Or HTTP) Server, type BLUESKY-SRV1, and then click Next.
- In the Internet Mail Logon dialog box, make sure Administrator is displayed under Account Name, and then, in the Password text box, type password. Alternatively, you could activate the logon using Secure Password Authentication (SPA).
- Click Next and then click Finish.
- On the Import Messages And Address Book wizard screen, select Do Not Import At This Time, and then click Next.
- Click Finish.
- To download all messages from your Inbox, open the Tools menu, point to Send And Receive, and then select BLUESKY-SRV1 (Default).
- Make sure you can successfully download messages. Switch to Outlook 2000, and verify that your Inbox is now empty.
- Switch back to Outlook Express, and, in the toolbar, click New Mail.
- Click the To button, and, in the Select Recipients dialog box, click Find.
- In the Find People dialog box, select Active Directory from the Look In list box. Under Name, type Admin, and click Find Now.
- Among other directory information, the Administrator account information is retrieved. Select Administrator, and click the To button.
- Click OK until you return to the new message.
- In the Subject line, type Active Directory is easy to search.
- In the message body, type You don't even have to create an LDAP account to access Active Directory manually.
- Click Send.
- Notice that the message leaves your Inbox and appears in your Inbox in Outlook 2000 (see Figure 11.15).
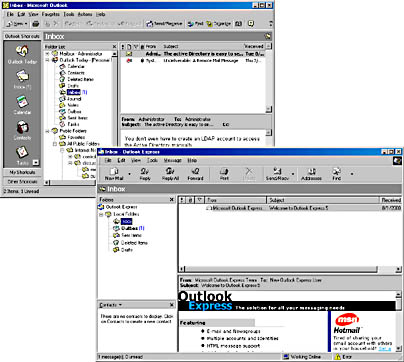
Figure 11.15 Sending messages with POP3 via SMTP
- Switch back to Outlook Express, open the Tools menu, and select Accounts.
- Click on the Mail tab, click Add, and select Mail.
- On the first wizard screen, accept the suggested name Administrator and click Next.
- On the second wizard screen, accept the E-Mail Address information and click Next.
- In the E-mail Server Names wizard screen, select IMAP from the list box, and then, under Incoming Mail (POP3, IMAP4 Or HTTP) Server and Outgoing Mail (POP3, IMAP4 Or HTTP) Server, type BLUESKY-SRV1, and then click Next.
- In the Internet Mail Logon dialog box, make sure Administrator is displayed under Account Name, and then, in the Password text box, type password. Alternatively, you could activate the logon using SPA.
- Click Next and then click Finish.
- In the Internet Accounts dialog box, click Add, and then select News.
- On the first wizard screen, accept the suggested name Administrator and click Next.
- On the second wizard screen, accept the E-Mail Address information and click Next.
- On the Internet News Server Names wizard screen, under News (NNTP) Server, type BLUESKY-SRV1. Activate the My News Server Requires Me To Log On check box, and then click Next.
- In the Internet News Logon dialog box, make sure Administrator is displayed under Account Name, and then, in the Password text box, type password. Click Next and then click Finish.
- In the Internet Accounts dialog box, click Close.
- An Outlook Express dialog box will appear asking you to download folders from the mail server. Click Yes.
- In the Show/Hide IMAP Folders dialog box, notice that all available message folders are listed, including public folders. Click OK to close the dialog box.
You are now able to access all message folders directly at the server through Outlook Express and the IMAP4 protocol (see Figure 11.16).
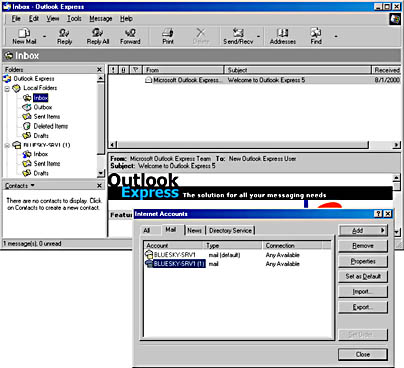
Figure 11.16 Accessing all message folders via IMAP4
- In the Folders pane, double-click the account node BLUESKY-SRV (2), which corresponds to your newsreader account.
- If an Outlook Express dialog box appears asking you whether you would like to make Outlook Express your default news client, click Yes.
- An Outlook Express dialog box will appear asking you whether you would like to download a list of available newsgroups from the server. Click Yes.
- In the Newsgroup Subscriptions dialog box, select Discussion, and click Subscribe (repeat this step for discussion.exchange and discussion.outlook as well), then click OK.
- Notice that your newsreader account is now listing three newsgroups. Select the discussion folder, and verify that the items posted with Outlook 2000 earlier are listed as news articles (see Figure 11.17).
Figure 11.17 Accessing all public folders in the form of newsgroups
Exercise Summary
Exchange 2000 Server and Outlook Express support all the important Internet client protocols. Hence, you can configure and run Outlook Express as a multipurpose Exchange client application. You can access your Inbox via POP3, all message folders including public folders via IMAP4, and public folders configured as newsgroups via NNTP. The sending of messages is accomplished through SMTP, and directory access is carried out over LDAP. The client configuration parameters required to connect to an Exchange 2000 server do not differ from the settings required to connect to any other Internet host.
EAN: N/A
Pages: 186