Lesson 1: Installation Types
The Setup program of Exchange 2000 Server has a huge job to accomplish, including the installation of files on your server's hard disk, the update of registry entries, possibly the extension of the Active Directory schema, and also the handling of errors (for instance, if the installation media is removed from the CD-ROM drive during the process of copying files). The overall setup process is accomplished in several phases that are different between the first server installation and subsequent installations in a forest.
This lesson introduces all the important installation types you encounter when installing Exchange 2000 Server. You already performed a first server installation and an installation of a subsequent server to accomplish the practical exercises in Chapters 1 through 4. Therefore, these installation types are covered from a more theoretical point of view here. Probably more interesting is the unattended Setup handling installation tasks without any user interaction, which is a valuable installation feature also known as silent setup.
At the end of this lesson, you will be able to:
- List the steps necessary to complete a first server installation.
- Describe the differences between a first server installation and an installation of subsequent servers.
- Explain the process of upgrading a previous version of Exchange Server.
- Perform an unattended installation of Exchange 2000 Server.
Estimated time to complete this lesson: 60 minutes
First Server Installation
As outlined in Chapter 4, you need to make several preparations before running the Setup program. Otherwise, you will be greeted with an unpleasant Microsoft Exchange 2000 Installation Wizard message box. This message box appears, for instance, when you attempt to install Exchange 2000 Server on a computer that is not part of a Windows 2000 domain (see Figure 5.1). The same error message is displayed if Active Directory cannot be accessed. If the Network News Transfer Protocol (NNTP) service was not installed in Windows 2000, on the other hand, the error message is "The NNTP Component of Microsoft Internet Information Services (IIS) Is Not Installed." To correct the former problem, make sure your server is part of a Windows 2000 domain, that a domain controller is available, and that you can access Active Directory with the required permissions. To correct the latter, install the NNTP service via the Add/Remove Programs program from the Control Panel and then repeat the Exchange 2000 Server installation. Setup problems may also be encountered if a \Program Files\Exchsrvr\Mdbdata folder containing old information store database files exists on the partition where you intend to install Exchange 2000 Server. Rename this folder or delete the old database files before starting the Setup program again. You can find more information about the installation preparation in Chapter 4, "Planning the Microsoft Exchange 2000 Server Installation."
NOTE
If possible, promote your computer to a domain controller before installing Exchange 2000 Server.
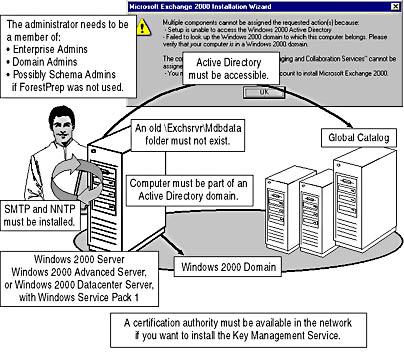
Figure 5.1 Prerequisites for the Exchange 2000 Setup program
Installation Steps
Provided that you did not prepare the Active Directory forest using /ForestPrep beforehand, Setup needs to extend Active Directory during the first server installation. During this process, the directory object for your Exchange 2000 organization is created; hence, Setup prompts you for the organization name. Likewise, the default administrative and routing groups are generated, so you are not prompted to add your server to existing groups. It is important to note that the default names are always First Administrative Group and First Routing Group. It is possible to rename them later. Refer to the "About This Book" section for a description of the steps required to perform a first server installation.
NOTE
The name of your Exchange 2000 organization cannot be changed after the installation.
Setup Options
When launching the Setup program, you will reach the Components To Install wizard screen after the welcome screen, a second page for the end-user license agreement, which you need to accept to continue the installation, and a third wizard screen where you need to enter your product key. The Components To Install wizard screen lists the Exchange 2000 components that you can install on your server. By default, under Action for Microsoft Exchange 2000, Setup suggests a Typical installation.You can select Custom if you wish to determine the details of the installation manually, such as individual features to be installed and the directories to receive the program files. Experienced administrators usually prefer this option.
Setup offers the following installation options:
- Custom. Allows you to select individual components and to leave out components normally included in a typical installation. For instance, you can use this option to install only the Microsoft Exchange System Management Tools, which are useful for setting up a dedicated management workstation.
- Minimum. Installs Microsoft Exchange 2000 with the minimum number of files needed for Microsoft Exchange Messaging and Collaboration Services. Because administrative utilities are not installed when selecting this option, it is not recommended for a first server installation.
- Typical. Installs Microsoft Exchange 2000 with most common settings (Microsoft Exchange Messaging and Collaboration Services and Microsoft Exchange System Management Tools) and copies the most commonly used files to the computer's hard disk. This is the default option.
Subsequent Server Installations
The installation options (Custom, Minimum, and Typical) are the same for first server and subsequent installations. However, whereas a first server installation asks you whether to join an existing Exchange Server 5.5 organization or to create a new one and then prompts you for the organization name, a subsequent installation has to ask for different information. The most significant difference may be the selection of an administrative group and a routing group for subsequent servers if you have created additional groups in your organization beforehand. A subsequent installation in a prepared domain environment was introduced in Exercise 4 of Chapter 4, "Planning the Microsoft Exchange 2000 Server Installation."
Installation Steps
A subsequent installation may display the following wizard screens:
- Welcome. To introduce you to the installation task
- End-User License Agreement. To accept the End-User License Agreement, which is required to continue the installation
- Product Key. To enter the product key of your Exchange 2000 Server copy
- Components To Install. To select the list of Exchange 2000 components you want to install
- Licensing. To inform you that you need to purchase a Client Access License for every client that will access your Exchange 2000 server
- Organization Name. To enter the name of the Exchange 2000 organization this server will join
- Administrative Group. To specify the administrative group to which to add this server (this wizard screen only appears if additional administrative groups have been created)
- Routing Group. To specify the routing group to which to add this server (this wizard screen only appears if additional routing groups exist in the administrative group that was specified in the Administrative Group wizard screen)
- Component Summary. To verify and correct specified options and to start the actual installation
In-Place Upgrade
During an in-place upgrade installation, you upgrade an existing Exchange server to Exchange 2000 Server. This involves different preparation steps depending on the situation. For instance, if you are running Exchange Server on Microsoft Windows NT Server 4.0, you will need to upgrade the operating system to Windows 2000 Server with Service Pack 1 first. If you are using Exchange Server 5.0 (or even 4.0), you will need to update your Exchange Server to version 5.5 with Service Pack 3. The in-place upgrade is only supported over Exchange Server 5.5. Still, you aren't ready for the upgrade yet. You have to configure connection agreements using the Active Directory Connector (ADC) before you can install Exchange 2000 Server.
Windows NT Primary Domain Controllers
It is very likely that you will encounter a Lightweight Directory Access Protocol (LDAP) port conflict when you upgrade a Windows NT primary domain controller (PDC) running Exchange Server 5.5 to Windows 2000. Active Directory claims ownership of the LDAP port and so does the Exchange Server 5.5 directory service. To resolve this port conflict, you need to change the LDAP port number that the Exchange Server 5.5 directory service is using within the Exchange Administrator program. Expand the container that represents your site, then the Configuration container, and then the Protocols container. Double-click the LDAP (Directory) Site Defaults object. Now, you can change the port number to a value other than 389. Don't forget to restart Exchange Server to put the changes into effect.
NOTE
It is advisable, but not required, to change the port number before upgrading the operating system to Windows 2000 Server.
After you have changed the LDAP port number and upgraded the operating system to Windows 2000 Server SP1, you need to set up and configure the ADC connection agreements using the customized port number. The LDAP port in the ADC connection agreement must match the LDAP port of Exchange Server 5.5. As soon as you have verified that the directory replication is working, you are ready to upgrade to Exchange 2000 Server. You can read more about the ADC and connection agreements in Chapter 6, "Coexistence with Previous Microsoft Exchange Server Versions."
Installation Steps
The in-place upgrade is the most inflexible installation type. The only task you need to perform is repeatedly clicking Next to confirm wizard screen after wizard screen. You cannot add or remove components or change the installation directory. If your in-place upgrade is also a first server installation of Exchange 2000 Server in your existing Exchange Server organization, the Active Directory schema must be updated. The ForestPrep phase of the Setup program will generate administrative groups and routing groups that match your Exchange Server 5.5 site topology. It is a good idea to run Setup using the /ForestPrep and /DomainPrep switches prior to an upgrade to Exchange 2000 Server. You can read more about /ForestPrep and /DomainPrep in Chapter 4, "Planning the Microsoft Exchange 2000 Server Installation."
NOTE
Although you cannot change installation options during an in-place upgrade, you can add or remove components later when launching Setup in maintenance mode, as explained in Lesson 2. However, if Exchange 2000 does not support connectors configured on your existing server, such as a Professional Office System (PROFS) connector, those connectors will not be available after the upgrade.
Installations in International Environments
Exchange 2000 Server comes in six different languages—English, French, German, Italian, Japanese, and Spanish. However, it is only possible to install the international versions of Exchange 2000 Server on their corresponding versions of Windows 2000 Server—with the exception of the English version, which is generally supported in any combination. For instance, it is possible to install the French version of Exchange 2000 Server on an English version of Windows 2000 Server, and vice versa. However, you cannot install the French Exchange 2000 Server version on a German Windows 2000 Server. In addition, most Exchange 2000 Server versions support the Windows 2000 Multilanguage Version, which is available only through volume licensing programs. This is a specialized version of Windows 2000 Server that allows changes in the language of the interface without installation of additional software components.
Choosing a Server Platform
In international environments, it still might be advisable to deploy the English versions of Windows 2000 Server and Exchange 2000 Server. The client base is not affected and may use any language version available. If your administrators are able and willing to master the English language, consider the following advantages:
- The English versions of Windows 2000 Server and Exchange 2000 Server are supported in any international environment, which allows you to standardize the Exchange 2000 Server platform across all geographical locations.
- It is easy for your administrators to collaborate, and it is possible to outline and document common maintenance procedures for all deployed server systems.
- English bug fixes and service packs are usually available up to 4 weeks earlier than international versions.
- It is easier to get technical assistance, for instance, through Microsoft Technet, because most discussions and articles deal with the English product versions, and you can search for keywords without the need to translate them back into English first.
- Many advanced Exchange-related solutions of third-party vendors and programming samples are available in English versions only.
To support multilingual MAPI-based clients, you need to install appropriate language support on your Global Catalog servers (Control Panel, Regional Options, General tab, and then Language). You also need to edit the Global Catalog's Registry if you want to support additional sort orders. Add REG_DWORD values to the following Registry key and set them to the desired locale ID values:
HKEY_LOCAL_MACHINE \Software \Microsoft \NTDS \Language
By default, Active Directory supports English sort orders, which correspond to the default value called Language 00000408, which is set to the language ID 0x00000409. If you want to support Russian, for instance, create an additional REG_DWORD value, name it Language 00000419, and set it to the hexadecimal value of 0x00000419.
Table 5.1 details the language codes that you may use with Windows 2000 Server (consult your product documentation if your language is not listed):
Table 5.1 Language Codes for Windows 2000 Server
| Language | Language Code |
|---|---|
| Bulgarian | 00000402 |
| Croatian | 0000041A |
| Czech | 00000405 |
| Danish | 00000406 |
| Dutch (Standard) | 00000413 |
| Dutch (Belgian) | 00000813 |
| English (United States) | 00000409 |
| English (United Kingdom) | 00000809 |
| English (Canadian) | 00001009 |
| English (NewZealand) | 00001409 |
| English (Australian) | 00000C09 |
| Finnish | 0000040B |
| French (Standard) | 0000040C |
| French (Belgian) | 0000080C |
| French (Swiss) | 0000100C |
| French (Canadian) | 00000C0C |
| German (Standard) | 00000407 |
| German (Swiss) | 00000807 |
| German (Austrian) | 00000C07 |
| Greek | 00000408 |
| Hungarian | 0000040E |
| Icelandic | 0000040F |
| English (Irish) | 00001809 |
| Italian (Standard) | 00000410 |
| Italian (Swiss) | 00000810 |
| Norwegian (Bokmal) | 00000414 |
| Norwegian (Nynorsk) | 00000814 |
| Polish | 00000415 |
| Portuguese (Standard) | 00000816 |
| Portuguese (Brazilian) | 00000416 |
| Romanian | 00000418 |
| Russian | 00000419 |
| Slovak | 0000041B |
| Slovenian | 00000424 |
| Spanish (Mexican) | 0000080A |
| Spanish (traditional sort order) | 0000040A |
| Spanish (modern sort order) | 00000C0A |
| Swedish | 0000041D |
| Turkish | 0000041F |
Unattended Setup Mode
It is possible to customize the setup process by using a predefined initialization file. This file can supply all the information needed for an automatic installation, making it appealing to administrators who need to deploy many Exchange servers. No additional user input is necessary and Setup can run unattended. This is especially useful if you want to delegate the task of installing Exchange 2000 Server to less experienced administrators. As mentioned at the beginning of this chapter, it is also a benefit in documenting the server installation because the initialization file details precisely the installed Exchange 2000 Server components, and it can be used at any time to exactly repeat the server installation (see Figure 5.2).
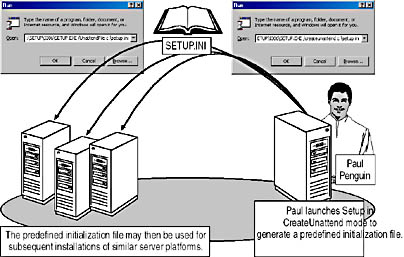
Figure 5.2 Setup in CreateUnattend and UnattendFile mode
Creating an Initialization File
The good news is that you don't need to be familiar with a specific syntax to create a predefined initialization file because Setup can accomplish this job for you. Let's say you want to generate an initialization file named SETUP.INI. Use the e:\Setup\i386\SETUP.EXE /CreateUnattend c:\SETUP.INI (where e:\ stands for your CD-ROM drive) command, which will display the wizard screens according to the given situation (first server or subsequent installation), but will not install the actual components. Instead, Setup creates the initialization file at the specified location, which you may then use for an unattended setup elsewhere. You may even use the /CreateUnattend switch to demonstrate or practice installing Exchange 2000 Server without actually setting up the system. Only the last wizard screen, Completing The Microsoft Exchange 2000 Wizard, indicates that you created an initialization file instead of seriously installing the system.
NOTE
The specified initialization file must not exist prior to launching Setup in CreateUnattend mode.
Encrypting an Initialization File
The Setup initialization file is a standard text file containing numerous entries for individual Exchange 2000 components. This file may contain passwords (such as the Key Management Service password), which may in this way be disclosed to unauthorized administrators. To prevent exposing security-related information, encrypt the initialization file using the /EncryptedMode Setup switch (e:\Setup\i386\SETUP.EXE /EncryptedMode /CreateUnattend c:\SETUP.INI). Setup will run as normal, but creates an encrypted file.
Using an Initialization File
As soon as you have generated an appropriate initialization file for your purposes, running Setup is remarkably easy. Specify the command-line switch /UnattendFile and your predefined initialization file (e:\Setup\i386\Setup.exe /UnattendFile c:\Setup.ini), and Setup will install Exchange 2000 Server without any user interaction. The switch /UnattendFile displays a user interface showing information about the progress of the automated installation.

Exercise 1: Installing Exchange 2000 in Unattended Mode
In this exercise you will examine the available options for an unattended setup of Exchange 2000 Server. You will create an initialization file and use it to set up BLUESKY-SRV1.

To view a multimedia demonstration that displays how to perform this procedure, run the EX1CH5*.AVI files from the \Exercise_Information\Chapter5 folder on the Supplemental Course Materials CD.
Prerequisites
- Log on as Administrator to BLUESKY-SRV1.
- Insert the Exchange 2000 Server installation CD in the CD-ROM drive.
To perform an unattended install of Exchange
- Click Start, select Run, and in the Run dialog box, type E:\Setup\i386\SETUP.EXE /? (where E stands for your CD-ROM drive).
- Click OK to display the Microsoft Exchange 2000 - Usage dialog box, which informs you about all the available Setup options.
At this point, you can examine the individual command-line switches. /CreateUnattend and /UnattendFile are particularly important for this exercise (see Figure 5.3).
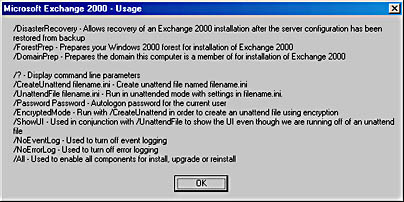
Figure 5.3 The Microsoft Exchange 2000 - Usage dialog box
- Click OK.
- Click Start again, select Run, and, in the Run dialog box, type E:\Setup\i386\SETUP.EXE /CreateUnattend c:\SETUP.INI, and click OK.
- On the Welcome wizard screen that appears, click Next.
- On the End-User License Agreement wizard screen, accept the licensing agreement by selecting I Agree, and then click Next.
- On the Product Identification wizard screen, enter the product key of your Exchange 2000 Server installation CD, and then click Next.
- On the Component Selection wizard screen, under Action for Microsoft Exchange 2000, make sure Typical is selected, and then click Next.
- On the Installation Type wizard screen, make sure Create A New Exchange Organization is selected, and then click Next.
- On the Organization Name wizard screen, under Organization Name, type Blue Sky Airlines, and then click Next.
- On the Licensing Agreement wizard screen, accept the licensing agreement by selecting I Agree That, and then click Next.
- On the Component Summary wizard screen, review your selections, and then click Next.
At this point, you have successfully created the initialization file named SETUP.INI, which can be found in the root directory of your C drive (see Figure 5.4). You may open this file in Notepad to examine its contents.
- On the final wizard screen, click Finish.
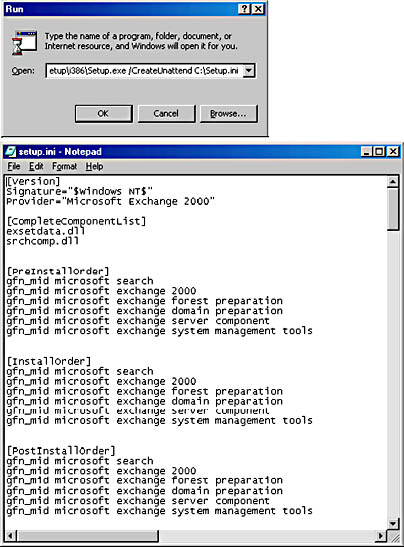
Figure 5.4 Creating SETUP.INI
- Click Start again, select Run, and in the Run dialog box, type E:\Setup\i386\SETUP.EXE /UnattendFile c:\SETUP.INI, and click OK.
At this point, the Microsoft Exchange 2000 Installation Wizard displays the Component Progress wizard screen immediately, informing you about the process of installing Exchange 2000 Server according to the settings specified in the predefined SETUP.INI file (see Figure 5.5).
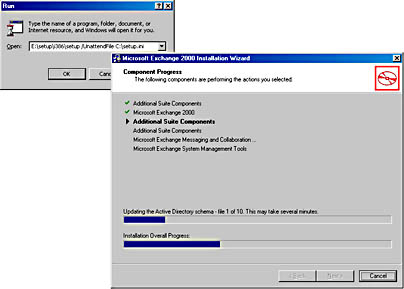
Figure 5.5 Installing Exchange 2000 unattended
Exercise Summary
It is easy to generate a SETUP.INI file using the Microsoft Exchange 2000 Installation Wizard. Launch Setup in /CreateUnattend mode, make your selections, and Setup will generate the file for you. You can then distribute the file to the administrator who is actually supposed to perform the installation. For convenience, place an appropriate Setup shortcut in an e-mail message. This administrator does not need to be familiar with the task of installing Exchange 2000 Server because no user interaction is required to set up the system. The unattended installation procedure is also essential for software deployments using Microsoft Systems Management Server (SMS).
EAN: N/A
Pages: 186