Lesson 2: Outlook Web Access Environments
By default, every user in an Exchange 2000 Server organization can use OWA to access mailbox and public folders. This allows you to deploy customized, Web-based collaboration systems with minimal effort. Just publish a virtual directory, as illustrated in Exercise 1, and your job is done. If you want to implement Internet-based OWA solutions, however, you need to optimize your environment for both security and performance reasons.
This lesson addresses how to provide access to Exchange 2000 Server via OWA in small-scale and large-scale environments. It demonstrates how to access mailbox and public folder resources and explains how to implement load balancing in front end/back end (FE/BE) arrangements.
At the end of this lesson, you will be able to:
- Access mailbox and public folder resources via OWA.
- Implement load balancing in an FE/BE environment for Internet users.
- Identify backward compatibility issues when working in mixed Exchange organizations.
Estimated time to complete this lesson: 60 minutes
Single-Server Configurations
Single-server environments provide direct access to mailboxes and public servers via the local IIS and the default HTTP virtual server (see Exercise 1). Every user can use a Web browser to connect to his or her home server and access mailbox and public folders via OWA. You can create additional virtual servers and assign them a unique combination of IP address, TCP port, Secure Sockets Layer (SSL) port, and host name to create separate Web server instances for users with different security requirements, as explained in Chapter 11, "Internet-Based Client Access."
NOTE
When working from outside your home domain, you must add the fully qualified domain name (FQDN) to the host name of the HTTP virtual server that provides access to your mailbox, such as http://bluesky-srv1.bluesky-inc-10.com/exchange/. Furthermore, your mailbox-enabled user account must have an SMTP address that conforms to the SMTP address definition in the default recipient policy of your organization (for instance, Administrator@Bluesky-inc-10.com where @Bluesky-inc-10.com is defined for SMTP addresses in the default recipient policy).
Front End/Back End Configurations
It is a good idea to deploy Exchange 2000 Server in an FE/BE arrangement if you want to support a large number of users over the Internet. Front end servers concentrate incoming client connections and proxy them to the appropriate back end servers where the mailboxes reside. The front end server looks up the mailbox location using Active Directory. You can move mailboxes between servers without changing the URL that users use to access their mailboxes, because the name of the actual mailbox or public store is not relevant. Make sure the virtual root names match between the front end and back end systems (that is, Exchange, Public, and roots for alternative public folder hierarchies). The configuration of front end servers was covered in Chapter 4, "Planning the Microsoft Exchange 2000 Server Installation" and discussed further in Chapter 19, "Implementing Advanced Security."
NOTE
OWA URLs are based on host or domain names. The URLs are independent of individual information store information.
Front End Load Balancing
In an FE/BE environment, you can group all your front end systems together for load balancing using Microsoft Network Load Balancing or another high- performance hardware load-balancing solution, such as Cisco Local Director. A free alternative is to use a round-robin DNS configuration according to RFC 1794, but there are serious drawbacks. You can read more about Microsoft Network Load Balancing in the Windows 2000 Server product documentation.
Disadvantages of Round-Robin DNS
Round-robin DNS is based on the simple concept of having the same host name mapped to the IP addresses of multiple front end servers, which are supposed to share the workload. To distribute user connections, DNS rotates host records. This also provides some level of fault tolerance because client requests are repeated if a particular front end server is not responding, which eventually will direct the client to an available system. However, Windows 2000 DNS prioritizes multiple host records based on their IP address to return the IP address closest to the client, preventing round-robin DNS from working properly. The behavior depends on the Enable Round Robin setting, found in the DNS snap-in, via the server Properties dialog box in the Advanced tab. You can read more about the configuration of Windows 2000 DNS in the product documentation.
Load Balancing and Secure Sockets Layer
Round-robin DNS should not be used for load balancing across servers if you use SSL to encrypt the communication between the client and the front end server. The SSL bulk encryption key is maintained on the server and lost if the client is redirected to another host by DNS. In this case, a new session must be established to generate a new bulk encryption key. Microsoft Network Load Balancing carefully manages the connection state and is therefore a more reliable and preferable solution.
Resource Access
You can control access to OWA resources per HTTP virtual server, virtual directory, and user. Unfortunately, when working with the default HTTP virtual server, called Exchange Virtual Server, you have to juggle three different administrative utilities—IIS, Exchange System Manager, and Active Directory Users and Computers. You may find it useful to create a custom Microsoft Management Console (MMC) utility to include all three snap-ins in a single tool for OWA management, as illustrated in Chapter 2, "Integration with Microsoft Windows 2000."
Controlling Access Permissions
IIS is required to manage the properties (including security settings) for the Default Web Site, which provides access to the OWA virtual directories. Exchange System Manager is the right tool to control access to virtual directories. Each virtual directory provides an Access tab, where you can define Access Control settings, Execute Permissions, and Authentication Settings. Last but not least, you can use Active Directory Users and Computers to enable or disable OWA for mailbox-enabled accounts. Make sure Advanced Features is enabled under View, display the account properties, click on the Exchange Advanced tab, and click Protocol Settings. In the Protocols dialog box, select HTTP, and click Settings. In the HTTP Protocol Details dialog box, disable the Enable For Mailbox check box to prevent the user from accessing Exchange 2000 Server through HTTP. Similarly, you can disable POP3 and IMAP4 per user.
Validated Resource Access
Validated users can work with mailbox and public folders and can search the Global Address List. Generally speaking, they have permissions just as if they were logged on directly using Outlook 2000. When using Internet Explorer 4.0 or Internet Explorer 5.0, IIS obtains your Windows 2000 credentials directly from the browser and OWA automatically connects you to your mailbox. With Netscape Navigator and other browsers you will be prompted for an account name and password. Based on the account information, your mailbox will be determined from Active Directory. IIS uses integrated Windows authentication by default. The configuration of authentication mechanisms was covered in Chapter 11, "Internet-Based Client Access."
Because OWA determines mailbox information automatically based on present account information, you only have to specify the URL http://<Server Name>/Exchange/ to gain access to your personal mailbox. If you want to work with other mailboxes, append the mailbox alias to the URL (such as, http://bluesky-srv1/Exchange/CarlT/). The mailbox alias corresponds to the user-specific portion of the e-mail address, for instance CarlT in CarlT@Bluesky-inc-10.com. It is a good idea to provide your users with an SMTP address that corresponds to the format <Windows 2000 account name>@<domain name>. If you are currently working with an account that does not have the required permissions to access the mailbox, an Enter Network Password dialog box will appear, prompting you for the required account information.
NOTE
You cannot work with two different OWA sessions on the same computer simultaneously.
Anonymous Resource Access
All access to mailbox and public folder resources is validated. Although you have the option to allow anonymous access to public folders, this does not mean that anonymous users are unknown. By default, the system assigns them the guest account of the IIS, such as IUSR_<SERVERNAME>. You can read more about anonymous access to IIS resources in the Windows 2000 Server product documentation.
It is very important to keep in mind that the IIS guest account, IUSR_<SERVERNAME>, is a valid Windows 2000 user account. Therefore, the Default client permissions are applied and not the Anonymous permissions. For this reason, it is not advisable to enable anonymous access to the MAPI-based public folder hierarchy (published as http://<server name>/public). Anonymous Web users would then be able to browse through your public folder resources just as any regular user in your organization. Instead, create additional virtual directories for those public folders that you want to publish and enable anonymous access only for these virtual resources. You can read more about the administration of public folders in Chapter 17, "Public Folder Management."
NOTE
It is a good idea to mail-enable the IIS guest account. This gives you the opportunity to configure explicit access permissions for anonymous users in Exchange System Manager and Outlook 2000.
To grant anonymous users access to the User Manual virtual directory (created in Exercise 1 of Lesson 1)
- In the Internet Information Services tool, right-click the Default Web Site object found under your server (such as Bluesky-srv1), then select Properties. Click on the Directory Security tab, and then, under Anonymous Access And Authentication Control, click Edit. Make sure the Anonymous Access check box is selected, click on the corresponding Edit button, and verify that the IIS guest account (such as IUSR_BLUESKY-SRV1) is displayed under Username. Close all dialog boxes.
- In Exchange System Manager, expand the Exchange Virtual Server object, found under Blue Sky Airlines (Exchange)\Administrative Groups\First Administrative Group\Servers\BLUESKY-SRV1\Protocols\HTTP. Right-click on the object labeled User Manual, and then select Properties. Click on the Access tab, click Authentication, enable the Anonymous Access check box, and, under Anonymous Account, define a username. Close all dialog boxes.
NOTE
The name you specify under Anonymous Account is used for informational purposes in Exchange System Manager. This account has no meaning for anonymous access over the Web; however, it is a good idea to reference the IUSR_<SERVERNAME> account, such as IUSR_BLUESKY-SRV1. - In Exchange System Manager, expand Folders under Blue Sky Airlines (Exchange)\Administrative Groups\First Administrative Group, and then expand Public Folders. Right-click the desired folder , such as User Manual, and select Properties. Click on the Permissions tab, click Client Permissions, and grant the required level of access rights to the Default account. If you have mail-enabled the IUSR_BLUESKY-SRV1 account, you can add the Internet Guest Account to the account list and grant permissions explicitly. You may also use Outlook 2000 to configure client permissions in the folder's Permissions tab.
NOTE
The only difference between an anonymous user and a validated user is that the former does not own a mailbox (although even this is possible) and does not have to specify account information to access Exchange 2000 Server resources. The Information Store will check whether the anonymous account has the permissions to open the requested resource. If the account has sufficient privileges, the access is granted; otherwise, the user is prompted for account information according to defined authentication settings.
Disabling the Exchange Virtual Server
As outlined in Chapter 11, "Internet-Based Client Access," you can stop, start, or pause each virtual server individually. Stopping the HTTP virtual server(s) prevents users from accessing resources via OWA. In Exchange System Manager, select the desired virtual server object, such as Exchange Virtual Server, and then select Stop from the shortcut menu.
IMPORTANT
The default HTTP server provides access to public folder properties through the Exadmin virtual directory. Stopping the virtual server prevents Exchange System Manager from being able to manage public folder settings. You will receive an error notification that access to the public folder has failed.

Exercise 2: Accessing Mailbox and Public Folder Resources with Outlook Web Access
In this exercise you will work with Inbox, calendar, and public folder items by means of OWA. You will examine various URLs that provide access to the resources.

To view a multimedia demonstration that displays how to perform this procedure, run the EX2CH22.AVI files from the \Exercise_Information\Chapter22 folder on the Supplemental Course Materials CD.
Prerequisites
- Complete the exercises of Chapter 21, "Microsoft Outlook Forms Environment." (Otherwise, use Outlook 2000 to create two public folders called Job Applicants and User Manual. For Job Applicants, set the item type to Contact Items. For User Manual, make sure the item type is Mail Items. Register a custom Outlook form in the Job Applicants folder and place some documents in the User Manual.)
- Restart BLUESKY-SRV1, and make sure it is operational.
- Log on as Administrator to BLUESKY-SRV1.
To send and receive messages and test other OWA features
- Click Start, click Run, and, in the Run dialog box, type http://bluesky-srv1/exchange/, and then click OK. Verify that Internet Explorer 5.0 is launched and that the browser shows a Web page that looks similar to Outlook 2000. This can take several minutes to start up.
NOTE
If you receive an HTTP 500 Error when starting OWA, click on the Reload button to open the page successfully. If the HTTP 500 Error occurs repeatedly, restart the Exchange 2000 server to re-initialize the Information Store and IIS. - Click New, and, in the Untitled — Message window, click To.
NOTE
If you have installed Office 2000 (without HTML Source Edit) and multimedia messaging for OWA, you may be prompted to insert the Office 2000 CD the first time you use Outlook Web Access. The Office 2000 installer program attempts to install HTML Source Edit. If the Office 2000 CD is not at hand, click Cancel in the installer program. This feature is not required for OWA or Office 2000 to work correctly. - In the Display Name box, type admin. Click Find, verify that the Administrator is found, and select this entry. Click To, and then click Close in the upper right corner.
- In the Subject line, type Messaging without limits.
- In the message text area, type Normal OWA messages contain rich text formatting and attachments. Delivery and read receipts are also supported. You have to click Options on the toolbar and select the corresponding check boxes. Perhaps even more exciting is Multimedia Messaging. If your computer is equipped with a sound card, you can send audio data with your messages. If you have a video capture board in addition, video may be included as well. The microphone button on the toolbar provides access to multimedia features.
- Format the text using a different font, font size, and color (see Figure 22.3), and then click Send.
- Right-click on the Web page that displays the messages from your Inbox, and then select Refresh. Verify that the newly composed message is displayed.
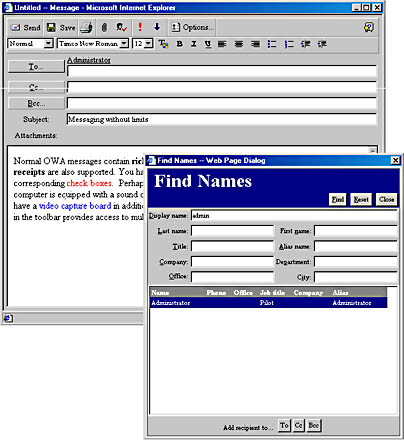
Figure 22.3 Sending a rich text message in OWA
- In the Outlook Web Access navigation bar, click Contacts.
- Click New, maximize the Untitled — Contact window, type Hawk under Last Name and Henry under First Name, and fill in other information as desired.
- Under E-Mail Address, type Henry.Hawk@Somewhere-inc-10.com, and, under Display Name, change the information to Henry Hawk.
- Click Save And Close, and then refresh the view of the Web page to display the newly created contact information (see Figure 22.4).
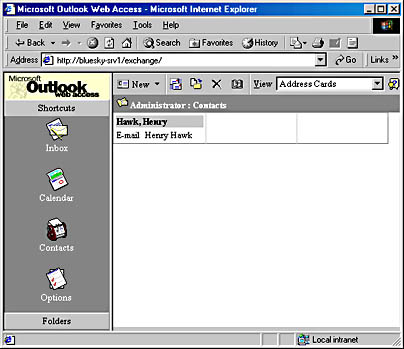
Figure 22.4 Displaying contacts in OWA
- In the navigation bar, click Options to examine the settings that you can apply to OWA, such as date and time formats for the Calendar, or an out-of-office notification. Notice the Download button under E-Mail, which allows you to install the latest version of the Exchange Multimedia Control on your workstation.
NOTE
If you are working on a workstation where the Exchange Multimedia Control is already installed, the Download button will be labeled Re-Install. - In the navigation bar, click Folders. Notice that you can access all folders in your mailbox as well as public folders.
- Expand Public Folders, and then select the Job Applicants folder.
- Click New to create a new contact and note that the standard OWA contact form is displayed because OWA does not support custom Outlook forms. Close the contact form again.
- In the navigation bar, right-click on the User Manual public folder, and then select Open In New. Verify that another browser window is opened.
- From the View list box, select the custom view Table Of Contents that was originally defined in Outlook 2000. Verify that OWA displays the items accordingly. OWA supports custom Outlook views (see Figure 22.5).
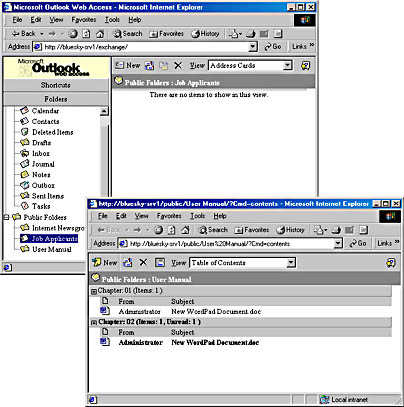
Figure 22.5 Displaying items in a custom view
- In the new browser window, examine the URL. It will have the format http://bluesky-srv1/public/User%20Manual/?Cmd=contents (see Figure 22.6).
- To experiment with URLs, type http://bluesky-srv1/Exchange/Administrator/Inbox/?Cmd=contents in your browser's Address box, and then press Enter to display the Inbox folder.
- Try http://bluesky-srv1/Exchange/Administrator/Calendar /?Cmd=navbar, and only the OWA navigation bar will be displayed.
- Type http://bluesky-srv1/Exchange/Administrator/Inbox/?Cmd=new , and press Enter to display an empty message form, which allows you to compose and send a rich text message right away.
- Try http://bluesky-srv1/Exchange/Administrator/Inbox /Messaging%20without%20limits.EML?Cmd=open, and the message that was composed earlier in this exercise appears ("%20" replaces the spaces in the subject line, but Internet Explorer 5.0 can do this job for you).
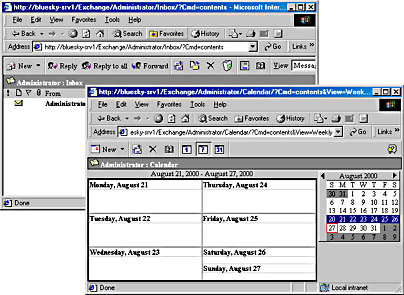
Figure 22.6 Using URLs to access resources directly
- Use http://bluesky-srv1/Exchange/Administrator/Calendar /?Cmd=contents&View=Weekly to view your Calendar folder similar to the Day/Week/Month view of Outlook 2000 (see Figure 22.6).
Exercise Summary
With OWA, you have access to all items in your mailbox as well as public folders and the Global Address List. OWA supports exciting new technologies, such as the creation of messages that contain audio or video information using Multimedia Messaging. To access your mailbox, use http://<server name>/Exchange/. To access the MAPI-based public folder hierarchy instead, use http://<server name>/Public/. It is possible to access individual mailboxes, public folders, and items in folders directly. All items can be referenced in a URL and desired actions may be specified in query strings.
Backward Compatibility Issues
As mentioned at the beginning of this chapter, the new OWA is not compatible with OWA of earlier versions of Exchange Server. Unfortunately, any OWA customizations cannot be retained after upgrading. However, you can use the legacy OWA version to access Exchange 2000 Server resources.
During the upgrading of your organization to Exchange 2000 Server, keep in mind that the new OWA cannot access public folders on earlier versions (see Figure 22.7). You should replicate all relevant public folders to Exchange 2000 Server to provide access to them. Another option is to directly upgrade the existing public server first. Upgrade strategies are discussed in Chapter 6, "Coexistence with Previous Microsoft Exchange Server Versions."
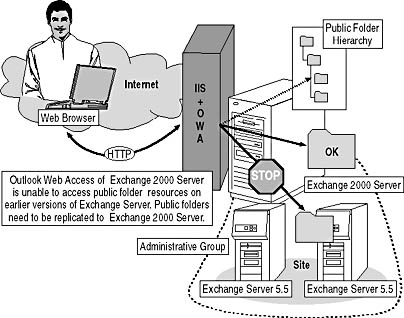
Figure 22.7 Outlook Web Access in a mixed environment
The following issues are important in regards to OWA when upgrading an Exchange organization to Exchange 2000 Server:
- ASP-based customizations of OWA and custom solutions based on collaboration data objects (CDOs) and OWA of earlier versions of Exchange Server are not upgradeable. However, these solutions do not need to be replaced and can be used in a native Exchange 2000 Server organization.
- Only hosts running the same version of OWA can be grouped together for load balancing. Separate URLs should be used for the new and the legacy OWA versions. If you are able to upgrade all servers running legacy OWA simultaneously, adjustments to DNS are not required.
- OWA of Exchange 2000 Server is limited to Exchange 2000 servers. Public folder resources can be replicated to Exchange 2000 Server to fully support OWA users.
- OWA of Exchange Server 5.5 can access mailbox and public folder resources on any server running Exchange Server 5.5 or Exchange 2000 Server.
EAN: N/A
Pages: 186