| The Timeline represents each layer or layer folder as a horizontal field containing a name and three but ons for controlling the way the layer or folder's contents look on the Stage. You can hide a layer or folder (making all the elements on that layer or within that folder temporarily invisible), lock a layer or folder (making the contents visible but uneditable), and view the items on the layer or within the folder as outlines. These controls are helpful when you are editing numerous items on several layers . To rename a layer or folder: -
In the Timeline, double-click the layer or folder name. Flash activates the name's text-entry field. -
Type a new name. -
Press Enter or click anywhere outside the name field. To hide the contents of a layer or folder: -
In the Timeline for the layer or folder that you want to hide, click the bullet in the column below the eye icon (Figure 5.17). Figure 5.17. The column below the eye icon controls the visibility of layers. Each of the eight elements (top) is on a separate layer. The four triangles at the corners are located within the bottom folder. Hiding the circle layer makes the circle disappear from the Stage (middle). Hiding the Corner folder makes the four triangles disappear as well (bottom).  Flash replaces the bullet with a red X , indicating that the contents of the layer or folder no longer appear on the Stage. The invisible setting does not affect the final movie. When you publish a movie (see Chapter 16), Flash includes all the contents of hidden layers and folders. To show the hidden contents of a layer or folder: -
In the Timeline for the layer or folder that you want to show, click the red X in the column below the eye icon. Flash replaces the X with a bullet and displays the contents of the layer or folder. To lock a layer or folder: -
In the Timeline for the layer or folder that you want to lock, click the bullet in the column below the padlock icon (Figure 5.18). Figure 5.18. The padlock icon indicates that a layer is locked. The contents of a locked layer appear on the Stage, but you can't edit them.  Flash replaces the bullet with a padlock icon. The contents of the layer or folder appear on the Stage, but you can't edit them. Locking a layer or folder does not affect the final movie. To unlock a layer or folder: To view the contents of a layer or folder as outlines: -
In the Timeline for the layer or folder that you want to view as outlines, click the solid square in the column below the square icon (Figure 5.19). Figure 5.19. A hollow square in the outline-mode column indicates that objects on that layer appear as outlines. Setting a folder to outline mode automatically changes all the layers within it to outline mode. 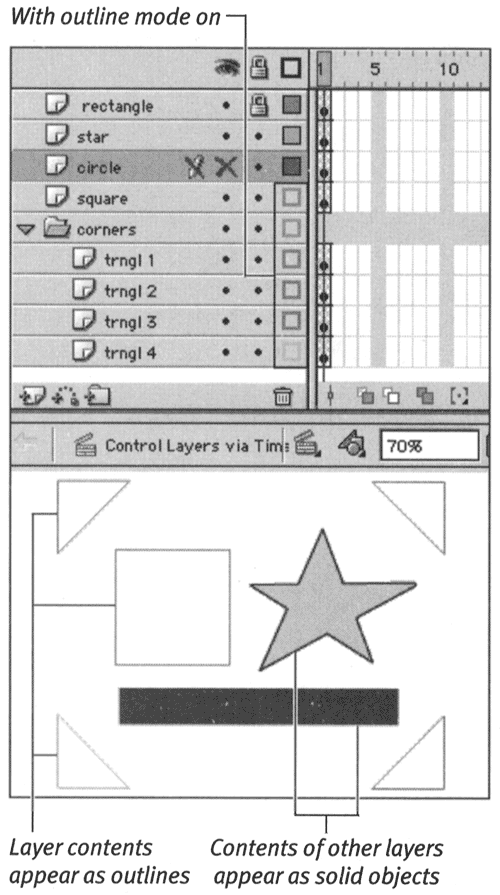 Flash replaces the solid square with a hollow square, indicating that the layer or folder is in outline mode. The contents of a layer appear on the Stage as outlines in the color that the square indicates. The elements on each layer within a folder appear in the outline color associated with their own layer, not in the outline color of the folder. Placing a layer or folder in outline mode does not affect the final movie. To view the contents of a layer or folder as solid objects: -
In the Timeline for the layer or folder whose contents you want to view as solid, click the hollow square (Figure 5.20). Figure 5.20. Clicking the hollow square in the outline-mode column returns you to viewing the contents of that layer or folder as solid objects.  Flash replaces the hollow square with a solid square, indicating that the layer or folder is no longer in outline mode. The contents of the layer or folder appear on the Stage as solid objects. Working with Layer-View Columns Flash provides several shortcuts for working with the three layer-view columns in the Timeline. The following tips describe hiding and showing layer content; the controls in the Timeline for locking and unlocking layer contents and for viewing layer contents as outlines work the same way. -
To hide the contents of several layers or folders quickly, click the bullet in the column below the eye icon and drag through all the layers or folders you want to hide. As the pointer passes over each bullet, Flash changes it to a red X. -
To show numerous layers or folders quickly, click a red X in the eye column and drag through all the layers or folders whose contents you want to show. -
To hide the contents of all layers or folders but one, Option-click (Mac) or Alt-click (Windows) the bullet in the eye column of the layer or folder you want to see. Flash puts an X in all the other layers or folders. -
To hide the contents of all the layers and folders,  -click (Mac) or Ctrl-click (Windows) the eye column of any layer or folder, or click the eye icon in the column header. Flash puts an X in all the layers. To show the contents of all the layers and folders, simply -click or Ctrl-click an X or click the eye icon again. -click (Mac) or Ctrl-click (Windows) the eye column of any layer or folder, or click the eye icon in the column header. Flash puts an X in all the layers. To show the contents of all the layers and folders, simply -click or Ctrl-click an X or click the eye icon again. |  |