| Flash provides several ways to load new files into your movie or Web site; here are two. The getURL action allows you to find other files and display them in a browser window when you run your movie in a browser. These files might be Flash Player files (with the extension .swf) or HTML pages. You can display the new file in the current browser window or in a new window. If your HTML page uses frames , you can target any frame to display the new file. The loadMovie action lets you display new movie files within the current movie window. The loaded movie can replace the current movie or stack up on top of the current movie as though it were simply another layer of animation. (An advanced application for the loadMovie and getURL actions is to pass variables from one file to another file.) To use getURL to open a separate browser window: -
Create a new Flash document. -
Place an instance of a button symbol in Keyframe 1 of your movie. (For more details on using symbols and buttons , see Chapters 6 and 13.) -
On the Stage, select the button. -
In the Actions panel, in the Actions Tool-box's Actions > Browser/Network category, double-click getURL (Figure 15.21). Figure 15.21. From the Actions Toolbox's Actions category, choose getURL to make Flash open another file in the browser. 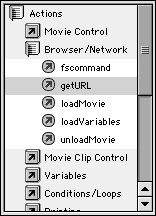 Flash updates the Script pane to read as follows : on (release) { getURL (""); } -
In the parameters area, in the URL field, enter the name or path of the file that you want to appear in a separate window (Figure 15.22). Figure 15.22. For testing on your computer without opening an Internet connection, enter a relative URLin the Actions panel's parameters area. The file you specify as the URLmust be in the same folder as the main movie file. To make Flash interpret the URLas an actual file name (a string), uncheck the Expression checkbox. 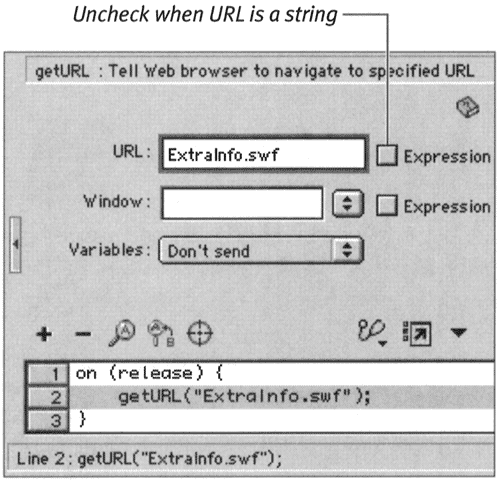 For testing this exercise, enter a relative URL for a file on your computer, such as a file located in the same folder as the Flash file that you created. (Make sure that the Expression checkbox is unchecked. You want Flash to treat the URL as a text string, not a variable or expression.) You can also use an absolute URL in this field, but in that case, you must have an Internet connection open to test the action. The Mystery of URLs The acronym URL stands for Uniform Resource Locator , which is a standardized way of handling the addresses of files so that they can be found on the Internet. The conventions of the URL make it possible to decipher the hierarchical structure of the server (or local computer) on which a file is stored, allowing you to maneuver through all the directories, folders, and layers to the specific file that you want. URLs have two forms: absolute and relative. An absolute URL is a complete address that specifies the protocol your browser should use to open the file (HTTP, or Hypertext Transfer Protocol, is one used to transfer the text and graphics of Web sites), the name of the server on which the file resides, the path name (the nested hierarchy of directories, volumes , folders, and so on), and the name of the file itself. A relative URL is a shorthand version of the full address that lets you describe one file's location in relation to another. In essence, you tell Flash to move up and down the hierarchy of nested files, folders, and directories, starting from the file where you give Flash the getURL instruction. It's like saying, "Look in the folder you're in right now for a file called Fabulous.fla," or "Look in the folder you're in right now for another folder called OtherJunk, and then look inside that folder for the file Fabulous.fla," or "Go up a level to the folder that contains the folder that contains the file you're in right now. In that higher-level folder, look for another folder called ThisJunk. Look in ThisJunk for a file called Abysmal.fla." Using relative URLs in actions has the advantage of allowing you to test your movies on your computer without opening an Internet connection. Additionally, provided that you keep your files in the same relative positions in the hierarchy, you won't need to rename the files when you transfer them from your local computer to the server where you'll make them available to your viewers . | -
From the Window pop-up menu, choose _blank (Figure 15.23). Figure 15.23. Choose _blank from the Window pop-up menu to make Flash open the new URLin a separate browser window. 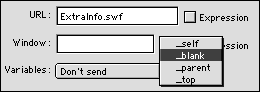 The _blank parameter tells Flash to open the new file in a new window in the browser. The three other predefined choices are _self , which opens the new file in the current browser window; _parent , which opens the new file in the parent of the current frame; and _top , which opens the new file in the top-level frame in the current browser window. Again, leave the Expression checkbox unchecked. You can also type the name of the window or frame that you want to display the new URL. -
From the File menu, choose Publish Preview > HTML (Figure 15.24). Figure 15.24. Choose File > Publish Preview > HTML to test the getURL action in your browser. 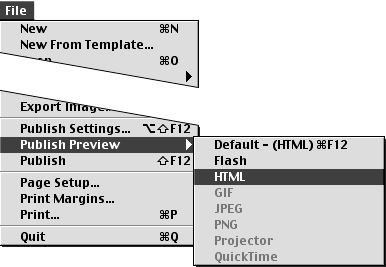 Flash exports your movie to a .swf file, creates an HTML file that plays the file, and opens that file in whatever browser you have available. (For more details on using Flash's publishing features, see Chapter 16.) -
In the movie playing in the browser window, click the button that you just created. Flash opens a new browser window and displays the file that you specified in the getURL action.  Tip Tip -
Instead of scripting a button to link to a new URL, you can create a text box that links to it. Using the text tool, create a text box, and enter the text that you want to be a hot link. With that text selected, in the URL field of the Text Property Inspector, enter the URL of the page to link to. From the Target pop-up menu, choose the way you want Flash to open the new URL; the choices are the same as those described in step 6 of the preceding exercise for the getURL action.
To use loadMovie : -
Follow steps 1 through 3 of the preceding exercise. -
In the Actions-Button panel, in the Actions Toolbox's Actions > Browser/Network category, double-click loadMovie (Figure 15.25). Figure 15.25. To open a new movie that plays in a different level of your movie, in the Actions Toolbox's Actions category, double-click loadMovie . 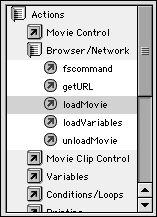 Flash updates the Script pane with the following code: on (release){ loadMovieNum ("",0); } The Mystery of Movie Levels When you ad movie clips to a Flash file or load other movies, the independent Timelines start stacking up. To control them with ActionScript, you need to tell Flash which Timeline you're trying to control. You do this with the target path name, which makes the hierarchical relationships of the nested Timelines clear. Imagine three family members having lunch : a grandparent, a parent, and child. If you restrict the conversation to the people at the table, the grandparent can talk about "my child," the parent can talk about "my child," and everybody can talk about "my family." The same word can refer to different people because the context is clear; the person saying the word has a known relationship to the person being referred to. There's a similar phenomenon in creating target paths in ActionScript. Imagine you have a Flash file named Grandma, which contains a movie clip named Mom; the Mom clip contains another movie clip named Kid. A script at ached to a frame or object inside the Kid clip can control the Mom clip's Timeline by using the target path _parent . But if you at ach a script to an object in the Mom clip using the path name _parent , you'll be controlling the Timeline in the Grandma movie. In other words, which Timeline _parent refers to depends on where the script containing it resides. A path name that always refers to the "founding parent" movie in a set of nested Timelines is _root . No matter where a script lives (in the Kid clip, the Mom clip, or the Grandma movie) when it uses the path name _root , it controls the main movie Timelinein this example, Grandma. In addition to having Timelines that stack up within an individual Flash file, in the Flash Player, you can stack up several movies on separate levels. You target these separate movies with the pathname _level plus the number of the level containing the movie ( _level1 , _level2 , and so on). To refer to the main movie Timeline in the bottommost level, use the path name _level0 . You determine which level contains which movie when you use the loadMovie action. You can replace the current movie by entering 0 for the Level parameter. If you type a higher number, Flash stacks the loaded movie on top of the current movie. | -
With loadMovieNum ("",0) ; selected in Line 2 of the Script pane, in the parameters area's URL field, enter the name of the Flash Player (.swf) file that you want to load. -
From the Location pop-up menu, choose Level, and enter 1 in the text field (Figure 15.26). Figure 15.26. Defining the Location parameter as Level, with a number greater than 0, tells Flash to display the loaded movie on top of the current movie. A Level setting of 0 tells Flash to replace the current movie with the loaded movie. (You can also choose to load a movie's variables without displaying or playing any of the movie.) 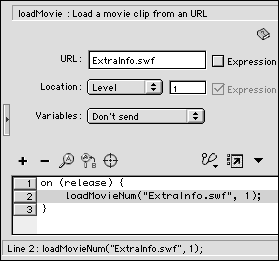 The elements of movies loaded in higher levels obscure elements in movies at lower levels, just as graphics in higher layers of a movie obscure graphics in the lower layers. -
From the Control menu, choose Test Movie to try out the loadMovie action. When you click the button, Flash loads the second movie on top of the movie that contains the button (Figure 15.27). Figure 15.27. The main movie (Load Movie.swf) is playing in Level 0 (top). When you click the globe button, Flash loads another movie (Extra Info.swf) into Level 1. The movie in Level 1 plays as though it were an additional layer of animation sitting on top of the original movie (bottom). 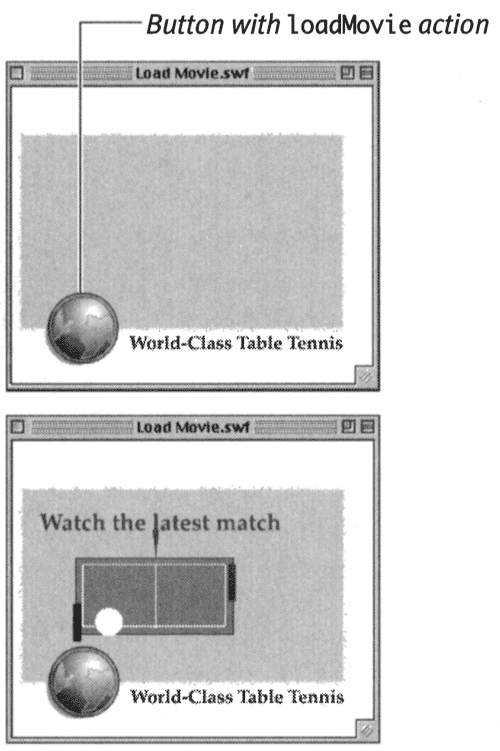 Tip -
You can also use actions to unload movies that you've already loaded. The process is similar to the preceding exercise, except that in step 2, you choose Actions > Browser/Network > unloadMovie, and you can skip step 3. In step 4, you enter the level number from which Flash should remove a previously loaded movie.
|