About the Timeline

I l @ ve RuBoard

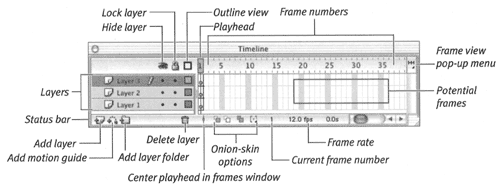
If you think of your Flash movie as a book, the Timeline would be its interactive table of contents: Each scene is like a chapter; each frame is like a page. Imagine that you could point to Chapter 10 in the table of contents, and the book would flip open to the first page of that chapter. In Flash, when you click a frame in the Timeline (or when the playhead enters a frame), that frame appears in your document window.

A Flash movie is much more complex than a book, of course. Each movie "page" may actually be several transparent sheets stacked one on top of another. Flash keeps track of these "sheets" in what it calls layers . And the whole "book" appears to be in motion as you move through the table of contents, with some unseen hand flipping the pages.

The Timeline is a vital , complex organizational and navigational tool. You will use it extensively when you create animations. Then you'll need to go more deeply into its components . For now, you only need to understand the Timeline generally ; you'll learn more about it in Chapter 8.

Figure 1.9 identifies the major Timeline elements. You can dock the Timeline to any side of a Flash window or float it as a separate window.

Figure 1.9. The Timeline is the complete record of your movie. It represents each scene, frame, and layer that make up the movie. Frames appear in chronological order. Clicking any frame in the Timeline takes you directly to that frame and displays its contents on the Stage.

graphics/01fig09.gif

To undock the Timeline window:

  1. Position the pointer over the textured area on the left side of the title bar at the top of the Timeline.

    The pointer changes to the grabber hand (Mac) or move icon (Windows).

  2. Click and drag away from the document window (Figure 1.10).

    Figure 1.10. Drag the Timeline by the textured portion of its title bar (top) and then release the mouse button. The Timeline floats in its own window (bottom).

    graphics/01fig10.gif

    A dotted line represents the Timeline window's position.

  3. Release the mouse button where you want the Timeline to sit.

To dock the Timeline:

  1. Position the pointer over the textured area on the left side of the title bar at the top of the Timeline window.

    The pointer changes to the grabber hand (Mac) or move icon (Windows).

  2. Click and drag the Timeline to any of the four edges of the document window.

  3. Release the mouse button when the pointer is at the edge of the window.

    The Timeline resizes to fit the window.

graphics/01icon02.gif Tips

  • Docking the Timeline vertically (at the left or right edge of the document window) gives you easy access to several layers at a time. Docking the Timeline horizontally increases the number of easily accessible frames.


The Timeline appears in any new document you create, but you can hide the Timeline to give the Stage more room.

To hide the Timeline:

  • From the View menu, choose Timeline; or press Option- graphics/01icon01.gif -T (Mac) or Ctrl-Alt-T (Windows) to toggle between hiding and showing the Timeline.

graphics/01icon02.gif Tips

  • To hide a floating Timeline quickly, simply click the close box (Mac OS 9 or Windows) or the close button (Mac OS X) to close the Timeline as you would any window.

  • You can collapse the Timeline window. Clicking the arrow to the left of the name Timeline , the name itself, or anywhere to the right of the name in the title bar toggles between the collapsed and expanded Timeline view (Figure 1.11).

    Figure 1.11. Click the triangle, the name, or anywhere to the right of the name in the title bar to collapse or expand the Timeline window.

    graphics/01fig11.gif


I l @ ve RuBoard


Macromedia Flash MX for Windows and Macintosh. Visual QuickStart Guide
Macromedia Flash MX 2004 for Windows and Macintosh (Visual QuickStart Guides)
ISBN: 0582851165
EAN: 2147483647
Year: 2002
Pages: 243

flylib.com © 2008-2017.
If you may any questions please contact us: flylib@qtcs.net