| Although shape tweens can animate changes in many properties of graphics color , size , locationthe distinguishing function of shape tweens is to transform one shape into another. In this chapter, however, you start by using a shape tween to create another simple bouncing-ball animation. This exercise demonstrates the similarity between the two types of tweens and shows how you can achieve the same result by using different tween commands. To define shape tweens via the Frame Property Inspector: -
Create a new Flash document, and name it something like Shape Tween Bounce. Flash creates a document with one layer and a keyframe at Frame 1 by default. -
In the Timeline, position the playhead in Frame 1. -
In the Toolbox, choose the oval tool. -
Set the stroke to No Color. -
Near the top of the Stage, draw a circle. This circle will be the ball. Make it fairly large. -
In the Timeline, select Frame 5, and choose Insert > Keyframe. The Insert > Keyframe command makes a new keyframe that contains the same elements as the preceding keyframe. -
Select Frame 10, and choose Insert > Keyframe. -
In Frame 5, select the ball, and drag it to the bottom of the Stage (Figure 10.1). Figure 10.1. When you reposition an editable graphic, for the purposes of shape tweening Flash considers the change in location to be a change in shape. In the middle keyframe of this figure, you relocate the ball to create the bottom of the bounce. 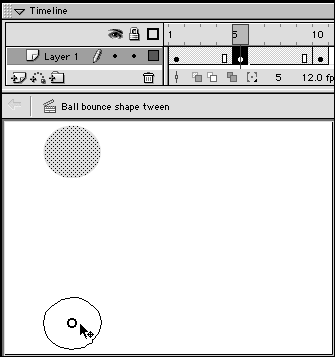 Now you have the keyframes necessary to make a simple bouncing ball like the one in the motion-tween exercise. In Frame 1, the ball is at the top of its bounce; in Frame 5, the ball is at the bottom of its bounce; and in Frame 10, the ball is back up at the top. -
To define the shape tween for the first half of the ball's bounce, in the Timeline, select any of the frames in the first keyframe span (1, 2, 3, or 4). Note that the ball is selected automatically. When you define a shape tween, the element to be tweened must be selected. -
From the Frame Property Inspector's Tween pop-up menu, choose Shape. The parameters for the shape tween appear (Figure 10.2). Figure 10.2. Choosing Shape from the Tween pop-up menu in the Frame Property Inspector displays the shape-tween parameters. 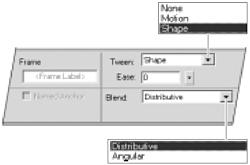 Flash creates a shape tween in frames 1 through 4 and color-codes those frames in the Timeline. With Tinted Frames active (choose it from the Frame View pop-up menu at the end of the info bar), Flash applies a light green shade to the frames containing a shape tween. If Tinted Frames is inactive, the frames are white, but Flash changes the arrow that indicates the presence of a tween from blue to green. -
In the Ease field, do one of the following: -
To make the bounce start slowly and speed up, enter a negative value. -
To make the bounce start quickly and slow down, enter a positive value. -
To keep the bounce constant, enter . -
From the Blend menu, choose one of the following options: -
To preserve sharp corners and straight lines as one shape transforms into another, choose Angular. -
To smooth out the in-between shapes , choose Distributive. -
To define the motion tween for the second half of the ball's bounce, in the Timeline, select any of the frames in the second keyframe span (5, 6, 7, 8, or 9). -
Repeat steps 10 through 12. Flash creates the second half of the ball's bounce with another shape tween (Figure 10.3). Figure 10.3. With onion skinning turned on, you can see the in-between frames Flash creates for the tween. In this case, because you changed only the position of the object, it looks just like the bouncing ball created with a motion tween. 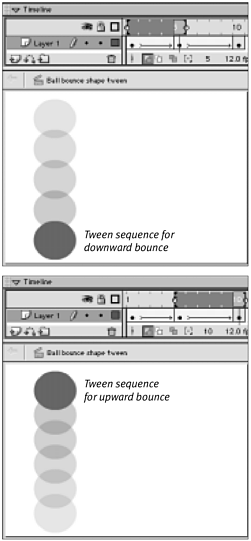 Shape-Tween Requirements To have a working shape tween, you need three things: a beginning keyframe containing one or more editable shapes, in-between frames defined as shape tweens, and an ending keyframe containing the new editable shape. For motion tweens, the Create Motion Tween command helps you combine those ingredients correctly. No equivalent command is available for shape tweens. You must create all shape tweens manually by setting up the beginning and ending keyframes and then defining the in-between frames as shape tweens in the Frame Property Inspector. |  Tip Tip -
Flash doesn't prevent you from defining shape tweens for frames that contain grouped shapes or symbols. Flash does warn you by placing the broken-tween dotted line in the relevant frames in the Timeline. When you select such frames, a warning button appears in the Frame Property Inspector (Figure 10.4). When you see these warnings, go back to the Stage and reevaluate what's there. If the item you want to tween is a group or symbol, you could use motion tweening. Or, to use shape tweening, you could break the group or symbol apart (select the shape or symbol and then choose Modify > Break Apart). If there's a symbol or group on the same layer as the editable shape you want to tween, move the extra item to its own layer (select it and choose Modify > Distribute to Layers). Figure 10.4. A warning button appears in the Frame Property Inspector when there are groups or symbols in frames you are defining as shape tweens (top). Click the exclamation-sign button to see the warning dialog box (bottom). 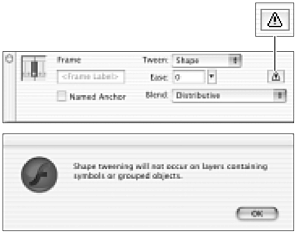
 |