| When you're applying gradients to multipart graphics, you can choose whether to give each part its own separate gradient (as you learned to do in Chapter 4) or to spread one gradient across all the parts. To truly spread a single gradient across multiple shapes, you must use merge-shapes. You can create a similar effect by using drawing-objects and locked gradients, but applying gradients to drawing-objects sometimes yields unpredictable results. To repeat one gradient in multiple fills 1. | On the Stage, create a graphic made of several fills.
They can be merge-shapes or drawing-objects.
| 2. | Deselect all the shapes.
| 3. | In the Tools panel, select the paint bucket.
| 4. | Deselect the Lock Fill modifier.
| 5. | Define a new gradient fill, or use any Fill Color control to select an existing one (see Chapter 2).
| 6. | Click each fill to which you want to apply the gradient.
Flash applies the same gradient to each shape separately (Figure 5.30). The full range of the gradient appears within each shape.
Figure 5.30. Applying unlocked gradient fills to multiple shapes results in multiple versions of the full gradient. This applies both to merge-shapes (the circles) and to drawing-objects (the squares). 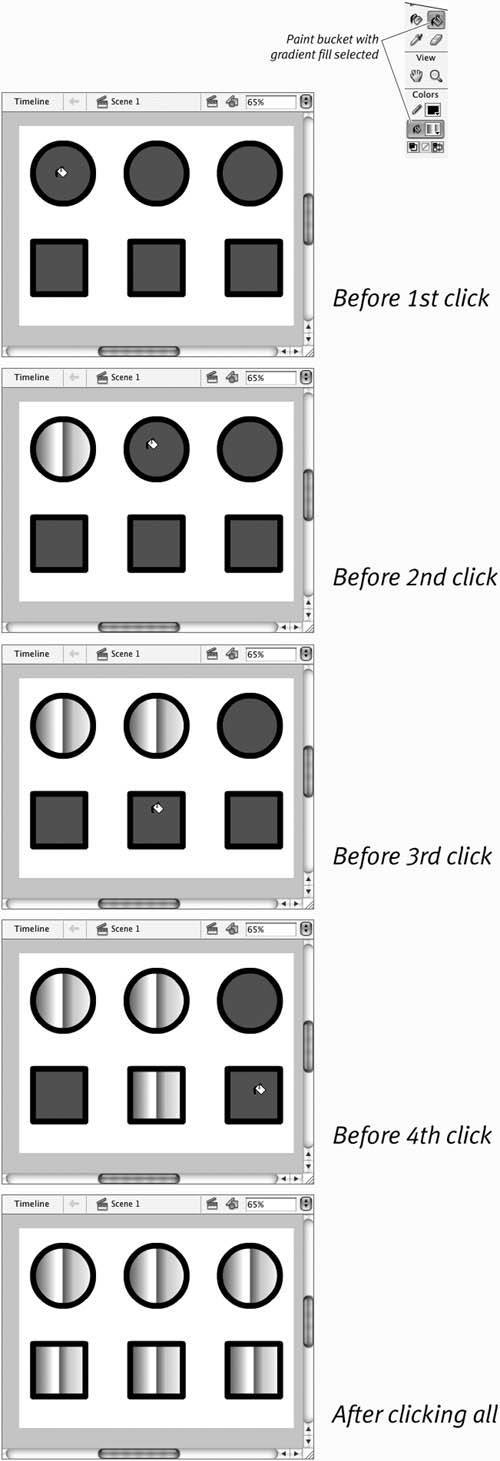
|
 Tip Tip
To repeat one gradient in multiple strokes 1. | On the Stage, create a graphic made of several strokes.
They can be merge-shapes or drawing-objects.
| 2. | Deselect all the strokes.
| 3. | In the Tools panel, select the ink bottle.
| 4. | Define a new gradient stroke or use any Stroke Color control to select an existing one (see Chapter 2).
| 5. | Click each stroke to which you want to apply the gradient.
Flash applies the same gradient to each stroke separately (Figure 5.31). The full range of the gradient appears within each stroke.
Figure 5.31. To apply separate gradients to strokes, use the ink-bottle tool to click unselected strokes. 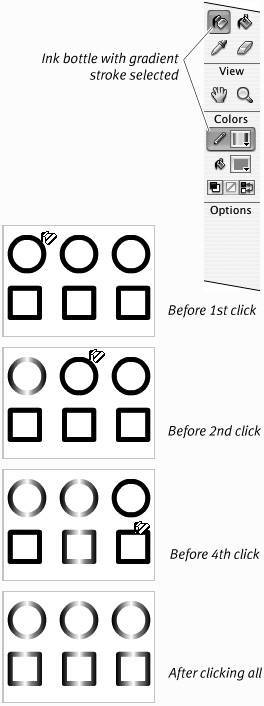
|
Tip
To spread one gradient across multiple merge-shape fills 1. | On the Stage, create a graphic made of several merge-shape fills.
| 2. | On the Stage, select the fills to which you want to apply the gradient.
| 3. | In the Tools panel, select the paint bucket.
| 4. | Deselect the Lock Fill modifier.
| 5. | Define a new gradient fill, or use any Fill Color control to select an existing one (see Chapter 2).
Separate gradients appear in each fill.
| 6. | Use the paint bucket to click any of the selected merge-shape fills.
Flash spreads a single gradient across all the selected fills (Figure 5.32). It's as if Flash creates an underlying gradient that fills a bounding box containing all the selected shapes; each shape reveals its portion of that underlying gradient.
Figure 5.32. When you choose a gradient fill with several merge-shapes selected, Flash first applies separate gradients to each shape (top). When you then click one of the selected fills directly with the paint-bucket tool (and Lock Fills deselcted), Flash spreads the gradient across all the fills. For linear gradients, the center of the gradient is at the center of the selected shapes; for radial gradients, where you click becomes the center of the gradient. 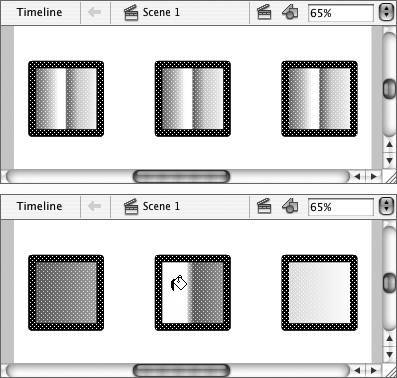
|
Tips Moving one of the shapes in the task above disconnects the shape's fill from the underlying gradient. The shape still shows the same slice of the gradient, but in fact the moved shape contains a separate copy of the gradient fill. If you select Lock Fill in step 4, Flash again spreads one gradient across all your merge-shapes, but this time Flash centers the underlying gradient at the left edge of the Stage. You can verify the location by clicking one of the shapes with the gradient-transform tool (see "To modify gradients underlying multiple merge-shapes," later in this chapter). Because drawing-objects are separate containers, you can't create a single underlying gradient for multiple drawing-object fills. You can fake the appearance of doing so, however, by using the technique in the previous tip but using drawing-object fills.
To spread one gradient across multiple merge-shape strokes 1. | On the Stage, create an object made of several merge-shape strokes.
| 2. | On the Stage, select the strokes to which you want to apply the gradient.
| 3. | In the Tools panel, select the ink bottle.
| 4. | Define a new gradient stroke, or use any Stroke Color control to select an existing one (see Chapter 2).
Flash spreads a single gradient across all the selected merge-shape strokes; the gradient is centered within the selection (Figure 5.33).
Figure 5.33. When strokes are selected on the Stage and you choose a gradient for the stroke attribute, Flash applies separate gradients to each drawing-object stroke (the circles) and a single underlying gradient to all the selected merge-shape strokes (the squares). 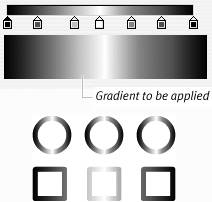
|
Tips If you follow the steps of the previous task, but use drawing-object strokes, Flash centers a separate gradient within each drawing-object stroke. If you use the ink bottle to directly click any of the selected merge-shape strokes, Flash applies a single underlying gradient, centering it within the shape you clicked and using the current overflow setting (see Chapter 4) to extend the gradient to the other selected shapes (Figure 5.34). Figure 5.34. When you use the ink bottle to click any stroke in a selection that includes multiple merge-shape strokes, Flash applies an underlying gradient again. This time it's centered in the merge-shape you click and overflows to the other merge-shapes. 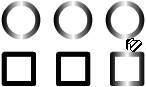
To modify gradients underlying multiple merge-shapes 1. | Follow the steps in the preceding tasks to create a gradient that underlies several merge-shape strokes or fills.
| 2. | In the Tools panel, choose the gradient-transform tool.
| 3. | Click any of the shapes that contain the underlying single gradient.
The gradient-transform handles appear (Figure 5.35). You can use them to modify the gradient to make it narrower or wider, to rotate it or change its center point (see Chapter 4).
Figure 5.35. When a single gradient underlies multiple merge-shape fills or strokes, you can click any of the shapes with the gradient-transform tool and modify the gradient beneath all those shapes. 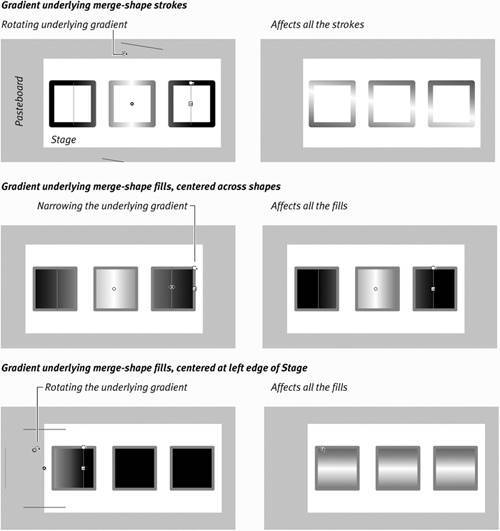
|
Tip When you apply locked gradient fills to drawing-objects, each object contains a separate virtual gradient; their centers line up at the left side of the Stage. If you try to modify the gradient inside one of these drawing-objects by using the gradient-transform tool, you'll see that they're in fact separate gradients (Figure 5.36). Figure 5.36. When you apply a locked gradient fill to multiple drawing-objects, it may look as if one virtual gradient underlies them all. But click one of the drawing-objects with the gradient-transform tool and modify the selected gradient, and your changes affect the color spectrum in only the object you clicked. 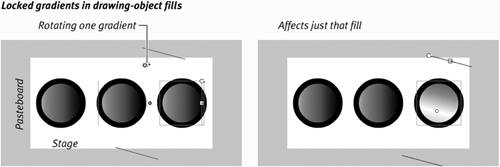
How Can You Tell What You're Painting or Erasing? Flash provides accurate previews only when you use the Paint/Erase Normal modes. In the complex painting modes, the brush tool paints a temporary fill over every object it touches on the Stage, obscuring all fills and lines below. When you release the mouse button, Flash calculates and redraws the new fill according to the paint mode you've selected in the Tools panel. Similarly, with the eraser tool, Flash temporarily obliterates everything the eraser touches, creating the proper erasure only after you release the mouse button. |
About the Complex Paint and Erase Modes In addition to Paint Normal mode, where you have a choice of creating merge-shape fills (which interact with other merge-shapes) or drawing-object fills (which don't), and Erase Normal mode (where the eraser eats up everything you drag it over), Flash offers four special modes that govern the way that brushstroke fills (Figure 5.37) or erasures (Figure 5.38) interact with existing strokes and fills. Figure 5.37. The special paint modes give you extra control over how the tools work with existing strokes and fills on the Stage. They behave somewhat differently with merge-shapes and drawing-objects. 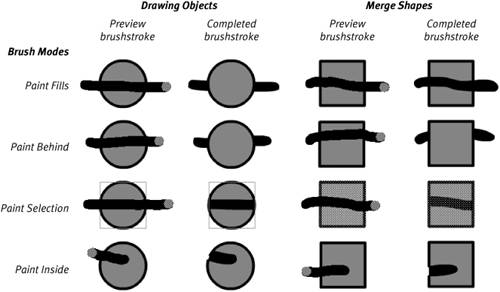
Figure 5.38. The special erase modes control how the eraser deals with strokes and fills. 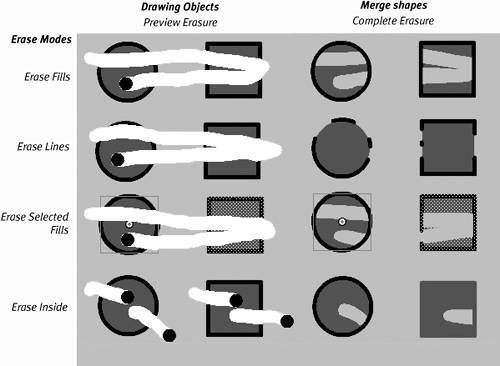
Note that the Object Drawing button is disabled when you choose one of the special brush modes, and it isn't even an option when you choose the eraser tool. When the brush or eraser is set to Paint/Erase Selected Fills or Paint/Erase Inside, it isn't supposed to affect strokes. However, these tools do occasionally create a gap when they intersect strokes that have a stroke-height setting greater than 1 pixel. If this happens to you, undo your brushstroke or erasure and try it again. Try not to touch the exact same spot in the stroke that left a gap before. The eraser tool in Erase Inside mode does not work on copies of drawing-objects. If you're trying to erase inside a drawing-object and nothing's happening, select the drawing-object and break it apart (choose Modify > Break Apart), then choose Modify > Combine Objects > Union to restore it to drawing-object status. Erase Inside works on the restored drawing-object. In the special paint modes, the paint brush tool always creates merge-shapes. This means that some of the names of the special modes can be a bit misleading. Paint Behind can truly paint a full brush stroke behind a drawing-object; but a merge-shape segments the brush stroke (Figure 5.39). Figure 5.39. Using the paint brush tool in one of the special painting modes always creates merge-shape fills. These brush strokes were created in Paint Behind mode. The merge-shape segements the brushstroke, chopping out the middle of the brushstroke shape, the drawing-object doesn't. 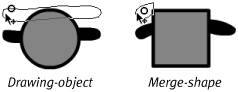
|
|