| If you aren't happy with the position of an element, you can always move it. You can position elements visually by dragging them around on the Stage with the selection tool. You can also position a selection numerically by specifying a precise Stage location in x- and y-coordinates. You can enter the x- and y-coordinates in either the (Shape) Property inspector or the Info panel. To reposition an element via the Properties tab of the Property inspector 1. | With the Properties tab of the Property inspector open, on the Stage, select an element.
The coordinates for the element's current position appear in the x and y fields in the Properties tab, and a labelfor example, Drawing Objectappears, identifying the type of element selected (Figure 4.20).
Figure 4.20. With an element selected on the Stage, the Properties tab of the Property inspector reveals attributes of that element, including the x- and y-coordinates of the upper-left corner (or center) of its bounding box. This drawing-object is located 1 inch to the right along the horizontal axis and 3 inches down the vertical axis. 
| 2. | To position the element, do one or both of the following:
- Enter a new x-coordinate for the element's position along the horizontal axis.
- Enter a new y-coordinate for the element's position along the vertical axis.
| 3. | Press Enter to confirm the last coordinate value you entered.
Whenever you tab to or click another field, or press Enter, Flash confirms your change, and the element moves to its new position (Figure 4.21).
Figure 4.21. Changing the x- and y-coordinates in the Properties tab of the Property inspector changes the location of a selected element. This arrow is now located 2 inches to the right along the horizontal axis and 3.25 inches down the vertical axis. 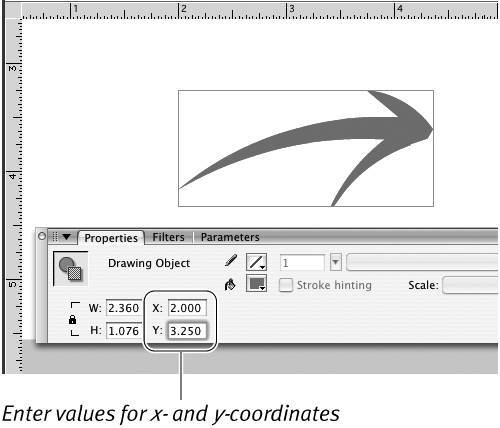
|
Tips for Positioning Elements Visually - Select a shape before trying to move it. You can move unselected shapes by dragging them with the selection tool, but it's easy to mistakenly edit the shape instead (see "Modifying Shapes: Selection Tool," later in this chapter). Selecting a shape ensures that the selection tool will activate its move icon (not the curve or corner point icon) when you click and drag. An outline preview of the shape helps you position the element as you drag it.
- Turn on rulers (View > Rulers) to help position elements. As you drag an element around the Stage, markers indicating the height and width of the element's bounding box appear in the ruler area (Figure 4.22). (To learn more about bounding boxes, see the sidebar "How Flash Tracks Elements.")
Figure 4.22. The longer lines in the ruler area indicate the edges of the element you're dragging. 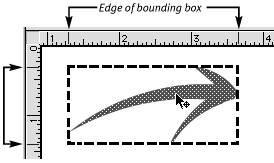
- When Snap Align is active, as it is by default, Flash displays guidelines for aligning your selection with other objects on the Stage as you drag (Figure 4.23). (To learn more about Snap settings, see Chapter 1.)
Figure 4.23. With Snap Align turned on, Flash displays guidelines as you drag a selection when you have more than one element on the Stage. 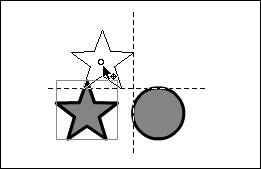
- Use the four arrow keys on the keyboard to move selected elements precisely; the amount depends on the magnification at which you view the Stage. At 100% magnification, the arrows move items in 1-pixel increments; at 200% magnification, it's 0.5-pixel increments. With Snap to Pixels active, the arrows move items in 1-pixel increments regardless of the Stage magnification.
- To beef up the arrow keys' ability to move selected elements, hold down the Shift key. When viewing the Stage at 100% magnification, each press of Shift-arrow moves a selected element 10 pixels.
|
How Flash Tracks Elements To keep track of an element's size and position on the Stage, Flash encloses each element in a bounding boxan invisible rectangle just big enough to hold the element. Flash then treats the Stage as a giant graph, with the top-left corner of the Stage as the center of the x- and y-axis (Figure 4.24). Flash locates elements by means of x- and y-coordinates on that graph. The units of measure for the graph are those currently selected in the Document Properties dialog (to learn more about document properties, see Chapter 1). The Property inspector and the Info panel show you the x- and y-coordinates for an element's current position and also display the height and width of the element's bounding box. Figure 4.24. The dotted line here represents the x-y axis of the Stage. The originthe 0 point both horizontally and verticallyis the top-left corner of the Stage. 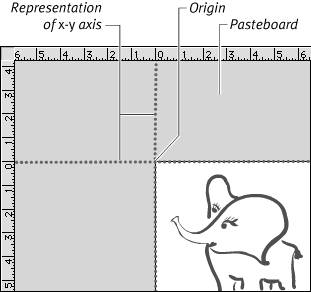
By entering new x- and y-coordinates and values for Height and Width in the Properties tab of the Property inspector or the Info panel, you can change an element's position and size. (For more information about resizing elements, see "Resizing Graphic Elements," earlier in this chapter.) For authoring purposes, Flash calculates an element's position on the Stage either from the top-left corner of the element's bounding box or from the element's transformation point. For shapes, text boxes, and groups, the transformation point is at the exact center of the bounding box; you can set the point's location for symbols and create different settings for individual symbol instances (see Chapter 7). Whether Flash uses the top-left corner or the transformation point, depends on the current setting of the Info panel's coordinate grid (the little nine-squares diagram). To determine which part of a graphic element the x- and y-coordinates refer to, choose the desired point in the Info panel's coordinate grid. Click the grid's top-left square to position elements by the top-left corner of the bounding box. Click the central square to position elements by the transformation point. The coordinate-grid setting applies to the coordinate you enter in both the Info panel and the Properties tab of the Property inspector. The setting remains in effect for all graphic elements until you change it in the Info panel. When you use ActionScript to dynamically move symbols at runtime, the rules for calculating an item's position are different, but that's beyond the scope of the tasks you'll be working on in the book. |
|