| Flash allows you to work with paragraph formatting much as you would in a word processor. The Text (Tool) Properties tab of the Property inspector lets you set right and left margins, a first-line indent, line spacing, and alignment (flush left, flush right, centered, or justified) (Figure 3.14). You can set paragraph attributes in advance so that as you type, the text tool applies them automatically. And you can apply paragraph attributes to existing text. The text tool uses whatever settings currently appear in the Text (Tool) Properties tab of the Property inspector. Figure 3.14. In the Text (Tool) Properties tab of the Property inspector, click the Edit Format Options button (top) to access a dialog for setting text attributes such as alignment, indents, margins, and space between lines of text (bottom). 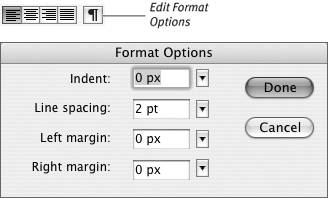
In the following tasks, you learn to modify existing text; keep the Properties tab of the Property inspector open. (Choose Window > Properties > Properties if it's not already open.) To select paragraphs to modify Do one of the following: - With the text tool, click within the paragraph you want to modify.
- With the text tool, click and drag to select multiple paragraphs within one text box.
- With the selection tool, click a text box to select all the paragraphs within the box.
To set paragraph alignment 1. | Select the paragraphs you want to modify.
| 2. | In the Text Properties tab of the Property inspector, do one of the following (Figure 3.15):
- To align horizontal text on the left (vertical text on the top), click the first alignment button.
- To center horizontal or vertical text, click the second alignment button.
- To align horizontal text on the right (vertical text on the bottom), click the third alignment button.
- To justify text (force all lines except the last line of a paragraph to fill the full column width), click the fourth alignment button.
Figure 3.15. The paragraph-alignment buttons allow you to format the text of a paragraph in four ways. A graphic representation of the selected paragraph-alignment style appears on each button in the Text (Tool) Properties tab of the Property inspector. The images on the buttons reflect whether the text box is set for horizontal (top) or vertical (bottom) text flow. 
|
 Tip Tip
To set margins 1. | In the Text (Tool) Properties tab of the Property inspector, click the Edit Format Options button (the one with the paragraph symbol).
The Format Options dialog appears.
| 2. | In the Left Margin or Right Margin field, enter the desired margin size.
The units of measure used for the margin are the ones set in the Document Properties dialog (see Chapter 1).
| 3. | Click Done (Figure 3.16).
Figure 3.16. You can enter a value for right and left margins (horizontal text) or top and bottom margins (vertical text) directly in the appropriate box of the Format Options dialog (top) or use the slider to select a value (bottom). 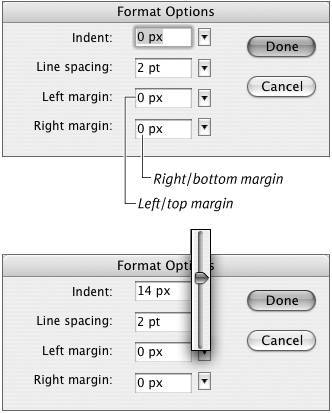
Flash uses the values that you enter to create margins from the left and right sides of the text box. Your audience won't see the margins unless you're creating text that they can edit, in which case you can make the border of the text box visible.
|
Tips For easy entry of new values, click the triangle to the right of the Margin field. A slider pops open. Drag the slider's lever to choose a value between 0 and 720 pixels. Flash incorporates the current margin settings into text boxes as you create them. With margins set to the default (0 pixels), clicking the text tool on the Stage creates a small text box, just large enough for the blinking insertion point. If you get a longer text box than you expect when you click the Stage with the text tool, check your margin settings in the Text (Tool) Properties tab of the Property inspector and adjust them as needed.
To set a first-line indent - In the Format Options dialog, in the Indent field, use the value-entry techniques described in the preceding task to enter a value for indenting the first line of text in the paragraph.
Flash calculates the indent from the left margin; when the left margin is set to 0, Flash measures the indent from the left edge of the text box.
To set line spacing - In the Format Options dialog, in the Line Spacing field, use the value-entry techniques described earlier in this chapter to enter a value for the amount of space you want between lines of text.
If your text contains various point sizes, Flash bases the spacing between two lines on the larger font (Figure 3.17).
Figure 3.17. The line spacing for the text block on the left is set to 0 points. The space you see between lines is the space specified as part of the font. Because the text is all one size, the spacing above and below the middle line of text is the same. In the text block on the rightwith the same 0-point line spacingone letter is a larger point size. Flash increases the space between lines to make room for the larger text 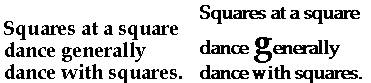
Tip Points are the most common unit of measure for working with type. Regardless of the units you've set in the Document Properties dialog, Flash always enters the line-spacing value with the abbreviation pt (for points). If you're using a font that creates larger line spacing than you like, enter a negative number for line spacing. Acceptable values for the line spacing field are -36 points to 72 points.
|