Using the Text Tool


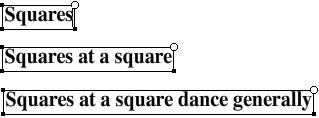
The text tool creates blocks of editable text. You can set the text to read horizontally or vertically. You can also apply a variety of text attributes to textincluding text and paragraph styles.

To create a single line of text for use as a graphic element

1.

In the Tools panel, select the text tool or press T (Figure 3.1).

Figure 3.1. Select the text tool in the Tools panel to start creating text boxes on the Stage.


For this task, use the current settings for type and paragraph styles. You learn to change these settings in upcoming tasks.

2.

Move the pointer over the Stage.

The pointer turns into a crosshair with a letter A in the bottom-right corner (Figure 3.2).

Figure 3.2. The text-tool pointer.


3.

Click the Stage at the spot where you want your text to start.

Flash creates a resizable text box with a blinking insertion point, ready for you to enter text (Figure 3.3).

Figure 3.3. Click the Stage with the text tool to create a text box. The round resize handle indicates that the text box does not have word wrap turned on.


Each corner of the text box has a draggable resize handle; the round handle in the upper-right corner indicates that word wrap hasn't been set on this text box.

4.

Start typing your text.

The text box grows to accommodate whatever you type (Figure 3.4).

Figure 3.4. As you type, the box grows horizontally to accommodate your text. The text won't wrap.


5.

When you finish typing, click elsewhere on the Stage or change tools.

Flash hides the text box, leaving just the text visible. When you click this text with the selection tool, Flash selects the text box so that you can reposition it or change the text's attributes directly.

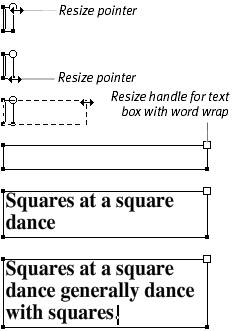
To create a text box with set width and word wrap

1.

With the text tool selected in the Tools panel, click the Stage at the spot where you want your text to start.

2.

Move the pointer over any of the resize handles.

The pointer changes to a double-headed arrow.

3.

Click and drag one of the handles until your text box is as wide as you want it (Figure 3.5).

Figure 3.5. Click and drag any resize handle to create a text box with a specific width. The top-right handle changes to a square, indicating that the text you enter will wrap to fit the column width of the text box. The text box continues to grow in lengthbut not widthas you enter more text.


The resize handle in the upper-right corner changes to a square, indicating that word wrap is set for this text box.

4.

Release the mouse button.

The blinking insertion point appears in the text box.

5.

Enter your text.

Flash wraps the text horizontally to fit inside the column that the text box defines. The box automatically grows longer (not wider) to accommodate your text.

Tips

  • To reposition a text box with the text tool active, position the pointer along the edge of the text box. The pointer changes to the selection arrow. Now you can drag the text box to a new location.

  • To restore a text box to its original state (where text doesn't wrap), double-click the square in the upper-right corner. It changes to the circle that indicates the box will grow horizontally.


Macromedia Flash 8 for Windows & Macintosh Visual QuickStart Guide
Macromedia Flash 8 for Windows & Macintosh
ISBN: 0321349636
EAN: 2147483647
Year: 2005
Pages: 204

flylib.com © 2008-2017.
If you may any questions please contact us: flylib@qtcs.net