| Flash allows you to make limited changes in each instance of a sound in the Edit Envelope window. You can change the start and end point of the sound (that is, cut a piece off the beginning or end of the waveform) and adjust the sound's volume. Flash offers six predefined volume edits: Left Channel, Right Channel, Fade Left to Right, Fade Right to Left, Fade In, and Fade Out. These sound-editing templates create common sound effects, such as making a sound grow gradually louder (Fade In) or softer (Fade Out), or (for stereo sounds) making the sound move from one speaker channel to the other. In addition to changing a sound's volume, you can make a sound shorter by instructing Flash to remove sound data from the beginning, the end, or both. To assign packaged volume effects 1. | Open the document you created in the preceding task (RepeatSnds.fla).
This is a 5-frame movie with an event sound that loops three times within those frames.
| 2. | In the Timeline, select keyframe 1.
This frame contains the sound Drip.AIFF.
| 3. | In the sound area of the Frame Properties tab of the Property inspector, click the Edit button.
The Edit Envelope window appears, displaying the waveform of the sound from keyframe 1 (Figure 15.43).
Figure 15.43. Flash lets you perform simple sound editingfor length and volumein the Edit Envelope window. 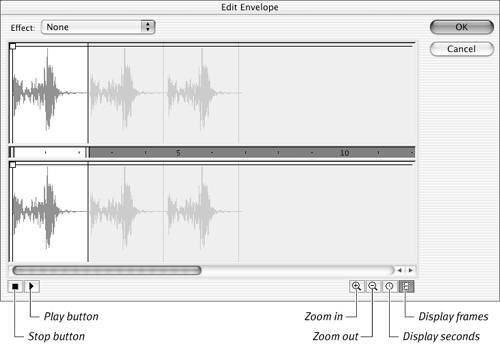
| 4. | In the Edit Envelop window, click the Display Frames button.
The window can measure the length of the sound in seconds or in frames. Clicking the film-strip icon in the lower-right corner of the window sets the units to frames; clicking the clock icon sets the units to seconds.
| 5. | From the Effect pop-up menu, choose Fade In (Figure 15.44).
Figure 15.44. The Effect pop-up menu in the Edit Envelope window offers six templates for common sound effects that deal with volume. Choose Fade In to make the sound start soft and grow in volume. 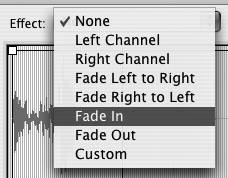
Flash adjusts the sound envelope (Figure 15.45). When the envelope line is at the top of the window, Flash plays 100 percent of the available sound. When the envelope line is at the bottom of the window, Flash plays 0 percent of the available sound.
Figure 15.45. The Fade In effect brings the sound's envelope down to 0 percent (the bottom of the sound-editing window) at the start of the sound and quickly raises it to 100 percent (the top of the sound-editing window). 
| 6. | Click the Play button to hear the sound with its fade-in effect.
The first iteration of the sound starts soft and grows louder. The repetitions play at full volume.
| 7. | Click OK.
Flash returns you to document-editing mode.
|
 Tip Tip
To customize volume effects 1. | Follow steps 13 in the preceding task.
| 2. | From the Effect pop-up menu, choose Custom (Figure 15.46).
Figure 15.46. To edit the volume of a sound yourself, from the Effect pop-up menu in the Edit Envelope window, choose Custom. 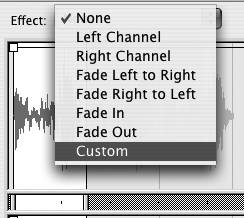
| 3. | In the Edit Envelope window, drag the square envelope handles that appear at the beginning of the sound in both channels down to 0 percent.
| 4. | In the right channel (the top section of the window), click the waveform at three places to set a different level for each repetition of the sound; for this sound, add handles near the marks for frames 2, 4, and 5.
Flash adds envelope handles so both channels have four handles.
| 5. | In the right-channel window, drag the second handle up to the 50 percent volume level (Figure 15.47).
Figure 15.47. Click the waveform in the sound-editing window to add a handle. Drag the handle to adjust the sound envelope. You can make the sound envelope the same or different for both channels. For monaural sounds, both waveforms are identical. 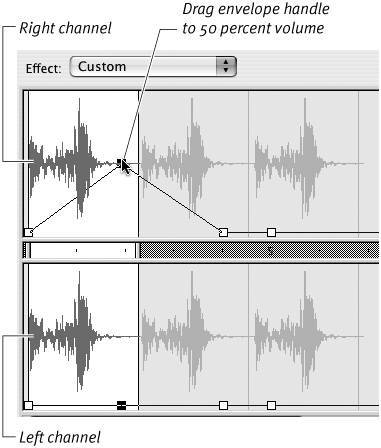
| 6. | Repeat step 5 for the left channel.
| 7. | In both channels, drag the third handle to the 50 percent level and the fourth handle to the 100 percent level (Figure 15.48).
Figure 15.48. You can use up to eight handles to shape a sound's envelope. By using the zoom tools to view more of the sound in the Edit Envelope window, you can see the sound envelope for all three iterations of the sound. The first fades in, the second plays at 50 percent volume, and the third plays at full volume. 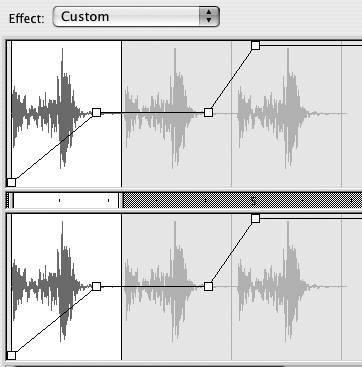
You can use as many as eight handles to create a variety of volume changes within one sound.
| 8. | Click the Play button to hear the sound with its fade-in effect.
Flash fades in the first iteration of the sound, plays the second iteration at half volume, and plays the third iteration at full volume.
| 9. | Click OK.
|
Tips To remove unwanted envelope handles, drag them out of the sound-editing window. When you add a handle to one channel, Flash automatically adds another to the same location in the other channel. To create different volumes from the two channels, however, you can drag the handle to a different level in each channel. You can start with one of the preset effects and build on it to create a custom effect. Choose the effect from the Effect menu in the Edit window; Flash sets the handles for that effect. Add envelope handles or reposition the existing handles; Flash switches the Effect menu to Custom and uses the new settings for the sound in this keyframe.
To edit sounds for length 1. | Using the movie you created in the preceding task, select keyframe 1.
| 2. | To access the Edit Envelope window, in the Frame Properties tab of the Property inspector, click the Edit button.
| 3. | In the Edit Envelope window, drag the time-out control to the place where the waveform goes flat (Figure 15.49).
Figure 15.49. Flash lets you trim the beginning and end of a sound in the Edit Envelope window. Here, dragging the time-out control clips off the end of the sound where the wave's amplitude is smaller, almost a flat line. (The small amplitude indicates very soft sound or silence). 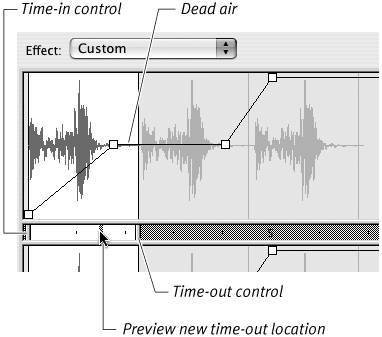
Flash shortens the sound in both channels (Figure 15.50).
Figure 15.50. After you reposition the time-out control, the new, shorter waveform appears in the Edit Envelope window. 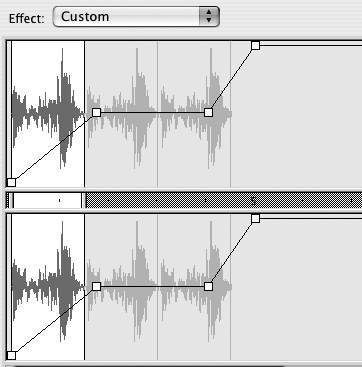
| 4. | Click OK.
Flash returns you to document-editing mode. Now all three iterations of the repeating sound are visible in the Timeline (Figure 15.51).
Figure 15.51. After you shown the sound, all three iterations fit into the 5-framme movie. 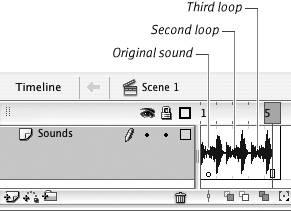
|
Tips To remove dead air from the beginning of a sound, drag the time-in control. Flash dims the initial portion of the sound's waveform to indicate that it won't play. Although you can change the start and end points of a sound in Flash, you still have the whole sound taking up room in your movie file. If you find yourself trimming many sounds in Flash, consider investing in a sound-editing program that allows you to leave the excess on the cutting-room floor rather than behind the curtains in Flash.
|