| You can assign a sound to a keyframe the same way you place a symbol or bitmap: by selecting the keyframe and then dragging a copy of the sound from an open Library panel (either that document's or another's) to the Stage. You can also assign any sound that resides in a document's library to a selected keyframe in that document by choosing the sound from the Sound pop-up menu in the Frame Properties tab of the Property inspector. To assign a sound to a keyframe 1. | Open a Flash document to which you want to add sound.
The Ping-Pong animation you created in Chapter 11 makes a good practice file. The document contains four keyframes in which a ball connects with a paddle. Adding sound can heighten the reality of that contact: You can make the sound realistic (say, a small thwock) or make it humorous, if the sound is unexpected (a boing, for example).
| 2. | Add a new layer for the sounds in your document, and name it Sound.
For more details on how to set up a sound layer, see the sidebar "Tips for Organizing Sounds."
| 3. | In the Timeline, select the Sound layer, and add keyframes at frames 5, 10, 15, and 20.
These four keyframes match the keyframes in which the ball hits one of the paddles in the animation (Figure 15.4).
Figure 15.4. Create a separate layer for the sounds in your movie. In that layer, add a keyframe at each place where you want a sound to occur. Here, the keyframes in the Sound layer correspond to the keyframes in other layers where the ball makes contact with a paddle. 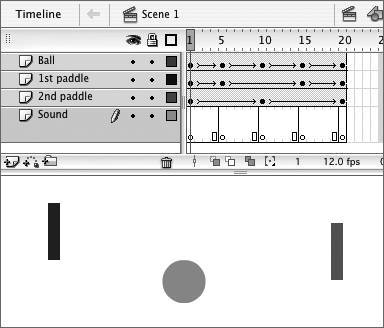
| 4. | Import the sound you want to hear when the paddle connects with the ball.
For more detailed instructions, follow the steps in "Importing Sounds" earlier in this chapter. If you don't have your own stock of sound clips, you can download a sound clip named BallHit from the companion Web site for this book. (Click the Files link at http://www.peachpit.com/vqs/flash8 to find the materials for this chapter.)
| 5. | In the Timeline, select keyframe 5 of the Sound layer.
This is the first frame in which the ball and paddle connect.
| 6. | Access the Library panel, and select your sound (Figure 15.5).
Figure 15.5. After you've imported a sound, it appears in the Library panel. Select the sound, and drag it to a keyframe. 
Its waveform appears in the preview window.
| 7. | Drag a copy of the sound from the Library panel to the Stage.
Although sounds have no visible presence on the Stage, you must drag the sound copy to the Stage. As you drag the sound, you see the outline of a box on the Stage. When you release the mouse button, Flash puts the sound in the selected keyframe and displays the waveform in that keyframe and any in-between frames associated with it (Figure 15.6).
Figure 15.6. When you drag a sound from the Library panel to the Stage, you see the symbol outline (top). A sound has no visible presence on the Stage, but Flash displays the sound's waveform in the Timeline (bottom). 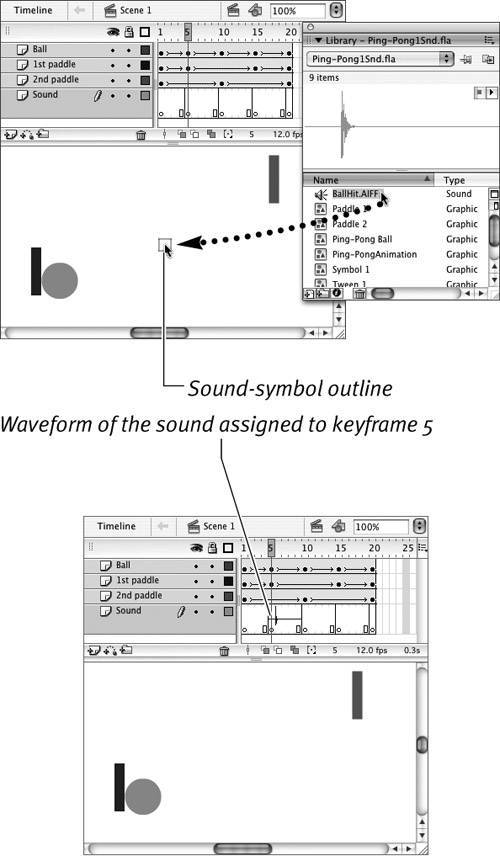
| 8. | In the Timeline, select keyframe 10 of the Sound layer.
This is the second frame in which the ball and paddle connect.
| 9. | Access the Frame Properties tab of the Property inspector.
| 10. | From the Sound pop-up menu, choose your sound.
All the sounds in the document's library are available from the Frame Properties tab of the Property inspector's Sound pop-up menu (Figure 15.7). You don't have to drag a copy of the sound to the Stage each time you want to turn on that sound in a keyframe.
Figure 15.7. In the Frame Properties tab of the Property inspector, the Sound pop-up menu lists all the sounds that are in the library of the current document. From this menu, you can choose a sound that you want to assign to the keyframe that's selected in the Timeline. 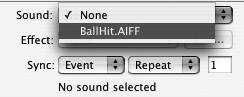
For now, leave the other settings in the Frame Properties tab of the Property inspector alone. You learn more about them in later tasks.
| 11. | Repeat steps 6 and 7 (or 8, 9, and 10) for keyframes 15 and 20.
After adding the sound to the four keyframes, you're ready to play the movie and check out the sounds (Figure 15.8). As each paddle strikes the ball, Flash plays the assigned sound, adding a level of realism to your simple Ping-Pong animation.
Figure 15.8. For each spot in the movie where a sound should occur, add a sound to a keyframe in the sound layer. A condensed image of the sound's waveform appears in the keyframe span. Within a single keyframe, you won't see much of the waveform; in keyframe 20, for example, just the initial line is visible. 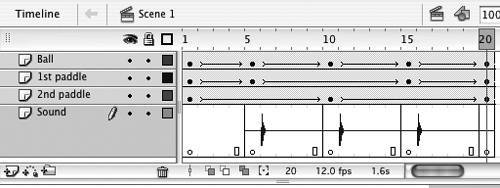
|
 Tip Tip
If you want to try adding sounds to your Flash projects, but you don't have the equipment to record your own, lots of copyright-free sounds are available. You can purchase CDs of sounds for use in projects; there are also online sites with downloadable sounds. Just make sure the sounds are copyright free before you download them for use in your own project.
Tips for Organizing Sounds Nothing prevents you from placing sounds in layers that contain other content, but your document will be easier to handleand sounds will be easier to find for updating and editingif you always put sounds in separate layers reserved for your soundtrack. Here are some tips for working with layers for sounds: - Name layers as a reminder of their content. For detailed instructions on working with layers, see Chapter 6.
- Place all your sound layers either at the bottom of the Timeline or at the top, so you can find them easily. The position of layers in the stacking order has no effect on the playback of sounds in the movie.
- Create a layer folder for sounds. Flash Player 8 (you'll learn about publishing for Flash Player in Chapter 16) can handle up to 32 sounds playing at one time (earlier Flash Player versions can handle up to 8 simultaneous sounds). If you put each sound on a separate layer, that's a lot to track. If you'll be working with lots of sound layers, create a layer folder, and name it SoundTracks. Placing all the sound layers in the SoundTracks folder makes it easier to track the sounds (Figure 15.9)
Figure 15.9. It's best to keep sounds in separate layers from the graphics and actions in your movie. To organize multiple sound layers, place them in a separate layer folder. Increasing layer height lets you see the sounds' waveforms more easily. 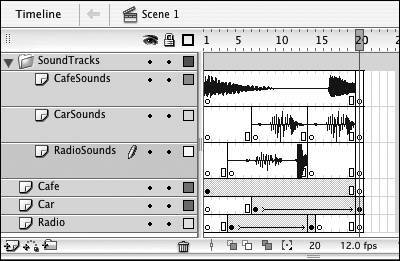
- Increase the height for sound layers to make it easier to see the waveform (a graphic image of the sound) for that layer. Choose Modify > Timeline > Layer (or double-click the layer icon of the selected layer) to access the Layer Properties dialog. From the Layer Height pop-up menu, choose 200% or 300% to make the layer taller. Click OK.
- After you've placed sounds in a layer, lock the layerto prevent yourself from adding graphics to it accidentallyby clicking the bullet in the column below the padlock icon.
|
|