Enabling Extension Support Many PHP configuration options can be altered by just editing the php.ini file. But enabling (or disabling) an extensionin other words, adding support for extended functionalityrequires more effort. To enable support for an extension for just a single PHP page, you can use the dl() function. To enable support for an extension for all PHP scripts requires a bit of work. Unfortunately, for Unix and Mac OS X users, you'll need to rebuild PHP with support for this new extension. Windows users have it easier: First, edit the php.ini file (see the steps in this section), removing the semicolon before the extension you want to enable. For example, to enable MySQL support, you'll need to find the line that says ;extension=php_mysql.dll
and remove that semicolon. Next, find the line that sets the extension_dir and adjust this for your PHP installation. Assuming you installed PHP into C:\php, then your php.ini file should say extension_dir = "C:/php/ext"
or extension_dir = "C:\\php\\ext"
This tells PHP where to find the extension. (The two backslashes are required because a single backslash has special meaning in PHP.) Save the php.ini file and restart your Web server. If the restart process indicates an error finding the extension, double-check to make sure that the extension exists in the extension_dir and that your pathnames are correct. |
If you have installed PHP on your own computer, then you also have the ability to configure how PHP runs. Changing PHP's behavior is very simple and will most likely be required at some point in time. Just a few of the things you'll want to consider adjusting are Whether or not display_errors is on The default level of error reporting The Magic Quotes settings Support for MySQL and the Improved MySQL Extension functions
What each of these meansif you don't already knowis covered in the book's chapters and in the PHP manual. But for starters, I would highly recommend that you make sure that display_errors is on. The short version of the configuration process is: edit the php.ini file and then restart the Web server. But because many different problems can arise, I'll cover configuration in more detail. If you are looking to enable support for an extension, like the MySQL functions, the configuration is more complicated (see the sidebar). To configure PHP 1. | Run a phpinfo() script (see the previous section) in your Web browser.
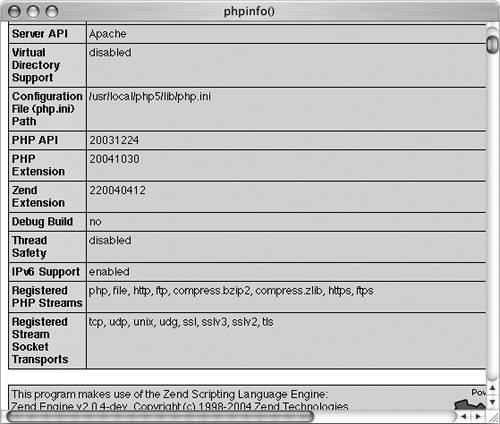
| 2. | In the resulting page, look for the line that says "Configuration File (php.ini) Path" (Figure A.27).
Figure A.27. The Configuration File value tells you which php.ini file is used for configuration purposes. 
It should be about six rows down in the table.
| 3. | Note the location of your php.ini file.
This is the active file PHP is using. Your server may have multiple php.ini files on it, but this is the one that counts.
If you don't have a php.ini file on your server (if the value is blank in the phpinfo.php script), create one by following these steps:
Download the complete source code from www.php.net/downloads.php.
Extract the source so that you now have a folder of files.
Find the php.ini-dist file, located within the main folder.
Rename this file as php.ini and move it to the proper directory (where PHP thinks the php.ini file should be).
| 4. | Open the php.ini file in any text editor.
If you are using Mac OS X, you do not have easy access to the php.ini directory. You can either use the Terminal to access the file, open it using BBEdit's Open Hidden option, or use something like TinkerTool to show hidden files in the Finder.
If you go to the directory listed and there's no php.ini file there, follow the sequence in Step 3 to create one.
| 5. | Make any changes you want, keeping in mind the following:
Comments are marked using a semicolon. Anything after the semicolon is ignored. Instructions on what most of the settings mean are included in the file. The top of the file lists general information with examples. Do not change these values! Change the settings where they appear later in the file. For safety purposes, don't change any original settings. Just comment them out (by preceding the line with a semicolon) and then add the new, modified line afterward. Add a comment (using the semicolon) to mark what changes you made and when. For example:
; register_globals = Off register_globals = On ; Added by  LEU 4/8/2005 LEU 4/8/2005
| 6. | Save the file.
| 7. | Restart the Web server (Apache, IIS, Xitami, etc.).
You do not have to restart the entire computer, just the Web serving application (Apache, IIS, etc.). How you do this depends upon the application being used, the operating system, and the installation method. Windows users can follow the instructions at the end of the Windows installation sequence. Mac OS X users can stop and then start Personal Web Sharing (under System Preferences > Sharing). Unix users can normally just enter apachectl graceful in a Terminal window.
| 8. | Rerun the phpinfo.php script to make sure the changes took effect.
|
 Tips Tips
Any changes to PHP's (or Apache's) configuration file do not take effect until you restart Apache. Always make sure that you restart the Web server to enact changes! Editing the wrong php.ini file is a common mistake. This is why I recommend that you run a phpinfo.php script to see which php.ini file PHP is using.
|

 LEU 4/8/2005
  Tips
Tips