| The final aspect of the public side of this site is the management of passwords. There are two processes to consider: resetting a forgotten password and changing an existing one. Resetting a password It inevitably happens that people forget their login passwords for Web sites, so having a contingency plan for these occasions is important. One option would be to have the user email the administrator when this occurs, but administering a site is difficult enough without this extra hassle. Thus, I will make a script whose purpose is to reset a forgotten password. Because the passwords stored in the database are encrypted using MySQL's SHA() function, there's no way to retrieve an unencrypted version. The alternative is to create a new, random password and change the existing password to this value. Rather than just display the new password in the Web browser (that would be terribly insecure), it will be emailed to the address with which the user registered. To write forgot_password.php 1. | Create a new document in your text editor and include the necessary files (Script 13.10).
<?php # Script 13.10 -  forgot_password.php require_once ('./includes/config. forgot_password.php require_once ('./includes/config.  inc.php); $page_title = 'Forgot Your Password'; include ('./includes/header.html'); inc.php); $page_title = 'Forgot Your Password'; include ('./includes/header.html');
Script 13.10. The forgot_password.php script allows users to reset their password without administrative assistance.  
| 2. | Check if the form has been submitted and validate the email address.
if (isset($_POST['submitted'])) { require_once ('../mysql_connect. php); if (empty($_POST['email'])) { $uid = FALSE; echo '<p><font color="red" size="+1>You forgot to enter your email address!</font> </p>'; } else { $query = "SELECT user_id FROM users WHERE email='". escape_ data($_POST['email]) . "'"; $result = mysql_query ($query) or trigger_error("Query: $query\n<br />MySQL Error: " . mysql_error()); if (mysql_num_rows($result) == 1) { list($uid) = mysql_fetch_ array ($result, MYSQL_NUM); } else { echo '<p><font color="red" size="+1>The submitted email address does not match those on file!</font> </p>'; $uid = FALSE; } }
This form will take an email address input and update the password for that record. The first step is to validate that an email address was entered (there's no need for the extra overhead of a regular expression). Second, an attempt is made to retrieve the user ID for that email address in the database. If no such record could be found, an error message is displayed (Figure 13.24). I'll be using $uid (user ID) as my flag variable, as I'll need this value in order to update the password in the database.
Figure 13.24. If the user entered an email address that is not found in the database, an error message is shown. 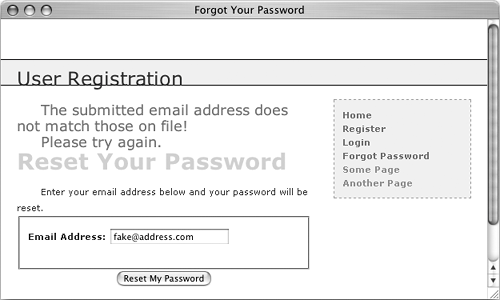
| 3. | Create a new, random password.
if ($uid) { $p = substr ( md5(uniqid(rand (),1)), 3, 10);
To create a new, random password, I'll make use of four PHP functions. The first is uniqid(), which will return a unique identifier. It is fed the arguments rand() and 1, which makes the returned string more random. This returned value is then sent through the md5() function, which calculates the MD5 hash of a string. At this stage, a hashed version of the unique ID is returned, which ends up being a string 32 characters long.
From this string, the password is determined by pulling out 10 characters starting with the third one, using the substr() function. All in all, this code will return a very random and meaningless 10-character string (containing both letters and numbers) to be used as the temporary password.
| 4. | Update the password in the database.
$query = "UPDATE users SET pass=SHA ('$p) WHERE user_id=$uid"; $result = mysql_query ($query) or trigger_error("Query: $query\n <br />MySQL Error: " . mysql_error()); if (mysql_affected_rows() == 1) { $body = "Your password to log into SITENAME has been temporarily changed to '$p. Please log in using this password and your username. At that time you may change your password to something more familiar."; mail ($_POST['email'], 'Your temporary password.', $body, 'From: admin@sitename.com); echo '<h3>Your password has been changed. You will receive the new, temporary password at the email address with which you registered. Once you have logged in with this password, you may change it by clicking on the "Change Password link.</h3>'; mysql_close(); include ('./includes/footer. html); exit();
Using the user ID (the primary key for the table) that was retrieved earlier, the password for this particular user is updated to the SHA() version of $p, the random password. Then an email is sent to the user and a message is printed (Figure 13.25).
Figure 13.25. The resulting page after successfully resetting a password. 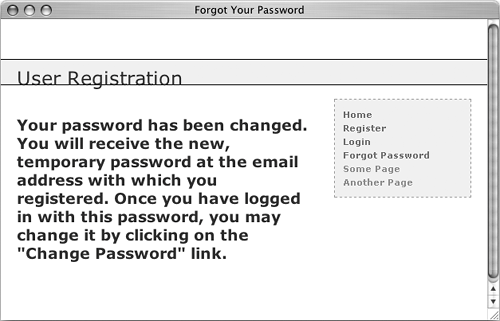
| 5. | Complete the conditionals and the PHP code.
} else { echo '<p><font color="red" size="+1>Your password could not be changed due to a system error. We apologize for any inconvenience.</font></p>'; } } else { echo '<p><font color="red" size="+1>Please try again. </font></p>'; } mysql_close(); } ?>
| 6. | Make the HTML form (Figure 13.26).
<h1>Reset Your Password</h1> <p>Enter your email address below and your password will be reset. </p> <form action="forgot_password.php" method="post> <fieldset> <p><b>Email Address:</b> <input type="text name="email" size="20 maxlength="40" value="<?php if (isset($_POST ['email])) echo $_POST ['email]; ?>" /></p> </fieldset> <div align="center"><input type= "submit name="submit" value= "Reset My Password /></div> <input type="hidden" name= "submitted value="TRUE" /> </form>
Figure 13.26. The simple form for resetting a password. 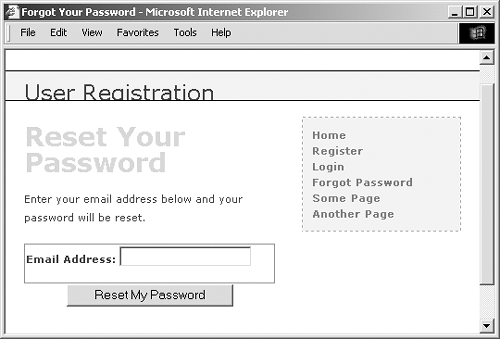
The form takes only one input, the email address. If there is a problem when the form has been submitted (see Figure 13.24), the submitted email address value will be shown again.
| 7. | Include the HTML footer.
<?php include ('./includes/footer.html'); ?>
| 8. | Save the file as forgot_password.php, upload to your Web server, and test in your Web browser.
| 9. | Check your email to see the resulting message after a successful password reset (Figure 13.27).
Figure 13.27. The email message received after resetting a password. 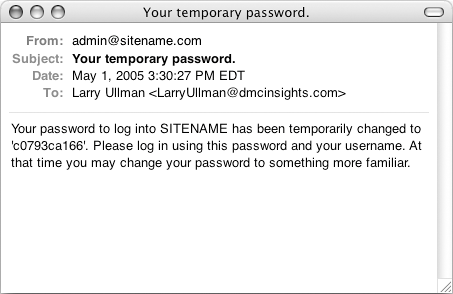
|
Changing a password The change_password.php script was initially written in Chapter 7 (called just password.php), as an example of an UDPATE query. The one developed here will be very similar in functionality but will differ in that only users who are logged in will be able to access it. Therefore, the form will only need to accept the new password and a confirmation of it (the user's existing password and email address will have already been confirmed by the login page). To write change_password.php 1. | Create a new document in your text editor and include the necessary files (Script 13.11).
<?php # Script 13.11 - change_password.php require_once ('./includes/config. inc.php); $page_title = 'Change Your Password'; include ('./includes/header.html');
Script 13.11. With this page, users can change an existing password (if they are logged in). 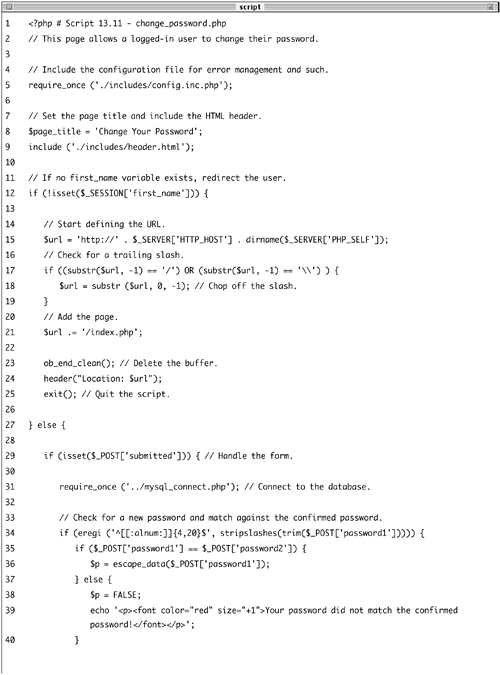  
| 2. | Check that the user is logged in.
if (!isset($_SESSION['first_name'])) { $url = 'http://' . $_SERVER ['HTTP_HOST] . dirname($_SERVER ['PHP_SELF]); if ((substr($url, -1) == '/') OR (substr($url, -1) == '\\') ) { $url = substr ($url, 0, -1); } $url .= '/index.php'; ob_end_clean(); header("Location: $url"); exit();
The assumption will be that this page is accessed only by logged-in users. To enforce this idea, the script checks for the existence of the $_SESSION['first_name'] variable. If it is not set, then the user will be redirected.
| 3. | Check if the form has been submitted and include the MySQL connection.
} else { if (isset($_POST['submitted'])) { require_once ('../mysql_ connect.php);
The key to understanding how this script functions is that there are three possible scenarios: the user is not logged in (and therefore redirected), the user is logged in and viewing the form, and the user is logged in and has submitted the form.
This else clause takes effect if the user is logged in, in which case the script then needs to determine if the form has been submitted or not.
| 4. | Validate the submitted password.
if (eregi ('^[[:alnum:]]{4,20}$', stripslashes(trim($_POST ['password1])))) { if ($_POST['password1'] == $_POST ['password2]) { $p = escape_data($_POST ['password1]); } else { $p = FALSE; echo '<p><font color="red" size="+1>Your password did not match the confirmed password!</font></p>'; } } else { $p = FALSE; echo '<p><font color="red" size="+1>Please enter a valid password!</font></p>'; }
The new password should be validated using the same tests as those in the registration process. Error messages will be displayed if problems are found (Figure 13.28).
Figure 13.28. As in the registration process, the user's new password must pass the validation routines, otherwise they will see error messages. 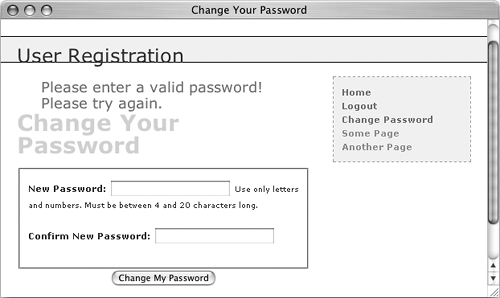
| 5. | Update the password.
if ($p) { $query = "UPDATE users SET pass= SHA('$p) WHERE user_id= {$_SESSION['user_id]}"; $result = mysql_query ($query) or trigger_error("Query: $query\n <br />MySQL Error: " . mysql_error()); if (mysql_affected_rows() == 1) { echo '<h3>Your password has been changed.</h3>'; mysql_close(); include ('./includes/footer. html); exit(); } else { echo '<p><font color="red" size="+1>Your password could not be changed due to a system error. We apologize for any inconvenience.</font> </p>'; }
Using the user's IDstored in the session when the user logged inthe password field can be updated in the database. If the update worked, a confirmation message is printed to the Web browser (Figure 13.29).
Figure 13.29. The script has successfully changed the user's password. 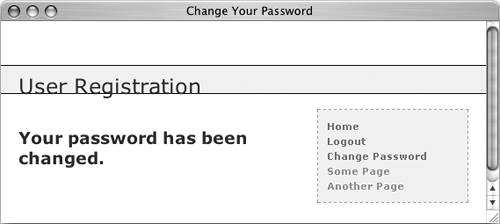
| 6. | Close the database connection and complete the conditionals and the PHP code.
} else { echo '<p><font color="red" size="+1>Please try again. </font></p>'; } mysql_close(); } ?>
| 7. | Create the HTML form (Figure 13.30).
<h1>Change Your Password</h1> <form action="change_password.php" method="post> <fieldset> <p><b>New Password:</b> <input type="password name="password1" size="20 maxlength="20" /> <small>Use only letters and numbers. Must be between 4 and 20 characters long.</small></p> <p><b>Confirm New Password:</b> <input type="password name="password2 size="20" maxlength="20 /></p> </fieldset> <div align="center"><input type= "submit name="submit" value= "Change My Password /></div> <input type="hidden" name= "submitted value="TRUE" /> </form>
Figure 13.30. The Change Your Password form. 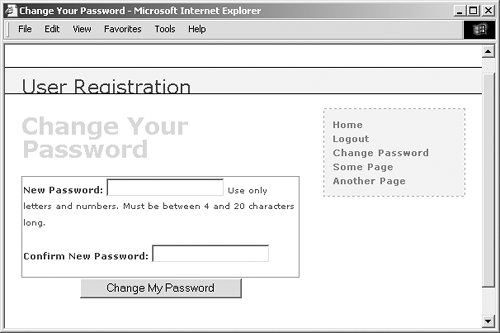
This form takes two inputs: the new password and a confirmation of it. A description of the proper format is given as well.
Since password inputs in HTML forms cannot be given preset values, there's no reason to set them using PHP (to make the form sticky).
| 8. | Complete the HTML page.
<?php } include ('./includes/footer.html'); ?>
| 9. | Save the file as change_password.php, upload to your Web server, and test in your Web browser.
|
 Tips Tips
Once this script has been completed, users can reset their password with the previous script and then log in using the temporary, random password. After logging in, users can change their password back to something more memorable with this page. The mysql_affected_rows() function will return 0 if an UPDATE query does not actually alter the value of any column in a record. For this reason, if users attempt to change their password but use their current password as the new one, this page will do nothing. Hopefully, this limitation should not be a problem, but you can rewrite the messages and error handling to allow for this possibility. Because the site's authentication does not rely upon the user's password from page to page (in other words, the password is not checked on each subsequent page after loggin in), changing a passward will not require the user to log back in.
Site Administration For this application, how the site administration works depends upon what you want it to do. For starters, you could add an administrator column to the users table (an unsigned TINYINT), indicating which users are administrators (1 for administrators, 0 for common users). Then, when you logged in as an administrator, different links could appear. One additional page you would probably want would be a view_users.php script, like the one created in Chapter 7 and modified in Chapter 8. You could use this to link to an edit_user.php page, which would allow you to manually activate an account or change a person's password. You could also delete a user using such a page. |
|