| Versions 4 and 4.1 of MySQL have been significant upgrades, adding many new features to the database application. Although you do not need to use all of these new features with every Web application you develop, in the right circumstances they'll make a world of difference. I'll discuss and demonstrate the most important additions here. First up are transactions, which require the InnoDB storage engine (see Chapter 5, "Advanced SQL and MySQL," for information on the different storage engines). If you are using version 4.0 or later, you should have the InnoDB type available to you. After that, I'll go over prepared statements. These are available as of MySQL 4.1, and you can run prepared statements through PHP using the Improved MySQL Extension, added in PHP 5. I'll also briefly give mention to, but not go into any detail over, subqueries. Using transactions A database transaction is a sequence of queries run during a single session. For example, you might insert a record into one table, insert another record into another table, and maybe run an update. Without using transactions, each individual query takes effect immediately and cannot be undone. With transactions, you can set start and stop points and then enact or retract all of the queries as needed (for example, if one query failed, all of the queries can be undone). Commercial interactions commonly require transactions, even something as basic as transferring $100 from my bank account to yours. What seems like a simple process is actually several steps: Confirm that I have $100 in my account. Decrease my account by $100. Increase the amount of money in your account by $100. Verify that the increase worked.
If any of the steps failed, I would want to undo all of them. For example, if the money couldn't be deposited in your account, it should be returned to mine until the entire transaction can go through. To perform transactions with MySQL, you must use the InnoDB table type (or storage engine). To begin a new transaction in the mysql client, type START TRANSACTION;
If you are using a version of MySQL prior to 4.0.11, you must use just BEGIN instead. Once your transaction has begun, you can now run your queries. Once you have finished, you can either enter COMMIT to enact all of the queries or ROLLBACK to undo the effect of all of the queries. After you have either committed or rolled back the queries, the transaction is considered complete, and MySQL returns to an autocommit mode. This means that any queries you execute take immediate effect. To start another transaction, just type START TRANSACTION (or BEGIN). It is important to know that certain types of queries cannot be rolled back. Specifically those that create, alter, truncate (empty) or delete tables or create or delete databases cannot be undone. Furthermore, using such a query has the effect of committing and ending the current transaction. Finally, you should understand that transactions are particular to each connection. So one user connected through the mysql client has a different transaction than another mysql client user, both of which are different than a connected PHP script. With this in mind, I'll run through a very trivial use of transactions within the mysql client here. In Chapter 14, transactions will be run through a PHP script. To perform transactions 1. | Connect to the mysql client and select the test database.
Since this is just a demonstration, I'll use the all-purpose test database.
| 2. | Create a new accounts table (Figure 11.20).
CREATE TABLE accounts ( id INT UNSIGNED NOT NULL  AUTO_INCREMENT, name VARCHAR(40) NOT NULL, balance DECIMAL(10,2) NOT NULL DEFAULT 0.0, PRIMARY KEY (id) ) ENGINE=InnoDB; AUTO_INCREMENT, name VARCHAR(40) NOT NULL, balance DECIMAL(10,2) NOT NULL DEFAULT 0.0, PRIMARY KEY (id) ) ENGINE=InnoDB;
Figure 11.20. A new table is created within the test database for the purposes of demonstrating transactions. 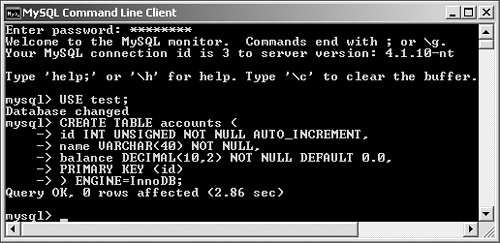
Obviously this isn't a complete table or database design. For starters, normalization would require that the user's name be separated into multiple columns, if not stored in a separate table altogether. But for demonstration purposes, this will be fine.
The most important aspect of the table definition is its engineInnoDB, which allows for transactions.
| 3. | Populate the table.
INSERT INTO accounts (name, balance)  VALUES ('Sarah Vowell, 5460.23), ('David Sedaris, 909325.24), ('Kojo Nnamdi, 892.00); VALUES ('Sarah Vowell, 5460.23), ('David Sedaris, 909325.24), ('Kojo Nnamdi, 892.00);
You can use whatever names and values here that you want. The important thing to note is that MySQL will automatically commit this query, as no transaction has begun yet.
| 4. | Begin a transaction and show the current table contents (Figure 11.21).
START TRANSACTION; SELECT * FROM accounts;
Figure 11.21. A transaction is begun and the existing table records are shown. 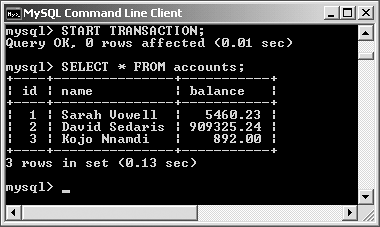
Again, if you are using an earlier version of MySQL you'll need to use just BEGIN instead of START TRANSACTION.
| 5. | Subtract $100 from David Sedaris' (or any user's) account.
UPDATE accounts SET balance= (balance-100) WHERE id=2;
Using an UPDATE query, a little math, and a WHERE conditional, I can subtract 100 from a balance. Although MySQL will indicate that one row was affected, the effect is not permanent until the transaction is committed.
| 6. | Add $100 to Sarah Vowell's account.
UPDATE accounts SET balance= (balance+100) WHERE id=1;
This is the opposite of Step 5, as if $100 were being transferred from the one person to the other.
| 7. | Confirm the results (Figure 11.22).
SELECT * FROM accounts;
Figure 11.22. Two UPDATE queries are executed and the results are viewed. 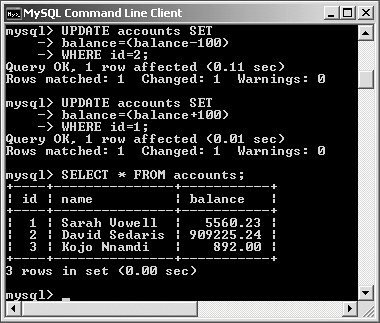
As you can see in the figure, the one balance is 100 more and the other is 100 less then they originally were (Figure 11.21).
| 8. | Roll back the transaction.
ROLLBACK;
To demonstrate how transactions can be undone, I'll undo the effects of these queries. The ROLLBACK commands returns the database back to how it was prior to starting the transaction. The command also terminates the transaction, returning MySQL to its autocommit mode.
| 9. | Confirm the results (Figure 11.23).
SELECT * FROM accounts;
Figure 11.23. Because I used the ROLLBACK command, the potential effects of the UPDATE queries were ignored. 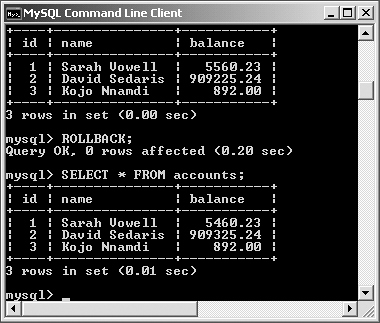
The query should reveal the contents of the table as they original were.
| 10. | Repeat Steps 4 through 6.
To see what happens when the transaction is committed, the two UPDATE queries will be run again. Be certain to start the transaction first, though, or the queries will automatically take effect!
| 11. | Commit the transaction and confirm the results (Figure 11.24).
COMMIT; SELECT * FROM accounts;
Figure 11.24. Invoking the COMMIT command makes the transaction's effects permanent. 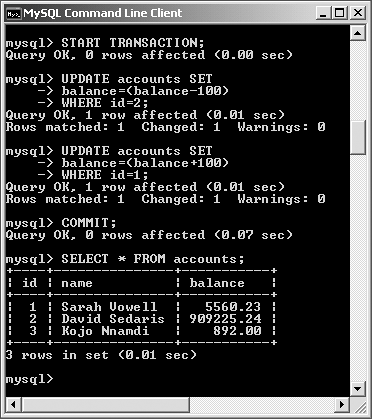
Once you enter COMMIT, the entire transaction is permanent, meaning that any changes are now in place. COMMIT also ends the transaction, returning MySQL to autocommit mode.
|
 Tips Tips
One of the great features of transactions is that they offer protection should a random event occur, such as a server crash. Either a transaction is executed in its entirety or all of the changes are ignored. To alter MySQL's autocommit nature, type SET AUTOCOMMIT=0;
Then you do not need to type START TRANSACTION and no queries will be permanent until you type COMMIT (or use an ALTER, CREATE, etc., query). As of MySQL 4.0.14 and 4.1.1, you can create savepoints in transactions: SAVEPOINT savepoint_name;
Then you can roll back to that point: ROLLBACK TO SAVEPOINT savepoint_name;
Using prepared statements Prepared statements were added to MySQL in version 4.1. The premise behind a prepared statement is that part of a query is essentially memorized by MySQL with specific elements being defined on the fly. The benefit of prepared statements are important: greater security and better performance. Prepared statements can be created out of any INSERT, UPDATE, DELETE, or SELECT query. In order to use them with PHP, you must use PHP's Improved MySQL Extension, available as of PHP 5. Begin by defining your query, marking placeholders using question marks. For the initial example, I'll assume I'm populating the accounts table, created in the previous section of this chapter. $query = "INSERT INTO accounts (name, balance) VALUES (?, ?)";
As you'll soon see, before the query is actually executed, the question marks will be assigned the appropriate values. Next, prepare the statement in MySQL, assigning the results to a PHP variable. $stmt = mysqli_prepare($dbc, $query);
At this point, MySQL will parse the query, checking for valid syntax. The speed improvement with prepared statements stems from the fact that a query needs to be parsed only once, no matter how many times it is run (presumably with different values). For this reason, the speed benefit of using prepared statements applies only when the same query is being run multiple times with different values. Next, you bind PHP variables to the query's placeholders. In other words, you state that one variable should be used for one question mark, another variable for the other question mark, and so on. Continuing with the same example, you would code mysqli_stmt_bind_param($stmt, "sd", $name, $balance);
The sd part of the command indicates what kind of values should be expected, using the characters listed in Table 11.3. In this case, the query expects to receive one string (or generic type) and one decimal. Table 11.3. Use these characters to tell the mysql_stmt_bind_param() function what kinds of values to expect.Bound Value Types |
|---|
LETTER | REPRESENTS |
|---|
d | decimal | i | integer | b | blob | s | all other types |
At this point, you can assign values to the PHP variables and then execute the statement. $name = 'Haruki Murakami'; $balance = 45902.29; mysqli_stmt_execute($stmt);
The values of $name and $balance will be used when the prepared statement is executed. To execute the statement again using different values, just repeat this last sequence. $name = 'Joe Queenan'; $balance = 65487.88; mysqli_stmt_execute($stmt);
To see this process in action, I'll write a script that quickly inserts several records into the accounts table. I'll also use the opportunity to demonstrate a couple of the other prepared statement-related functions. To use prepared statements 1. | Create a new PHP script in your text editor or IDE (Script 11.7).
<!DOCTYPE html PUBLIC "-//W3C//DTD XHTML 1.0 Transitional//EN "http://www.w3.org/TR/xhtml1/DTD/ xhtml1-transitional.dtd> <html xmlns="http://www.w3.org/1999/ xhtml xml:lang="en" lang="en"> <head> <meta http-equiv="content-type" content="text/html; charset= iso-8859-1 /> <title>Prepared Statements</title> </head> <body> <?php # Script 11.7 - prepared.php
Script 11.7. In this script, prepared statements are executed using the Improved MySQL Extension functions. 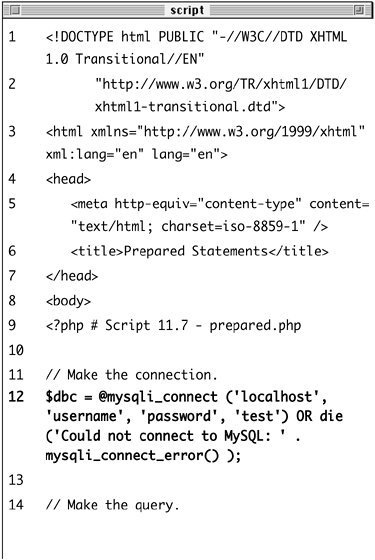
| 2. | Connect to the test database.
$dbc = @mysqli_connect ('localhost', 'username, 'password', 'test') OR die ('Could not connect to MySQL: ' . mysqli_connect_error() );
The test database, which contains the accounts table, will be used in this example.
Introducing Subqueries Another new feature to MySQL is subqueries, which were added in version 4.1. Simply put, a subquery is a SELECT query within another query. The simplest subquery returns a single value, which can then be used in the main query. SELECT * FROM table1 WHERE columnX=(SELECT MAX(columnY) FROM table2)
Here the subquery returns the highest value from columnY of table2. This value is then used to determine what data is selected from table1. More complicated subqueries can return a row or an entire table of data, which is then used by the main query. Subqueries also have their own operators: IN, ANY, ALL, EXISTS, and NOT EXISTS. While subqueries are a nice feature, the same result can often be achieved using a well-written join. For more information on subqueries, see the MySQL manual. |
| 3. | Define and prepare the query.
$query = "INSERT INTO accounts (name, balance) VALUES (?, ?)"; $stmt = mysqli_prepare($dbc, $query);
This syntax has already been explained. The query is defined, using two placeholders for values to be assigned later. Then the mysqli_prepare() function sends this to MySQL, assigning the result to $stmt.
| 4. | Bind the appropriate variables and create a list of values to be inserted.
mysqli_stmt_bind_param($stmt, "sd", $name, $balance); $data = array( array('Italo Calvino', 65465.99), array('Vladimir Nabokov', 132.74), array('James Joyce', 432.74), array('William Faulkner', 841664.67), array('F. Scott Fitzgerald', 69.23), array('Zora Neale Hurston', 130654.44), array('Franz Kafka', 87.63), array('William Carlos Williams', 9.98), array('Jane Austen', 1324.02), array('George Eliot', 49683.56) );
The first line says that one string and one decimal value will be added to the prepared statement. The values will be found in the $name and $balance variables.
The $data array is a multidimensional list of all the values to be inserted. Using this structure, I can easily loop through each item and insert it into the database.
| 5. | Print a caption and begin a foreach loop that executes the statements.
echo "<p>The query being prepared is: $query</p>\n; foreach ($data as $record) { $name = $record[0]; $balance = $record[1]; mysqli_stmt_execute($stmt);
The foreach loop will break each element of $data into its own array, called $record. Then the appropriate variables$name and $balanceare given their values, based upon $record. Finally, the prepared statement is executed using these values.
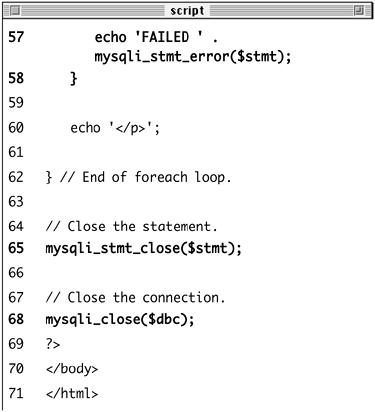
| 6. | Print the results of the execution and complete the loop.
echo "<p>Name: $name<br />Balance: $balance<br />Result: "; if (mysqli_stmt_affected_rows ($stmt) == 1) { echo 'OK'; } else { echo 'FAILED ' . mysqli_stmt_error($stmt); } echo '</p>'; }
The echo statement just prints out what values are being inserted. The successful insertion of a record is indicated using the mysqli_stmt_affected_rows() function, which works as you expect it would (returning the number of affected rows). If a problem occurred, the mysqli_stmt_error() function returns the specific MySQL error message.
| 7. | Close the statement and the database connection.
mysqli_stmt_close($stmt); mysqli_close($dbc);
The first function closes the prepared statement, freeing up the resources. At this point, $stmt no longer has a value. The second function closes the database connection.
| 8. | Complete the page.
?> </body> </html>
| 9. | Save the file as prepared.php, upload to your Web server, and test in your Web browser (Figure 11.25).
Figure 11.25. Prepared statements are used to quickly insert several records. 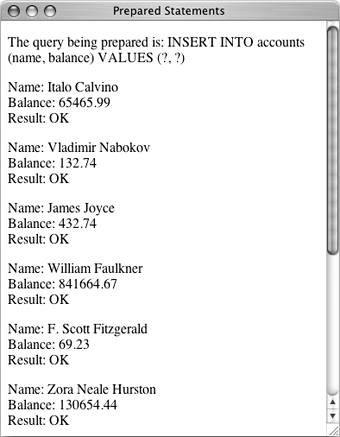
|
Tips There are two kinds of prepared statements. Here I have demonstrated bound parameters, where PHP variables are bound to a query. The other type is bound results, where the results of a query are bound to PHP variables. Because of how MySQL deals with prepared statements, you don't actually need to sanctify your values using mysqli_real_escape_string() or similar functions. You should still perform basic validation in PHP, of course.
|