| Once you've been able to successfully connect to the database, you can start interacting with it. For beginners, the easiest first thing to do is to execute a simple queryone that alters a database without returning any results. Queries that begin with INSERT, ALTER, CREATE, DELETE, or UPDATE fall into this category. Running a simple query is a two-step process. First you create a statement variable that will be used to run the query, and then you execute a query using the statement variable. Commonly your code might look like this: Statement stmt; stmt = con.createStatement(); stmt.executeUpdate("DELETE FROM tablename WHERE column='value'"); stmt.close();
The createStatement() method creates an open channel through which queries can be run. The executeUpdate() method actually runs the query on the database, and then the close() method will free up the resources assigned to the open connection. Note that executeUpdate() is not used for just UPDATE queries. It's used for any query that doesn't return results (other than a numeric value indicating rows affected or the like). This function also returns the number of affected rows, which can be used to verify the results. As a basic example of this, I'll write an application that takes command-line arguments for populating the clients table in the accounting database. To execute a simple query: | | 1. | Create a new Java application in your text editor or Java development tool (Script 9.2).
import java.sql.*; public class Insert { public static void main(String args[]) throws Exception {
The beginning part of this script differs from Script 9.1 only in the name of the class, changing Connect to Insert.
Script 9.2. The Insert Java class takes five command-line arguments and adds them as the client's name and address in the clients table.| [View full width] 1 import java.sql.*; 2 3 // Script 9.2 'Insert.java' 4 5 public class Insert { 6 7 public static void main(String args[]) throws Exception { 8 9 // Initialize variables. 10 Connection con = null; 11 Statement stmt = null; 12 int affected = 0; 13 14 try { 15 16 // Connect to MySQL. 17 String url = "jdbc:mysql:///accounting"; 18 Class.forName("com.mysql.jdbc.Driver").newInstance(); 19 con = DriverManager.getConnection(url, "username", "password"); 20 21 // Run the query. 22 stmt = con.createStatement(); 23 affected = stmt.executeUpdate("INSERT INTO clients (client_name,  client_street, client_city, client_state, client_zip) VALUES ('" + args[0] + "', '" + args[1] + "', '" + args[2] + "', '" + args[3] + "', '" + args[4] + "')"); 24 25 // Print a message. 26 if (affected == 1) { 27 System.out.println("The client was added to the database!"); 28 } else { 29 System.out.println("The client could not be added to the database!"); 30 } 31 } 32 33 // Catch exceptions. 34 catch (SQLException e) { 35 System.out.println("Problem: " + e.toString()); 36 } 37 38 // Clean up. 39 finally { 40 if (stmt != null) { 41 try { 42 stmt.close(); 43 } catch (Exception e) { 44 System.out.println(e.toString()); 45 } 46 stmt = null; 47 } 48 if (con != null) { 49 try { 50 con.close(); 51 } catch (Exception e) { 52 System.out.println(e.toString()); 53 } 54 con = null; 55 } 56 } 57 58 } // End of main(). 59 60 } // End of class Insert. client_street, client_city, client_state, client_zip) VALUES ('" + args[0] + "', '" + args[1] + "', '" + args[2] + "', '" + args[3] + "', '" + args[4] + "')"); 24 25 // Print a message. 26 if (affected == 1) { 27 System.out.println("The client was added to the database!"); 28 } else { 29 System.out.println("The client could not be added to the database!"); 30 } 31 } 32 33 // Catch exceptions. 34 catch (SQLException e) { 35 System.out.println("Problem: " + e.toString()); 36 } 37 38 // Clean up. 39 finally { 40 if (stmt != null) { 41 try { 42 stmt.close(); 43 } catch (Exception e) { 44 System.out.println(e.toString()); 45 } 46 stmt = null; 47 } 48 if (con != null) { 49 try { 50 con.close(); 51 } catch (Exception e) { 52 System.out.println(e.toString()); 53 } 54 con = null; 55 } 56 } 57 58 } // End of main(). 59 60 } // End of class Insert.
|
| | | 2. | Initialize the variables.
Connection con = null; Statement stmt = null; int affected = 0;
Along with a connection variable, simple queries will require a variable of type Statement. I'm also declaring an integer, which will be used to reflect the number of affected rows.
| | | 3. | Establish a connection to the accounting database.
try { String url = "jdbc:mysql:///accounting"; Class.forName("com.mysql.jdbc.Driver").newInstance(); con = DriverManager.getConnection(url, "username", "password");
There are three very significant changes you'll need to make in this script compared with the previous one: the database name (from test to accounting), the username, and the password. Be certain to use a user/hostname/password combination that has permission to connect to and modify the accounting database.
Remember that if you need to use the hostname (because localhost won't work), that value gets placed between mysql:// and the database name.
| | | 4. | Execute an INSERT query.
[View full width] stmt = con.createStatement(); affected = stmt.executeUpdate("INSERT INTO clients (client_name, client_street, client_city, client_state, client_zip) VALUES ('" + args[0] + "', '" + args[1] + "', '" + args[2] + "', '" + args[3] + "', '" + args[4] + "')");
The first step is to establish the stmt variable based upon the createStatement() method of the con connection variable. Then the query is fed as an argument to the executeUpdate() method. In this example, I'll be adding a client's name along with their address. These values will be retrieved as command-line arguments typed when the application is run (Figure 9.5). To access their values, I refer to args[0] through args[4], which is established in the initial class line. The resulting query will be something like
Figure 9.5. I can use Java to add records to a database by typing new values on the command line as I run the application. 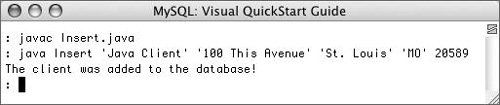
[View full width] INSERT INTO clients (client_name, client_street, client_city, client_state, client_zip) VALUES ('Name', 'Street', 'City', 'State', 12345)
Note that I haven't done any data validation or checking here, which you'll likely want to do using standard Java methods. You could also create a more interactive application, one that actually prompts the user for specific pieces of data.
| 5. | Report on the success.
if (affected == 1) { System.out.println("The client was added to the database!"); } else { System.out.println("The client could not be added to the database!"); }
Since executeUpdate() returns the number of affected rows, I can use that value to confirm whether or not the query worked. If the query didn't work, you might want to also print out the query for debugging purposes.
| 6. | Complete the try clause and catch any errors that might have occurred.
} catch (SQLException e) { System.out.println("Problem: " + e.toString()); }
The catch block of code will report on any errors caught by MySQL when executing the query (Figure 9.6). It's similar in usage and result to the catch used in the Connect class, although it's catching an exception of type SQLException.
Figure 9.6. Any MySQL errors will be printed for debugging purposes. 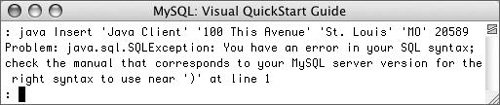
| | | 7. | Wrap up the class.
finally { if (stmt != null) { try { stmt.close(); } catch (Exception e) {System.out.println(e.toString()); } stmt = null; } if (con != null) { try { con.close(); } catch (Exception e) { System.out.println(e.toString()); } con = null; } } }// End of main(). }// End of class Insert.
One addition to this script is that I now formally close the stmt variable as well as con. Closing these frees up the resources required while the application is running.
| 8. | Save the file as Insert.java.
| 9. | Compile Insert.java.
| | | 10. | Run Insert (Figure 9.7).
Figure 9.7. Another client is added to the database. 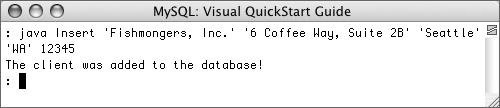
To run the application, follow the steps as explained in the previous section of this chapter, but be sure to add the five requisite arguments (for the client's name, street address, city, state, and zip code):
java Insert client street city state zip
To insert any strings with spaces in them, quote the entire string (as in Figures 9.6 and 9.7).
|
 Tips Tips
Besides lacking data validation, this script will also fail if the user enters data containing apostrophes (Figure 9.8). One solution for this would be to use prepared statements, discussed at the end of the chapter. Figure 9.8. Apostrophes in submitted data will break the query.  If you want to run multiple non-SELECT queries, you can reuse the stmt object without recalling createStatement(): [View full width] stmt = con.createStatement(); stmt.executeUpdate("INSERT INTO expense_categories (expense_;category) VALUES ('Office Furniture')"); stmt.executeUpdate("INSERT INTO expense_categories (expense_category) VALUES ('Parking')");
|